Mazda CX-5 Service & Repair Manual: Camshaft Position (CMP) Sensor Inspection
Intake CMP Sensor
Visual inspection
CAUTION:
-
When replacing the CMP sensor, make sure there is no foreign material on it such as metal shavings. If it is installed with foreign material, the sensor output signal will malfunction resulting from fluctuation in magnetic flux and cause a deterioration in engine control.
1. Remove the intake CMP sensor..
2. Verify that there are no metal shavings on the intake CMP sensor.
-
If there is a malfunction, remove any metal shavings that are adhering.
Voltage inspection
CAUTION:
-
When replacing the CMP sensor, make sure there is no foreign material on it such as metal shavings. If it is installed with foreign material, the sensor output signal will malfunction resulting from fluctuation in magnetic flux and cause a deterioration in engine control.
-
If the wiring harnesses or waterproof connectors are damaged, water penetrating the connector will cause a sensor malfunction. To prevent this, be careful not to damage wiring harnesses or waterproof connectors.
1. Idle the engine.
2. Measure the intake CMP sensor output voltage using the oscilloscope.
-
If not as specified, replace the intake CMP sensor..

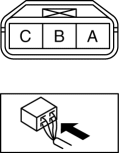
|
Terminal |
Voltage (V) |
Condition |
|
A |
Above 4.8 |
High output* |
|
Below 0.8 |
Low output* |
|
|
B |
Below 1.0 |
Under any condition |
|
C |
B+ |
Under any condition |
* Output voltage varies with camshaft rotation.
Exhaust CMP Sensor
Visual inspection
CAUTION:
-
When replacing the CMP sensor, make sure there is no foreign material on it such as metal shavings. If it is installed with foreign material, the sensor output signal will malfunction resulting from fluctuation in magnetic flux and cause a deterioration in engine control.
1. Remove the exhaust CMP sensor..
2. Verify that there are no metal shavings on the exhaust CMP sensor.
-
If there is a malfunction, remove any metal shavings that are adhering.
Voltage inspection
CAUTION:
-
When replacing the CMP sensor, make sure there is no foreign material on it such as metal shavings. If it is installed with foreign material, the sensor output signal will malfunction resulting from fluctuation in magnetic flux and cause a deterioration in engine control.
-
If the wiring harnesses or waterproof connectors are damaged, water penetrating the connector will cause a sensor malfunction. To prevent this, be careful not to damage wiring harnesses or waterproof connectors.
1. Idle the engine.
2. Measure the exhaust CMP sensor output voltage using the oscilloscope.
-
If not as specified, replace the exhaust CMP sensor..
|
Terminal |
Voltage (V) |
Condition |
|
A |
Above 4.8 |
High output* |
|
Below 0.8 |
Low output* |
|
|
B |
Below 1.0 |
Under any condition |
|
C |
B+ |
Under any condition |
* Output voltage varies with camshaft rotation.
 Air Fuel Ratio (A/F) Sensor
Purpose/Function
Detects the oxygen concentration (all-range air/fuel ratio) in the exhaust
gas as basic information for mainly determining the fuel injection amount.
Detects the oxy ...
 Camshaft Position (CMP) Sensor Removal/Installation
CAUTION:
When replacing the CMP sensor, make sure there is no foreign material on
it such as metal shavings. If it is installed with foreign material, the sensor
output signal will malfu ...
Other materials:
Windshield Wiper System
Outline
Equipped with continuous (low/high), auto-stop, one-touch wiper, intermittent
wiper (without auto wiper system), auto wiper (with auto wiper system), and
synchronized washer and wiper operation.
The front body control module (FBCM) performs windshield wiper and washer
...
Washer Motor Inspection
1. Disconnect the negative battery cable..
2. Set the front over fender aside..
3. Set the mudguard (RH) aside..
4. Remove the front bumper..
5. Disconnect the washer motor connector from the washer motor.
6. Disconnect the windshield washer hose from the washer motor.
7. Disconnect the ...
Registering Your Vehicle in A Foreign Country (Except United States and Canada)
Registering your vehicle in a foreign country may be problematic depending on
whether it meets the specific emission and safety standards of the country in which
the vehicle will be driven. Consequently, your vehicle may require modifications
at personal expense in order to meet the regulation ...
