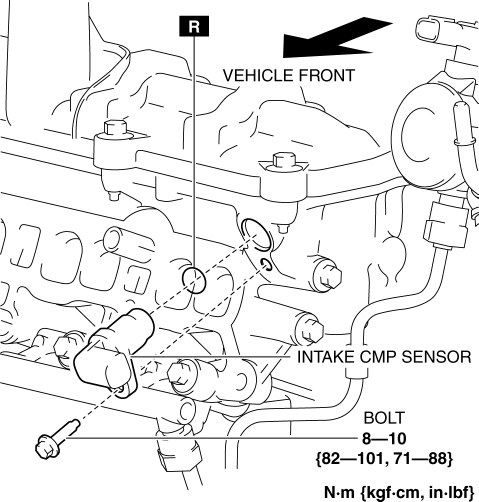
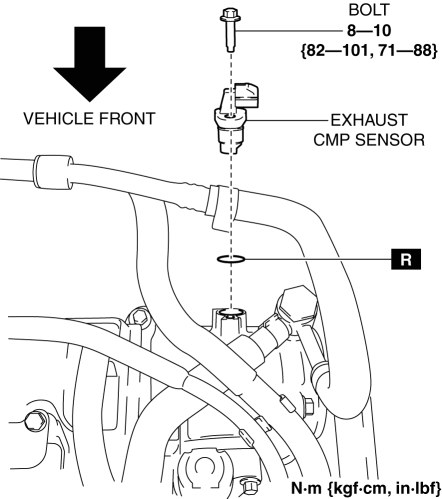
Mazda CX-5 Service & Repair Manual: Camshaft Position (CMP) Sensor Removal/Installation
CAUTION:
-
When replacing the CMP sensor, make sure there is no foreign material on it such as metal shavings. If it is installed with foreign material, the sensor output signal will malfunction resulting from fluctuation in magnetic flux and cause a deterioration in engine control.
Intake CMP Sensor
1. Disconnect the negative battery cable..
2. Remove the plug hole plate..
3. Remove the intake manifold..
4. Disconnect the intake CMP sensor connector.
5. Remove the intake CMP sensor.

6. Install in the reverse order of removal.
Exhaust CMP Sensor
1. Disconnect the negative battery cable..
2. Remove the plug hole plate..
3. Disconnect the exhaust CMP sensor connector.
4. Remove the exhaust CMP sensor.

5. Install in the reverse order of removal.
 Camshaft Position (CMP) Sensor Inspection
Intake CMP Sensor
Visual inspection
CAUTION:
When replacing the CMP sensor, make sure there is no foreign material on
it such as metal shavings. If it is installed with foreign material, ...
 Camshaft Position (CMP) Sensor
Purpose/Function
Detects the camshaft speed as basic information for mainly determining the
fuel injection timing and ignition timing.
Detects the camshaft speed and inputs it to the ...
Other materials:
Front Lower Arm Inspection
1. Remove the front lower arm..
2. Inspect the front lower arm for bending or damage, and the front lower arm
ball joint for excessive looseness.
If there is any malfunction, replace the front lower arm.
3. Rotate the front lower arm ball joint stud 5 times. Install the
SST ...
Antenna Feeder No.1 Removal/Installation
With audio system
1. Disconnect the negative battery cable..
2. Remove the following parts:
a. Side speaker grille (RH).
b. Tweeter (RH).
c. A-pillar trim.
d. Passenger-side front scuff plate.
e. Passenger-side front side trim.
f. Glove compartment.
g. Decoration panel.
h. Dashboa ...
Windshield Wipers and Washer
The ignition must be switched ON.
WARNING
Use only windshield washer fluid or plain water in the reservoir:
Using radiator antifreeze as washer fluid is dangerous. If sprayed on the windshield,
it will dirty the windshield, affect your visibility, and could result in an accident.
Only use wind ...
