Mazda CX-5 Service & Repair Manual: Buckle Switch Inspection
Driver-side
1. Switch the ignition to off.
2. Disconnect the negative battery cable and wait for 1 min or more
..
3. Remove the front seat..
4. Remove the front buckle..
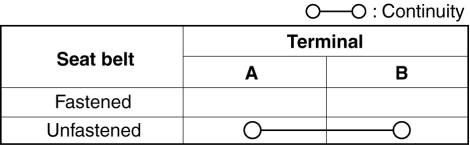
5. Inspect for continuity between the buckle switch terminals using a tester.

-
If not as indicated in the table, replace the front buckle.
Passenger-side (with buckle switch)
1. Since the buckle switch cannot be inspected separately, perform air bag DTC inspection.
(See DTC B0052:09/B0052:11/B0052:14 [TWO-STEP DEPLOYMENT CONTROL SYSTEM].)
 Air Bag Module And Pre Tensioner Seat Belt Disposal Procedures [Two Step Deployment
Control System]
Air Bag Module And Pre Tensioner Seat Belt Disposal Procedures [Two Step Deployment
Control System]
WARNING:
A live (undeployed) air bag module, pre-tensioner seat belt or lap pre-tensioner
seat belt may accidentally operate (deploy) when it is disposed of and cause
serious injury. Alw ...
 Front Buckle Removal/Installation
Driver-side
1. Disconnect the negative battery cable and wait for 1 min or more..
2. Remove the front seat..
3. Disconnect the front buckle connector.
4. Remove the bolt.
5. Remove t ...
Other materials:
Discharge Headlight Bulb
Purpose, Function
Charges the internal metallic element and emits white light resembling sunlight.
Construction
A mercury-free bulb has been adopted for the discharge headlight bulb.
The discharge headlight bulb is assembled to the front combination light.
The dis ...
Electric Variable Valve Timing Motor/Driver Removal/Installation
WARNING:
A hot engine can cause severe burns. Turn off the engine and wait until it
is cool before servicing.
CAUTION:
Applying excessive force (force of 100 N {10.2 kgf, 22.5 lbf} or more) to
the electric variable valve timing motor/driver may cause a malfunction. When
...
Brake/Taillight Bulb Removal/Installation
1. Disconnect the negative battery cable..
2. Insert a tape-wrapped flathead screwdriver into the service hole in the position
shown in the figure.
3. Move the flathead screwdriver in the direction of the arrow (1) shown in the
figure, pull out the service hole cover, and detach the serv ...
