Mazda CX-5 Service & Repair Manual: A/C Cut Off Control [Skyactiv G 2.0]
Outline
-
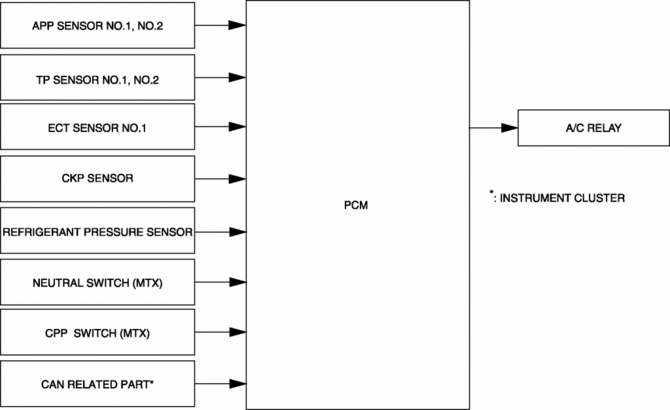
Controls the A/C operation by switching the A/C relay ON/OFF at the optimal timing according to engine operation conditions. Acceleration performance and A/C compressor reliability have been improved by controlling the A/C operation.
Block Diagram
Operation
-
The PCM stops current to the A/C relay when any of the following conditions are met:
|
Operation condition |
While A/C relay not energized |
Purpose |
|
At engine start |
Approx. 4 s |
Improved startability |
|
When engine speed is 6,700 rpm or more |
Approx. 5 s elapsed since engine speed was 6,200 rpm or less |
A/C compressor reliability assurance |
|
Accelerated |
3 to 5 s |
Acceleration from standstill/acceleration performance improvement |
|
Refrigerant pressure 3.14 MPa {32.0 kgf/cm2, 455 psi} or more |
Refrigerant pressure decreases to 2.55 MPa {26.0 kgf/cm2, 370 psi} or less |
A/C compressor reliability assurance |
|
Refrigerant pressure of 0.196 MPa {2.00 kgf/cm2, 28.4 psi} or less continues for 5 s or more |
Refrigerant pressure of 0.226 MPa {2.30 kgf/cm2, 32.8 psi} or more continues to 5 s or more |
A/C compressor reliability assurance |
|
Drive-by-wire control malfunction |
— |
Reverse driving performance assurance |
|
Panic braking determined |
— |
Load performance assurance |
|
Misfire determination |
— |
Catalytic converter protection |
|
ECT sensor malfunction |
— |
Engine protection |
|
Engine coolant temperature 113 °C {235 °F} or more |
Turns on/off repeatedly every 10 s until engine coolant temperature is less than approx. 107 °C {225 °F} |
Engine protection |
|
Engine coolant temperature 117 °C {243 °F} or more |
Until engine coolant temperature is less than 110 °C {230 °F} |
Engine protection |
 A/C Compressor Removal/Installation
1. Disconnect the negative battery cable..
2. Discharge the refrigerant..
3. Remove the front under cover No.2..
4. Remove the drive belt..
5. Disconnect the connector.
6. Remove bolts A ...
 A/C Unit
Outline
The A/C unit which integrates the cooling and heater units has been adopted.
Construction
The A/C unit consists of the following parts.
Operation
Air Mix Door Op ...
Other materials:
Generator Inspection [Skyactiv G 2.0]
CAUTION:
Do not apply direct battery positive voltage to generator terminal D, otherwise
it could cause damage to the internal parts (power transistor) of the generator.
Charging system warning Light
1. Verify that the battery is fully charged.
2. Verify that the assembly conditi ...
Magnet Clutch [Full Auto Air Conditioner]
Purpose
The magnetic clutch transmits the rotation force from the engine to the shaft
in the A/C compressor.
Function
The magnetic clutch engages or disengages the magnetic clutch and the A/C
turns on or off by switching the power transmission from the engine.
C ...
Fuel Pump Unit
Purpose, Function
Supplies fuel in the fuel tank to the high pressure fuel pump.
Based on the control signal from the PCM, the fuel pump operates by the operation
of the fuel pump relay and the fuel pump control module.
Construction
2WD
The fuel pump unit is installed ...
