Mazda CX-5 Service & Repair Manual: Turn And Hazard Indicator Alarm
Purpose
-
The turn and hazard indicator alarm notifies the driver that a turn light or the hazard warning lights are flashing.
Function
-
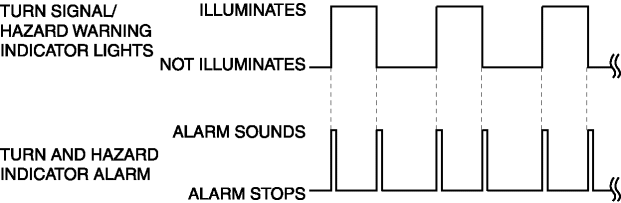
When the instrument cluster receives the turn signal/hazard warning indicator light illumination request signal sent from the front body control module (FBCM) via the CAN signal, the turn and hazard indicator alarm sounds simultaneously with illumination on/off of the direction/hazard warning indicator lights.
-
The turn and hazard indicator alarm sound pattern is as follows:
|
Sound frequency (Hz) |
Alarm when turn signal/hazard warning indicator lights illumination off > on: 1,400 Alarm when turn signal/hazard warning indicator lights illumination on > off: 1,300 |
|
Sound frequency |
Continuously |
|
Wave pattern |
|
Construction
-
The turn and hazard indicator alarm sounds using the buzzer built into the instrument cluster.
Construction, Operation
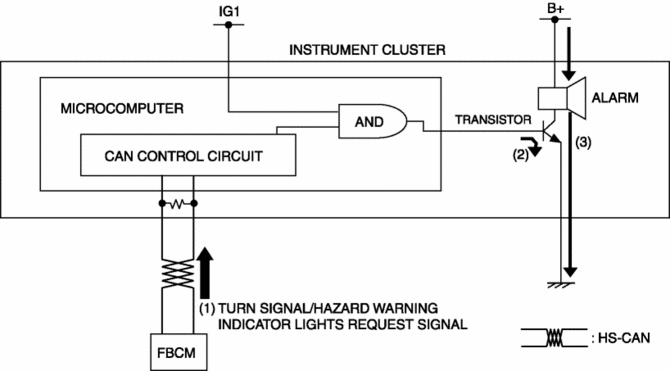
1. The instrument cluster receives (1) the turn signal/hazard warning indicator light request signal from the front body control module (FBCM).
2. The instrument cluster microcomputer turns the transistor on (2) based on the turn signal/hazard warning indicator light request signal.
3. When the transistor turns on, a ground circuit with the alarm is established and the alarm sounds (3).
Fail-safe
-
Function not equipped.
 Tire Pressure Monitoring System Warning Light
Purpose, Function
The tire pressure monitoring system warning light notifies the driver that
it was determined that a tire pressure has decreased below the specified value
based on the in ...
 Turn Signal/Hazard Warning Indicator Lights
Purpose
Notifies the driver that a turn light, the hazard warning lights are flashing.
Function
Flashes according to the turn switch and hazard warning switch operations.
Con ...
Other materials:
Roof Molding Removal
1. Insert a tape-wrapped flathead screwdriver in the position shown in the figure.
2. Rotate a tape-wrapped flathead screwdriver in the direction of the arrow in
the order of (1), (2) shown in the figure and remove the roof molding from the front
T-stud.
3. Rotate the roof molding in th ...
Cruise Set Indicator Light (Green)
Purpose/Function
Illuminates during the cruise control system operation to inform the driver
that the cruise control system is operating.
Construction
Built into the instrument cluster.
Operation
Illuminates during the cruise control system operation.
...
Trip Computer Information System
Outline
The trip computer system displays the instantaneous fuel economy, average
fuel economy, remaining distance to empty, and the average vehicle speed.
The instrument cluster performs trip computer system fail-safe..
Function
The instrument cluster controls the tri ...
