Mazda CX-5 Service & Repair Manual: Rear Fender Lower Panel Removal [Panel Replacement]
Symbol Mark

Removal Procedure
1. Drill the 20 locations shown in the figure.
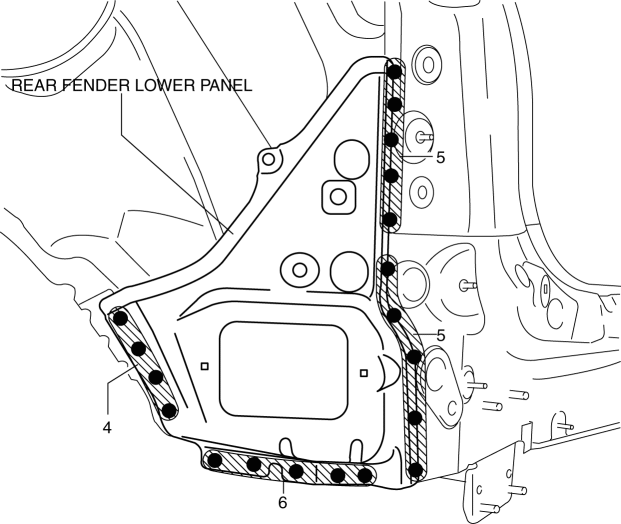
2. Remove the rear fender lower panel.
 Rear Fender Lower Panel Installation [Panel Replacement]
Symbol Mark
Installation Procedure
1. When installing new parts, measure and adjust the body as necessary to conform
with standard dimensions.
2. After temporarily installing new parts, make ...
 Rear Fender Panel Installation [Panel Replacement]
Symbol Mark
Installation Procedure
1. When installing new parts, measure and adjust the body as necessary to conform
with standard dimensions.
2. Drill holes for the plug welding before inst ...
Other materials:
Rear Beltline Molding Removal/Installation
CAUTION:
Affix protective tape to the position shown in the figure.
1. Fully open the rear door glass.
2. Insert a tape-wrapped flathead screwdriver and then detach the clip A in the
direction of arrow (1) shown in the figure.
3. Pull up the rear belt line molding in the di ...
Engine SST
1: Mazda SST number
2: Global SST number
Example
1:49 UN20 5072
2:205–072
Holder
1:–
2:AKS042808
Adapter
1: 49 UN20 5072
2: 205–072
Holder
1: 49 B011 105
2: –
...
Anticorrosion, Sound Insulation, And Vibration Insulation
Body Sealing
Apply body sealer where necessary.
For locations where application of body sealer is difficult after installation,
apply it before installation.
Application of Undercoating
Apply an undercoat to the required location of the body.
Application ...
