Mazda CX-5 Service & Repair Manual: Rear Door Glass Removal/Installation
1. Fully lower the rear door glass.
2. Disconnect the negative battery cable..
3. Remove the following parts:
a. Rear door trim.
b. Rear door quarter glass.
c. Rear door speaker.
d. Rear power window motor.
4. Press the center of the service hole cover in the direction of arrow (1) shown in the figure.

5. Remove the service hole cover by holding its rib and partially peeling it back in the direction of arrow (2) shown in the figure.
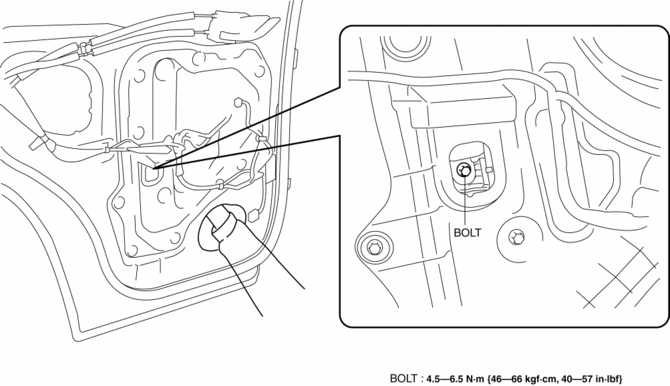
6. Remove the bolt.
CAUTION:
-
If the bolts are removed without supporting the rear door glass, the rear door glass may fall off and be damaged. Remove the bolts while inserting your hand into the rear door speaker installation hole to support the rear door glass.

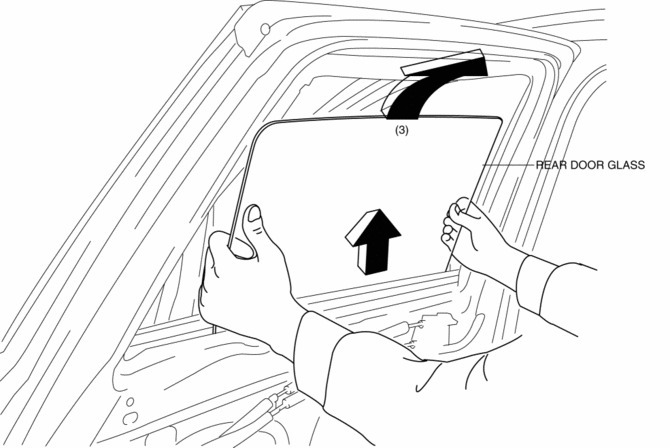
7. Lift the rear door glass up and remove while tilting it.
8. Lift up the rear door glass, tilt it in the direction of arrow (3) shown in the figure.

9. Install in the reverse order of removal.
 Quarter Window Glass Removal
1. Disconnect the negative battery cable..
2. Remove the following parts:
a. Trunk board.
b. Trunk end trim.
c. Rear scuff plate.
d. Trunk side trim.
e. D-pillar trim.
f. C-pillar trim. ...
 Rear Door Quarter Glass Removal/Installation
1. Fully lower the rear door glass.
2. Disconnect the negative battery cable..
3. Remove the rear door trim..
4. Remove the rear door weather strip arrow (1) shown in the figure.
5. Remove ...
Other materials:
Low Engine Coolant Temperature Indicator Light (Blue)/High Engine Coolant Temperature
Warning Light (Red)
Purpose
Low engine coolant temperature indicator light (blue)
The low engine coolant temperature indicator light (blue) notifies the driver
that the engine coolant temperature is low and vaporization of the fuel is difficult.
High engine coolant temperature warning light (red)
...
Starter Relay [Skyactiv G 2.0]
Purpose, Function
The starter relay supplies power to the starter by receiving the signal from
the PCM.
Construction
The starter relay is installed to the relay and fuse block.
Operation
The contact point is on when the voltage is supplied to the coil based on
...
Fuel Injector Relay [Skyactiv G 2.0]
Purpose, Function
Supplies power to the PCM for the fuel injector and spill valve control solenoid
valve operation.
Construction
The fuel injector relay is installed in the relay and fuse block.
Operation
When the ignition is switched ON, the battery voltage ...
