Mazda CX-5 Service & Repair Manual: Caliper (Rear) Disassembly/Assembly
1. Disassemble in the order indicated in the table.
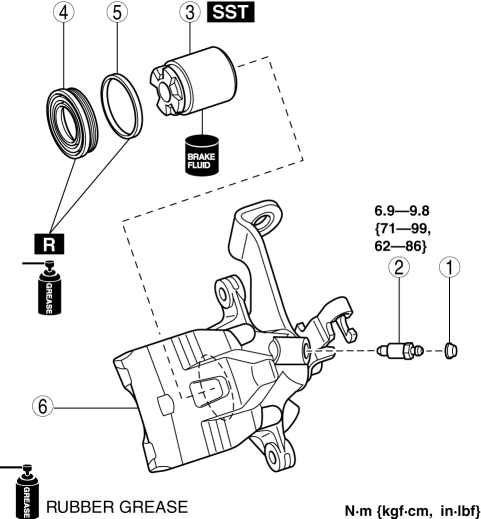
|
1 |
Bleeder cap |
|
2 |
Bleeder screw |
|
3 |
Piston (See Piston Disassembly Note.) (See Dust Seal, Piston Assembly Note.) |
|
4 |
Dust seal (See Dust Seal, Piston Assembly Note.) |
|
5 |
Piston seal |
|
6 |
Caliper body |
2. Assemble in the reverse order of removal.
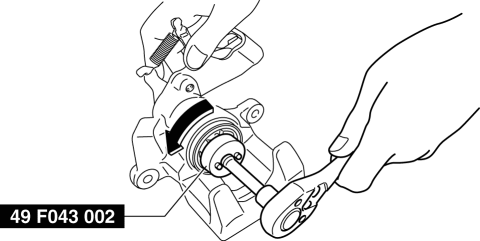
Piston Disassembly Note
1. Rotate the piston counter-clockwise using the SST
, remove the piston from the caliper body.
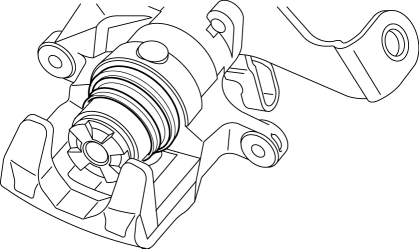
Dust Seal, Piston Assembly Note
1. Assemble the dust seal to the piston.
2. Assemble the lip of the dust seal to the groove of the caliper body with the dust seal is assembled to the piston as shown in the figure.
3. Rotate the piston clockwise using the SST
slowly and push the piston inwards completely.
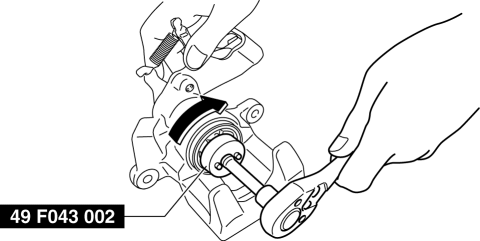
4. Verify that the dust seal is installed into the groove of the piston securely.
 Caliper (Front) Disassembly/Assembly
1. Disassemble in the order indicated in the table.
1
Bleeder cap
2
Bleeder screw
3
Piston
(See Piston Disassem ...
 Front Brake (Disc)
Purpose/Function
Large diameter, ventilated disc type front brakes with a 297 mm {11.7 in}
diameter and 28 mm {1.1 in} thickness have been adopted, improving braking force
and fade resist ...
Other materials:
Restraints SST
49 H066 002
Deployment tool
49 B066 004
Adapter harness
49 L066 002
Adapter harness
49 G066 003
Adapter harness
49 N088 0A0
Fuel and Thermometer checker
...
Instrument Cluster Configuration (Using Read/Write Function)
NOTE:
When performing configuration, it is necessary to read the vehicle specification
information from the instrument cluster before replacing it. Connect the M-MDS
to the vehicle and perform vehicle identification before removing the instrument
cluster. The vehicle specification i ...
Mirrors
Mirrors
Before driving, adjust the inside and outside mirrors.
Outside Mirrors
WARNING
Be sure to look over your shoulder before changing lanes: Changing lanes without
taking into account the actual distance of the vehicle in the convex mirror is dangerous.
You could have a serious accident. ...
