Mazda CX-5 Service & Repair Manual: Oil Seal (Side Gear) Replacement
1. Remove the drain plug and the drain differential oil into a container.
2. Install a new washer and the drain plug, and tighten.
3. Remove the rear drive shaft..
4. Remove the clip from the drive shaft.
CAUTION:
-
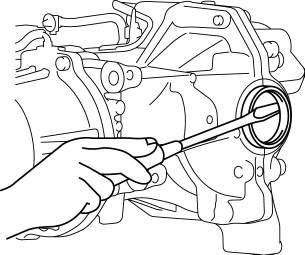
Wrap the end of a screwdriver with cloth to prevent scratches to the inside of the differential casing.
5. Remove the oil seal from the differential casing using a screwdriver.
6. Apply differential oil to the new oil seal lip.
NOTE:
-
Install the oil seal at a straight angle.
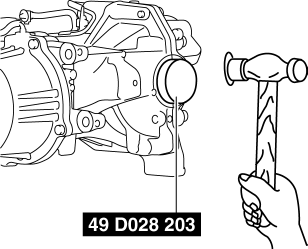
7. Install the new oil seal to the differential carrier using the SST
.
8. After installing the new clip onto the drive shaft, insert the drive shaft into the differential..
9. Verify that the drive shaft cannot be pulled out.
10. Add the specified differential oil.
11. After adding the oil, perform an oil level inspection..
12. Install a new washer and the oil filler plug, and tighten.
-
Tightening torque
-
40—53 N·m {4.1—5.4 kgf·m, 30—39 ft·lbf}
 Oil Seal (Differential) Replacement [Fw6 A EL, Fw6 Ax EL]
Transaxle Case Side
1. Remove the front under cover No.2..
2. Drain the ATF..
3. Disconnect the drive shaft (LH) from the transaxle..
CAUTION:
The oil seal is easily damaged by the shar ...
 Oil Shower Pipe
Outline
Mechanical resistance loss has been reduced through structural changes to
achieve optimum fuel economy. An oil shower pipe has been adopted as a part
of this structural change.
...
Other materials:
Changing a Flat Tire
NOTE
If the following occurs while driving, it could indicate a flat tire.
• Steering becomes difficult.
• The vehicle begins to vibrate excessively.
• The vehicle pulls in one direction.
If you have a flat tire, drive slowly to a level spot that is well off the road
and out of the way ...
Front Under Cover No.1 Removal/Installation
1. Remove bolts A.
2. Remove screws B.
3. Remove fasteners C.
4. Remove the front under cover No.1 in the direction of the arrow in the order
of (1), (2) shown in the figure while detaching the guide D.
5. Install in the reverse order of removal. ...
Purge Solenoid Valve Removal/Installation
1. Disconnect the negative battery cable..
2. Remove the plug hole plate..
3. Remove the air cleaner and air hose as a single unit..
4. Disconnect the high pressure fuel pump connector.
5. Disconnect the harness clip as shown in the figure.
6. Remove in the order indicated in the table ...
