Mazda CX-5 Service & Repair Manual: Pressure Sensor [Two Step Deployment Control System]
Purpose
-
The pressure sensor determines at an earlier stage whether to detonate the air bag on the side of the vehicle (around front door) receiving an impact. This is for improved accuracy of the side air bag operation (deployment).
Function
-
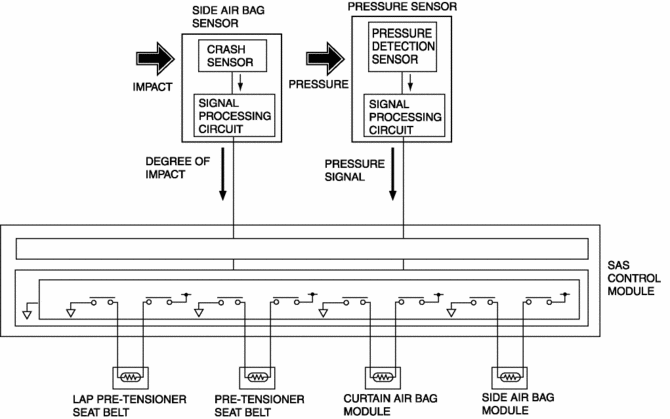
When the vehicle is involved in a side-impact collision, the pressure sensor detects air pressure applied to the internal front door and sends an air bag deployment signal to the SAS control module.
Construction
-
A pressure detection sensor is built into the pressure sensor.
-
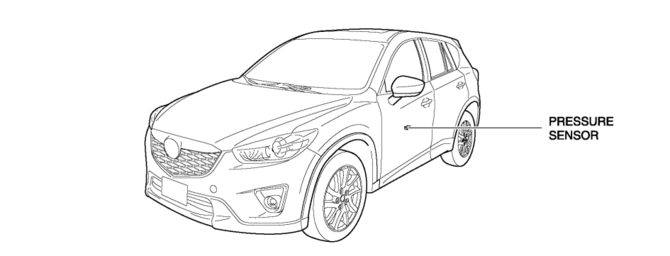
Located inside the center of the front doors.
Operation
1. If the vehicle is involved in a side-impact collision, air pressure is generated in the sealed front door and applied to the pressure sensor.
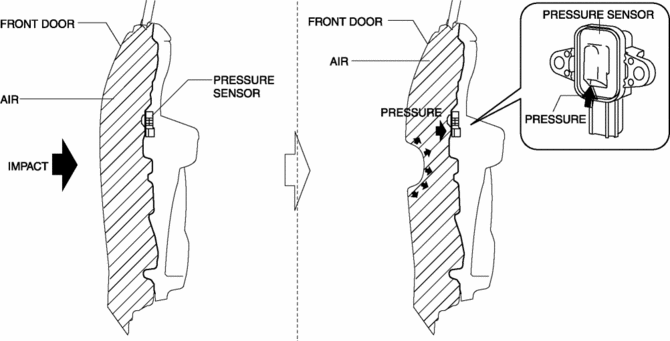
2. The pressure detection sensor built into the pressure sensor detects the pressure and converts the pressure into an electrical signal at the signal processing circuit.
3. The pressure signal, which is converted to an electrical signal, is sent to the SAS control module.
Fail-safe
-
Function not equipped.
 Pressure Sensor Removal/Installation [Two Step Deployment Control System]
WARNING:
Handling the pressure sensor improperly can accidentally operate (deploy)
the air bag module, which may seriously injure you. Read the air bag system
service warnings and cautio ...
 Purge Control
Outline
An appropriate amount of evaporative gas is fed into the intake manifold
by the purge solenoid valve operation according to the engine operation conditions.
This ensures driveabil ...
Other materials:
Vanity Mirror Illumination Inspection
1. Disconnect the negative battery cable..
2. Remove the sunvisor..
3. Verify that the continuity between the vanity mirror illumination terminals
is as indicated in the table.
If not as indicated in the table, replace the sunvisor.
...
Fuel Distributor [Skyactiv G 2.0]
Purpose, Function
Distributes fuel pumped from the high pressure fuel pump to each fuel injector.
Construction
The fuel distributor is installed to the cylinder head.
The fuel distributor is integrated with the fuel pressure sensor.
...
Front Seat Rail Guide Cover Removal/Installation
WARNING:
Handling a side air bag improperly can accidentally operate (deploy) the
air bag, which may seriously injure you. Read the service warnings/cautions
in the Workshop Manual before handling the front seat (side air bag integrated)..
If the sliding mechanisms on both side ...
