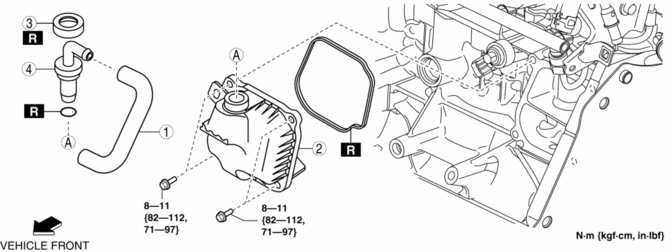
Mazda CX-5 Service & Repair Manual: Positive Crankcase Ventilation (PCV) Valve Removal/Installation
1. Disconnect the negative battery cable..
2. Remove the intake manifold..
3. Remove in the order indicated in the table.
4. Install in the reverse order of removal.
|
1 |
PCV hose |
|
2 |
Oil separator |
|
3 |
Retainer (See Retainer Removal Note.) (See Retainer Installation Note.) |
|
4 |
PCV valve |
Retainer Removal Note
CAUTION:
-
Be sure to follow the removal procedures below to prevent the leakage of blow-by gas caused by the damage to the tab of the oil separator or the oil separator itself.
1. Insert a flat blade screwdriver with its tip wrapped in a shop rag into the gap between the retainer and the oil separator as shown in the figure.
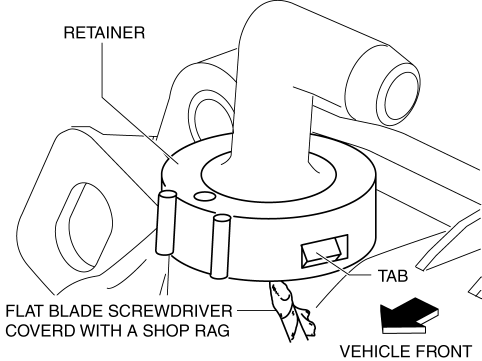
2. Spread the side surface of the retainer outward to dismount it with attention to the tab.
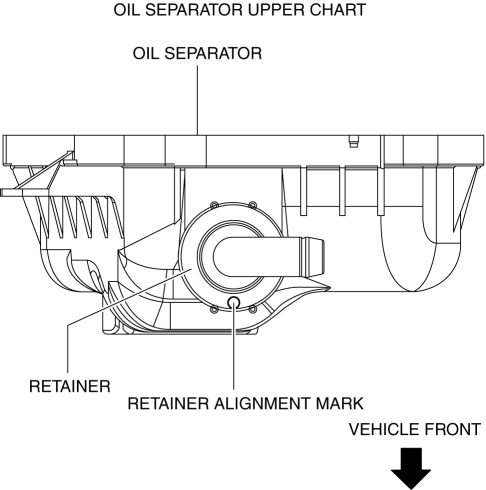
Retainer Installation Note
CAUTION:
-
Be sure to replace the old retainer with a new one to prevent the escape of blow-by gas. Reinstalling the old retainer will reduce airtightness.
1. Make sure that the retainer alignment mark is directed as shown in the left diagram before installing the retainer to the oil separator.
 Positive Crankcase Ventilation (PCV) Valve Inspection
Airflow Inspection
1. Disconnect the section (A) of ventilation hose shown in the figure.
2. Start the engine and verify that vacuum is applied to the end of the disconnected
ventilation hose ...
 Positive Crankcase Ventilation (PCV) Valve
Purpose, Function
Prevents release of blow-by gas (unburnt gas) into the atmosphere.
The PCV valve is open/closed by the intake manifold vacuum.
Construction
The PCV valve ...
Other materials:
Solar Radiation Sensor Removal/Installation [Full Auto Air Conditioner]
NOTE:
When removing the solar radiation sensor, perform the procedure in the posture
shown in the figure.
1. Disconnect the negative battery cable..
2. Remove the following parts:
a. Front scuff plate (passenger-side).
b. Front side trim (passenger-side).
c. Dashboard ...
Camshaft Position (CMP) Sensor Removal/Installation
CAUTION:
When replacing the CMP sensor, make sure there is no foreign material on
it such as metal shavings. If it is installed with foreign material, the sensor
output signal will malfunction resulting from fluctuation in magnetic flux and
cause a deterioration in engine control.
...
Front Door Latch And Lock Actuator Inspection
The following actuator and switches are integrated with the front door latch
and lock actuator.
From the actuator/switch name and operation in the following table, select
the actuator or switch to be inspected, and perform the inspection following
the inspection procedure ...
