Mazda CX-5 Owners Manual: Installing Child-Restraint Systems
Accident statistics reveal that a child is safer in the rear seat. The front passenger's seat is clearly the worst choice for any child under 12, and with rear-facing childrestraint systems it is clearly unsafe due to air bags.
NOTE
Even if your vehicle is equipped with front passenger seat weight sensors , which automatically deactivates the front passenger air bag, a rear seat is the safest place for a child of any age or size.
Some child-restraint systems now come with tethers and therefore must be installed on the seats that take tethers to be effective. In your Mazda, tethered child-restraint systems can only be accommodated in the three positions on the rear seat.
Some child-restraint systems also employ specially designed LATCH attachments; refer to “Using LATCH Lower Anchor” .
WARNING
Tethered Child-Restraint Systems Work Only on Tether-Equipped Rear Seats: Installation of a tether equipped child-restraint system in the front passenger's seat defeats the safety design of the system and will result in an increased chance of serious injury if the child-restraint system goes forward without benefit of being tethered.
Place tether equipped child-restraint systems where there are tether anchors.
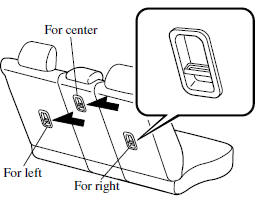
Anchor Bracket Location
Anchor brackets for securing childrestraint systems are equipped in the vehicle. Locate each anchor position using the illustration.
To install a child-restraint system, always follow the instruction manual accompanying the child-restraint system.
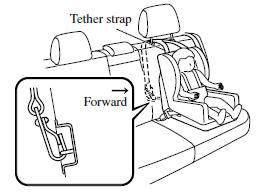
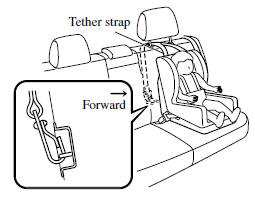
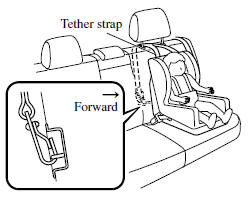
Installation of a child-restraint system equipped with a tether.
Anchor bracket location
WARNING
Always attach the tether strap to the correct tether anchor position: Attaching the tether strap to the incorrect tether anchor position is dangerous. In a collision, the tether strap could come off and loosen the child-restraint system. If the childrestraint system moves it could result in death or injury to the child.
Securing an LATCH-compatible childrestraint system.
LATCH lower anchor location
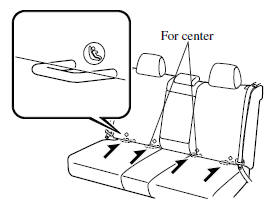
When installing on the center seat, use the anchor for the center seat.
NOTE
The markings above the LATCH lower anchors indicate the locations of the LATCH lower anchors for the attachment of a child-restraint system.
Using Automatic Locking Mode
Follow these instructions when using a child-restraint system, unless you are attaching a LATCH-equipped childrestraint system to the rear LATCH lower anchors. Refer to “Using LATCH Lower Anchor” .
NOTE
Follow the child-restraint system manufacturer's instructions carefully. If you are not sure whether you have a LATCH system or tether, check in the child-restraint system manufacturer's instructions and follow them accordingly. Depending on the type of child-restraint system, it may use LATCH system instead of seat belts or if the belt goes across the child's chest, may recommend against using automatic locking mode.
1. Make sure the seatback is securely latched by pushing it back until it is fully locked.
2. Raise the head restraint to the top locked position.
Refer to Head Restraints 1.
3. Secure the child-restraint system with the lap portion of the lap/shoulder belt.
See the manufacturer's instructions on the child-restraint system for belt routing instructions.
4. To get the retractor into the automatic locking mode, pull the shoulder belt portion of the seat belt until the entire length of the belt is out of the retractor.
5. Push the child-restraint system firmly into the vehicle seat. Be sure the belt retracts as snugly as possible. A clicking noise from the retractor will be heard during retraction if the system is in the automatic locking mode. If the belt does not lock the seat down tight, repeat this step.
NOTE
Inspect this function before each use of the child-restraint system. You should not be able to pull the shoulder belt out of the retractor while the system is in the automatic locking mode. When you remove the child-restraint system, be sure the belt fully retracts to return the system to emergency locking mode before occupants use the seat belts.
6. If your child-restraint system requires the use of a tether strap, refer to the manufacturer's instructions to hook and tighten the tether strap.
WARNING
Use the tether and tether anchor only for a child-restraint system: Using the tether or tether anchor to secure anything but a child-restraint system is dangerous. This could weaken or damage the tether or tether anchor and result in injury.
Always route the tether strap between the head restraint and the seatback: Routing the tether strap on top of the head restraint is dangerous. In a collision the tether strap could slide off the head restraint and loosen the child-restraint system. The childrestraint system could move which may result in death or injury to the child.
Always attach the tether strap to the correct tether anchor position: Attaching the tether strap to the incorrect tether anchor position is dangerous. In a collision, the tether strap could come off and loosen the child-restraint system. If the childrestraint system moves it could result in death or injury to the child.
If You Must Use the Front Seat for Children
If you cannot put all children in the rear seat, at least put the smallest children in the rear and be sure the largest child up front uses the shoulder belt over the shoulder.
NEVER put a rear-facing child-restraint system on the front passenger seat whether your vehicle is equipped with a seat weight sensor or not.
This seat is also not set up for tethered child-restraint systems, put them in one of the rear seat positions set up with tether anchors.
Likewise the LATCH child-restraint system cannot be secured in the front passenger's seat and should be used in the rear seat.
Do not allow anyone to sleep against the side window if you have optional side and curtain air bags, it could cause serious injuries to an out of position occupant. As children more often sleep in cars, it is better to put them in the rear seat. If installing the child-restraint system on the front seat is unavoidable, follow these instructions when using a front-facing child-restraint system in the front passenger's seat.
NOTE
• To check if your front seats have side
air bags:
Mazda vehicles equipped with side air bag will have a “SRS AIRBAG” tag on the outboard
shoulder of the front seats.
• To check if your vehicle has curtain
air bags:
Mazda vehicles equipped with curtain air bag will have an “SRS AIRBAG” marking on
the window pillars along the roof edge.
WARNING
Always move the front passenger seat as far back as possible if installing a front-facing child-restraint system on it is unavoidable: As your vehicle has front air bags and doubly so because your vehicle has side air bags, a front-facing child-restraint system should be put on the front passenger seat only when it is unavoidable.
Even if the front passenger air bag deactivation indicator light illuminates, always move the seat as far back as possible, because the force of a deploying air bag could cause serious injury or death to the child.
Never use a rear-facing child-restraint system in the front seat with an air
bag that could deploy:
Rear-facing child-restraint systems on the front seat are particularly dangerous.
Even in a moderate collision, the child-restraint system can be hit by a deploying air bag and moved violently backward resulting in serious injury or death to the child.
Even though you may feel assured that the front passenger air bag will not deploy based on the fact that the front passenger air bag deactivation indicator light illuminates, you should not use a rear-facing childrestraint system in the front seat.
Do not allow a child or anyone to lean over or against the side window of a vehicle with side and curtain air bags: It is dangerous to allow anyone to lean over or against the side window, the area of the front passenger seat, the front and rear window pillars and the roof edge along both sides from which the side and curtain air bags deploy, even if a child-restraint system is used. The impact of inflation from a side or curtain air bag could cause serious injury or death to an out of position child.
Furthermore, leaning over or against the front door could block the side and curtain air bags and eliminate the advantages of supplemental protection. With the front air bag and the additional side air bag that comes out of the front seat, the rear seat is always a better location for children. Take special care not to allow a child to lean over or against the side window, even if the child is seated in a child-restraint system.
Front Passenger's Seat Child-Restraint System Installation (With automatic locking mode seat belt)
1. Switch the ignition ON.
2. Slide the seat as far back as possible.
3. Place the child-restraint system on the seat without putting your weight on the seat and fasten the seat belt. See the manufacturer's instructions on the child-restraint system for belt routing instructions.
4. To get the retractor into the automatic locking mode, pull the shoulder belt portion of the seat belt until the entire length of the belt is out of the retractor.
5. Push the child-restraint system firmly into the vehicle seat. Be sure the belt retracts as snugly as possible. A clicking noise from the retractor will be heard during retraction if the system is in automatic locking mode. If the belt does not lock the seat down tight, repeat the previous step and also this one.
NOTE
• Inspect this function before each use of the child-restraint system. You should not be able to pull the shoulder belt out of the retractor while the system is in the automatic locking mode. When you remove the child-restraint system, be sure the belt fully retracts to return the system to emergency locking mode before occupants use the seat belts.
• Follow the child-restraint system manufacturer's instructions carefully.
Depending on the type of child-restraint system, it may not employ seat belts which are in automatic locking mode.
6. Seat your child safely in the childrestraint system and secure the child according to the instructions from the child-restraint system manufacturer.
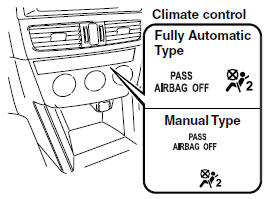
7. (With Driver and Front Passenger Occupant Classification System)
Make sure the front passenger air bag deactivation indicator light illuminates after installing a child-restraint system on the front passenger seat.
If the front passenger air bag deactivation indicator light does not illuminate, remove the child-restraint system, switch the ignition to OFF, and then re-install the child-restraint system.
WARNING
Do not seat a child in a child-restraint system on the front passenger seat if the front passenger air bag deactivation indicator light does not illuminate (With Driver and Front Passenger Occupant Classification System): While it is always better to install any child-restraint system on the rear seat, it is imperative that a childrestraint system ONLY be used on the front passenger seat if the deactivation indicator light illuminates when the child is seated in the child-restraint system . Seating a child in a childrestraint system installed on the front passenger seat with the front passenger air bag deactivation indicator light not illuminated is dangerous. If this indicator light does not illuminate, this means that the front passenger front and side air bags, and seat belt pretensioner are ready for deployment. If an accident were to deploy an air bag, a child in a child-restraint system sitting in the front passenger seat could be seriously injured or killed. If the indicator light does not illuminate after seating a child in a childrestraint system on the front passenger seat, seat a child in a child-restraint system on the rear seat and consult an Authorized Mazda Dealer as soon as possible.
Using LATCH Lower Anchor
Your Mazda is equipped with LATCH lower anchors for attachment of specially designed LATCH child-restraint systems in the rear seats. Both anchors must be used, otherwise the seat will bounce around and put the child in danger. Most LATCH child-restraint systems must also be used in conjunction with a tether to be effective. If they have a tether you must use it to better assure your child's safety.
WARNING
Follow the manufacturer's instructions for the use of the child-restraint system: An unsecured child-restraint system is dangerous. In a sudden stop or a collision it could move causing serious injury or death to the child or other occupants. Make sure the child-restraint system is properly secured in place according to the childrestraint system manufacturer's instructions.
Never attach two child-restraint systems to the same LATCH lower anchor: Attaching two child-restraint systems to the same LATCH lower anchor is dangerous.
In a collision, one anchor may not be strong enough to hold two child-restraint system attachments, and it may break, causing serious injury or death. If you use the seat position for another child-restraint system when an outboard LATCH position is occupied, use the center seat belts instead, and the tether if tether-equipped.
Make sure the child-restraint system is properly secured: An unsecured child-restraint system is dangerous. In a sudden stop or a collision it could move causing serious injury or death to the child or other occupants. Follow the child-restraint system manufacturer's instructions on belt routing to secure the seat just as you would with a child in it so that nobody is tempted to put a child in an improperly secured seat later on. When not in use, remove it from the vehicle or fasten it with a seat belt, or latch it down to BOTH LATCH lower anchors for LATCH child-restraint systems.
Make sure there are no seat belts or foreign objects near or around the LATCH
childrestraint system:
Not following the child-restraint system manufacturer's instructions when installing
the child-restraint system is dangerous. If seat belts or a foreign object prevent
the child-restraint system from being securely attached to the LATCH lower anchors
and the child-restraint system is installed improperly, the child-restraint system
could move in a sudden stop or collision causing serious injury or death to the
child or other occupants. When installing the child-restraint system, make sure
there are no seat belts or foreign objects near or around the LATCH lower anchors.
Always follow the child-restraint system manufacturer's instructions.
Installation on rear outboard seats
1. First, adjust the front seat to allow clearance between the child-restraint system and the front seat .
2. Make sure the seatback is securely latched by pushing it back until it is fully locked.
3. Expand the area between the seat bottom and the seatback slightly to verify the locations of the LATCH lower anchors.
4. Raise the head restraint to the top locked position.
Refer to Head Restraints 1.
5. Secure the child-restraint system using BOTH LATCH lower anchors, following the child-restraint system manufacturer's instruction. Pull on the child-restraint to be sure both anchors are engaged.
6. If your child-restraint system came equipped with a tether, that means it is very important to properly secure the tether for child safety. Please carefully follow the child-restraint system manufacturer's instructions when installing tethers.
WARNING
Use the tether and tether anchor only for a child-restraint system: Using the tether or tether anchor to secure anything but a child-restraint system is dangerous. This could weaken or damage the tether or tether anchor and result in injury.
Always route the tether strap between the head restraint and the seatback: Routing the tether strap on top of the head restraint is dangerous. In a collision the tether strap could slide off the head restraint and loosen the child-restraint system. The childrestraint system could move which may result in death or injury to the child.
Always attach the tether strap to the correct tether anchor position: Attaching the tether strap to the incorrect tether anchor position is dangerous. In a collision, the tether strap could come off and loosen the child-restraint system. If the childrestraint system moves it could result in death or injury to the child.
Installation on rear center seat
The LATCH lower anchors at the center of the rear seat are much further apart than the sets of LATCH lower anchors for child-restraint system installation at other seating positions. Child-restraint systems with rigid LATCH attachments cannot be installed on the center seating position.
Some LATCH equipped child-restraint systems can be placed in the center position and will reach the nearest LATCH lower anchors which are 420 mm (16.5 in) apart. LATCH compatible childrestraint systems (with attachments on belt webbing) can be used at this seating position only if the child-restraint system manufacturer's instructions state that the child-restraint system can be installed to LATCH lower anchors that are 420 mm (16.5 in) apart. Do not attach two childrestraint systems to the same LATCH lower anchor. If your child-restraint system has a tether, it must also be used for your child's optimum safety.
The procedure for installation on the rear outboards seats is the same.
For the LATCH position, refer to Anchor Bracket Location.
WARNING
Always route the tether strap between the head restraint and the seatback: Routing the tether strap on top of the head restraint is dangerous. In a collision the tether strap could slide off the head restraint and loosen the child-restraint system. The childrestraint system could move which may result in death or injury to the child.
Always attach the tether strap to the correct tether anchor position: Attaching the tether strap to the incorrect tether anchor position is dangerous. In a collision, the tether strap could come off and loosen the child-restraint system. If the childrestraint system moves it could result in death or injury to the child.
 Child-Restraint System Installation
Child-Restraint System Types
In this owner's manual, explanation of child-restraint systems is provided for
the following three types of popular childrestraint systems: infant seat, child
sea ...
 SRS Air Bags
...
Other materials:
Rear Seat Center Armrest Removal/Installation
1. Operate the push knob (RH) and lower the rear seat back (RH).
2. Remove screw A.
3. Remove the rear seat center armrest hinge cover (RH) in the direction of the
arrow (1) shown in the figure while setting hook A aside.
4. Remove bolt B.
5. Remove the rear seat center armrest in ...
Engine Coolant Temperature (ECT) Sensor Inspection
Resistance Inspection
WARNING:
When the engine is hot, it can badly burn. Turn off the engine and wait until
it is cool before removing the ECT sensor.
ECT Sensor No.1
1. Remove the ECT sensor No.1..
2. Place the ECT sensor No.1 in water with a thermometer, and heat the water
...
Front Accessory Socket Removal/Installation
1. Disconnect the negative battery cable..
2. Remove the front console..
3. Insert a tape-wrapped flathead screwdriver into the gap between the cap tab
and socket.
4. Move the flathead screwdriver in the direction of the arrow (1) shown in the
figure, press the front accessory socket i ...
