Mazda CX-5 Owners Manual: Child-Restraint System Installation
Child-Restraint System Types
In this owner's manual, explanation of child-restraint systems is provided for the following three types of popular childrestraint systems: infant seat, child seat, booster seat.
NOTE
• Installation position is determined by the type of child-restraint system. Always read the manufacturer's instructions and this owner's manual carefully.
• Due to variations in the design of childrestraint systems, vehicle seats and seat belts, all child-restraint systems may not fit all seating positions. Before purchasing a child-restraint system, it should be tested in the specific vehicle seating position (or positions) where it is intended to be used. If a previously purchased child-restraint system does not fit, you may need to purchase a different one that will.
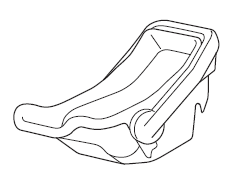
Infant seat
An infant seat provides restraint by bracing the infant's head, neck and back against the seating surface.
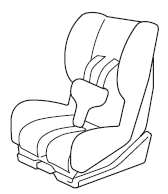
Child seat
A child seat restrains a child's body using the harness.
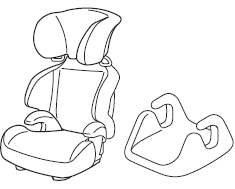
Booster seat
A booster seat is a child restraint accessory designed to improve the fit of the seat belt system around the child's body.
 Child Restraint Precautions
Mazda strongly urges the use of child-restraint systems for children small enough
to use them.
You are required by law to use a child-restraint system for children in the U.S.
and Canada.
Check ...
 Installing Child-Restraint Systems
Accident statistics reveal that a child is safer in the rear seat. The front
passenger's seat is clearly the worst choice for any child under 12, and with rear-facing
childrestraint systems it ...
Other materials:
Electric Variable Valve Timing Control
Outline
The PCM determines the optimum intake valve timing according to the engine
operation conditions, and sends the motor drive signals to the electric variable
valve timing driver. With the adoption of the electric drive system, variable
intake valve timing can be controlled with ...
Rear ABS Wheel Speed Sensor Inspection [Awd]
Installation Visual Inspection
1. Inspect the following items:
If there is any malfunction, replace the applicable part.
a. Excessive play of the ABS wheel-speed sensor
b. Deformation of the ABS wheel-speed sensor
c. Deformation or damage of the ABS sensor rotor
Clearance Inspec ...
Auxiliary Jack/Usb Port
NOTE:
“iPod” is a registered trademark of Apple Inc. in the United States and other
countries.
Purpose, Function
The Auxiliary jack/USB port outputs the audio signals of commercially-available
portable audio, a USB device, or an iPod connected to the Auxiliary jack/USB ...
