Mazda CX-5 Service & Repair Manual: Fuel Gauge Sender Unit Inspection [Awd]
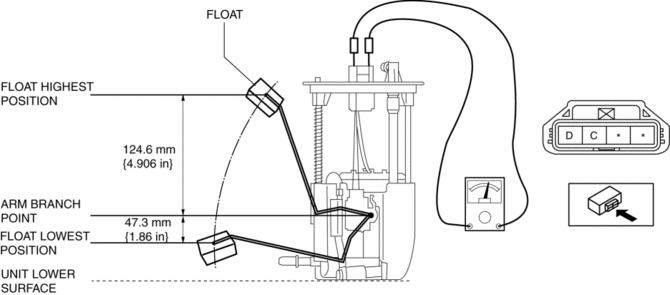
Fuel gauge sender unit (main)
NOTE:
-
For the fuel gauge sender unit removal/installation, refer to the fuel pump removal/installation because the fuel gauge sender unit is integrated with the fuel pump..
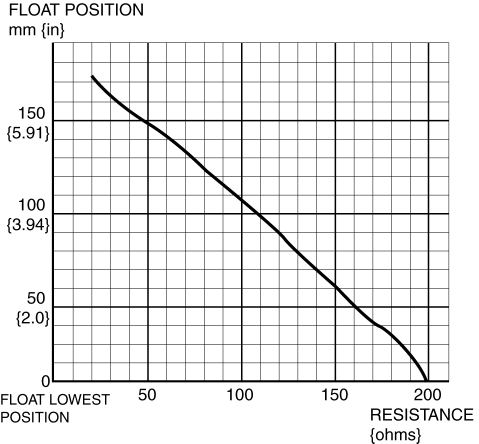
1. Verify that the resistance at fuel gauge sender unit (main) terminals D and C is as indicated in the table according to the height of the float.
-
If not as indicated in the table, replace the fuel gauge sender unit (main).
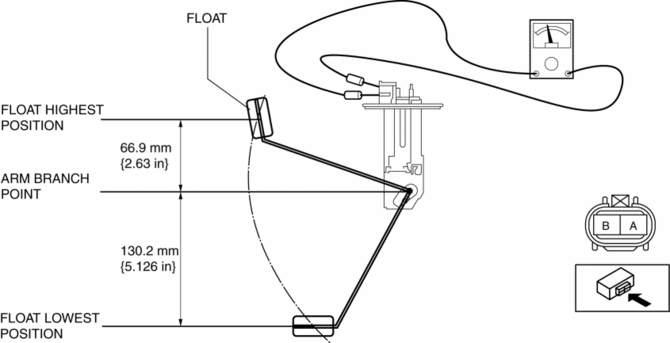
Fuel gauge sender unit (sub)
1. Remove the fuel gauge sender unit (sub)..
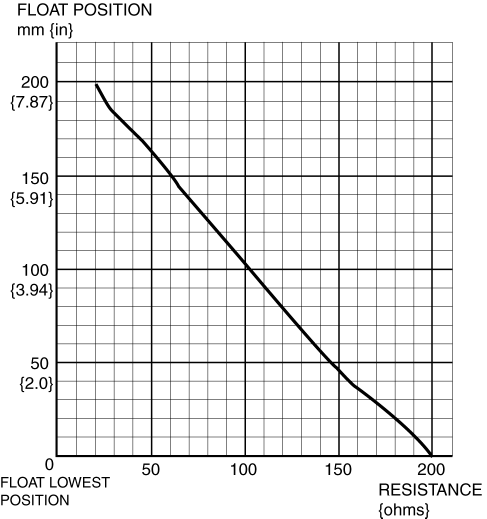
2. Verify that the resistance at fuel gauge sender unit (sub) terminals B and A is as indicated in the table according to the height of the float.
-
If not as indicated in the table, replace the fuel gauge sender unit (sub).
 Electronic Control Coupling
Purpose, Function
An electromagnetic clutch, which operates smoothly due to the lack influence
from the front and rear wheel traction force, has been adopted for the electronic
control co ...
 Fuel Gauge Sender Unit Removal/Installation [Awd]
WARNING:
Always keep sparks and flames away from fuel when servicing the fuel system.
Fuel can be easily ignited which could cause serious injury or death, and damage
to equipment.
...
Other materials:
Dashboard Under Cover Removal/Installation
1. Detach hooks A in the direction of arrow (1) shown in the figure.
2. Pull the dashboard under cover in the direction of arrow (2) while detaching
pins B.
3. Remove the dashboard under cover in the direction of the arrow (3) shown in
the figure while detaching the guide C.
CAUTION:
...
Magnetic Clutch Adjustment [Manual Air Conditioner]
1. Measure the clearance around the entire circumference between the pressure
plate and A/C compressor pulley using a thickness gauge.
2. Verify the clearance.
If not within the specification, remove the pressure plate and adjust the
clearance by changing the shim (0.2 mm {0.008 i ...
Seat Warmer Unit Inspection
WARNING:
Handling a side air bag improperly can accidentally operate (deploy) the
air bag, which may seriously injure you. Read the service warnings/cautions
in the Workshop Manual before handling the front seat (side air bag integrated)..
CAUTION:
If the slide bar is ope ...
