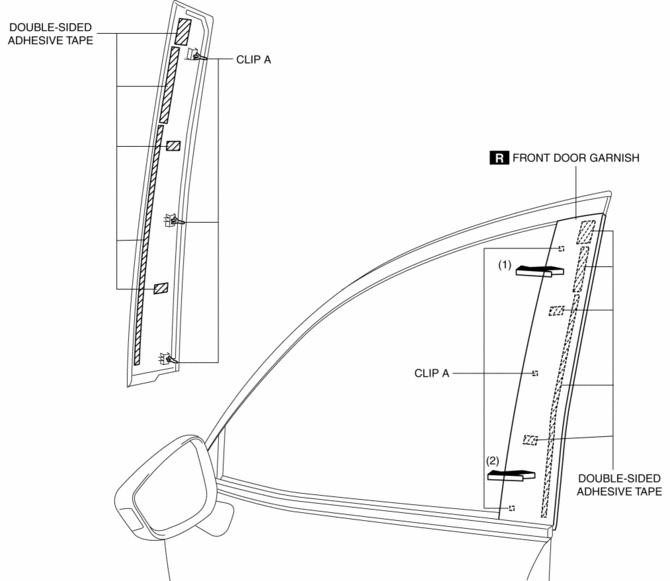
Mazda CX-5 Service & Repair Manual: Front Door Garnish Removal/Installation
WARNING:
-
Using a utility knife with bare hands can cause injury. Always wear gloves when using a utility knife.
1. Using a tape-wrapped fastener remover, remove clips A in the direction of arrow (1), (2) shown in the figure.
2. Remove the double-sided adhesive tape in the position shown in the figure using the utility knife, remove the rear door garnish from the body.

3. Install in the reverse order of removal.
 Front Door Checker Removal/Installation
CAUTION:
When the front door checker securing bolts are removed, the front door may
open until it contacts the front fender panel causing the front door and the
front fender panel to be ...
 Front Door Hinge Removal/Installation
1. Disconnect the negative battery cable..
2. Remove the following parts:
a. Front bumper.
b. Front combination light.
c. Front bumper slider.
d. Front over fender.
e. Front fender panel. ...
Other materials:
Remote Transmitter Battery Voltage Inspection
NOTE:
Because the remote transmitter battery power cannot be determined using the
battery itself, determine by the remote transmitter battery low warning operation
conditions.
Operation procedure for remote transmitter battery low warning
1. Place the remote transmitter inside t ...
Warning/Indicator Lights
Warning (Display Indication)
Message information such as system operations or malfunctions is indicated in
the display. Check the vehicle condition or have the vehicle inspected at an Authorized
Mazda Dealer according to the indication.
Brake System Warning Light
This warning has th ...
Brake Fluid Air Bleeding
CAUTION:
Brake fluid will damage painted surfaces. Be careful not to spill any on
painted surfaces. If it is spilled, wipe it off immediately.
NOTE:
Keep the fluid level in the brake fluid reserve tank at 3/4 full or more
during the air bleeding.
Begin air bleedin ...
