Mazda CX-5 Service & Repair Manual: Front Door Checker Removal/Installation
CAUTION:
-
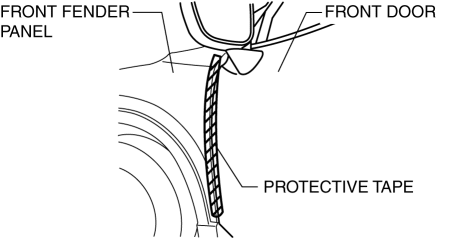
When the front door checker securing bolts are removed, the front door may open until it contacts the front fender panel causing the front door and the front fender panel to be damaged. Before removing the front door, overlap and adhere the protective tape to the position shown in the figure and be careful no to damage the front door and the front fender panel.
1. Fully close the front door glass.
2. Disconnect the negative battery cable..
3. Remove the inner garnish..
4. Remove the front door trim..
5. Remove the front door speaker..
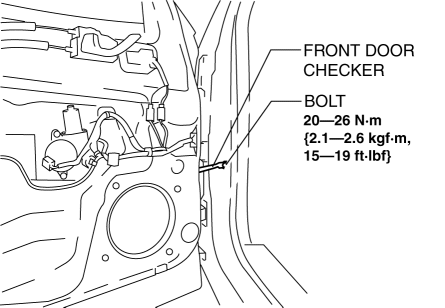
6. Remove bolt.
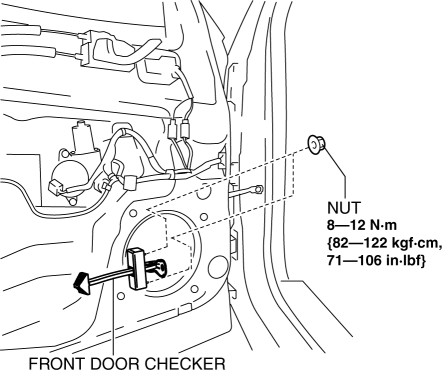
7. Remove nuts.
8. Pull out the front door checker from the front speaker installation hole.
9. Install in the reverse order of removal.
 Doors And Liftgate
Outline
Side impact bars built into the front and rear doors have been adopted.
Door modules have been adopted on the front and rear doors.
Structural view
...
 Front Door Garnish Removal/Installation
WARNING:
Using a utility knife with bare hands can cause injury. Always wear gloves
when using a utility knife.
1. Using a tape-wrapped fastener remover, remove clips A in the directi ...
Other materials:
Control Valve Body Removal/Installation [Fw6 A EL, Fw6 Ax EL]
On-Vehicle Removal
WARNING:
A hot transaxle and ATF can cause severe burns. Turn off the engine and wait
until they are cool.
Using compressed air can cause dirt and other particles to fly out, causing
injury to the eyes. Wear protective eyeglasses whenever using compressed ai ...
Ebd Control
Outline
EBD control uses the ABS system to control brake fluid pressure distribution
to the rear wheels so that they do not lock-up prior to the front wheels during
braking, thereby preventing the loss of handling stability.
Feature
EBD control has independent control syste ...
Air Fuel Ratio (A/F) Sensor Heater Control [Skyactiv G 2.0]
Outline
Based on the control of the A/F sensor heater, a stabilized oxygen concentration
is detected even at low exhaust temperatures, and feedback control of fuel injection
even at cold engine start is made possible for improved cold temperature exhaust
emission performance.
...
