
Mazda CX-5 Service & Repair Manual: Liftgate Opener Switch Inspection
1. Disconnect the negative battery cable..
2. Remove the following parts:
a. Liftgate upper trim.
b. Liftgate side trim.
c. Liftgate lower trim.
d. Liftgate garnish.
e. Liftgate opener switch.
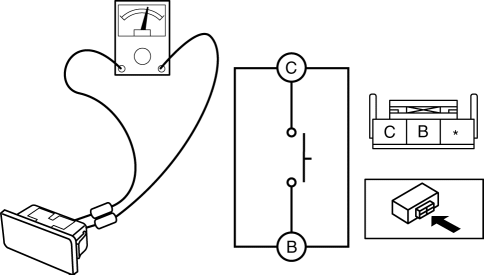
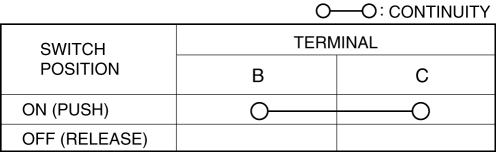
3. Verify the continuity of liftgate opener switch terminals B and C.
-
If not as indicated in the table, replace the liftgate opener switch.
 Liftgate Lower Trim Removal/Installation
1. Remove the following parts:
a. Liftgate upper trim.
b. Liftgate side trim.
c. Liftgate recess.
2. Remove fasteners A.
3. Take the shaded area shown in the figure, and pull the liftgat ...
 Liftgate Opener Switch Removal/Installation
1. Disconnect the negative battery cable..
2. Remove the following parts:
a. Liftgate upper trim.
b. Liftgate side trim.
c. Liftgate lower trim.
d. Liftgate garnish.
3. Remove the liftgate ...
Other materials:
Drive Plate Removal/Installation [Fw6 A EL, Fw6 Ax EL]
1. Remove the transaxle..
2. Remove in the order indicated in the table.
1
Drive plate installation bolts
(See Drive Plate Installation Bolts Removal Note.)
(See Drive Plate Installation Bolts Installation Note.)
2
Backing plate
...
Rear Seat Center Armrest Removal/Installation
1. Operate the push knob (RH) and lower the rear seat back (RH).
2. Remove screw A.
3. Remove the rear seat center armrest hinge cover (RH) in the direction of the
arrow (1) shown in the figure while setting hook A aside.
4. Remove bolt B.
5. Remove the rear seat center armrest in ...
Charcoal Canister
Purpose, Function
Absorbs evaporative gas flowing from the fuel tank to prevent release of
the gas into the atmosphere.
Construction
The charcoal canister is installed near the fuel tank.
U.S.A. and CANADA
Except U.S.A. and CANADA
The charcoal canister ...
