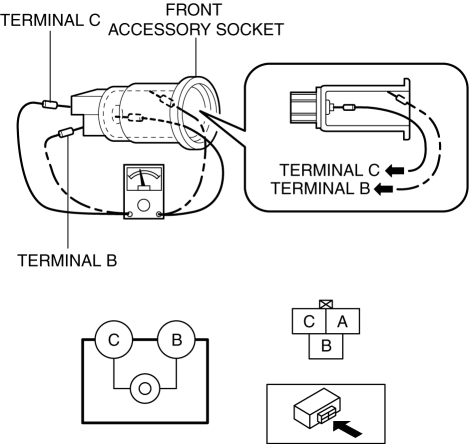
Mazda CX-5 Service & Repair Manual: Front Accessory Socket Inspection
1. Remove the front accessory socket..
2. Connect the tester probe to the position shown in the figure and verify that there is continuity.
-
If it cannot be verified, replace the front accessory socket..
 Center Accessory Socket Removal/Installation
1. Disconnect the negative battery cable..
2. Remove the upper console..
3. Insert a tape-wrapped flathead screwdriver into the gap between the cap tab
and socket.
4. Move the flathead scr ...
 Front Accessory Socket Removal/Installation
1. Disconnect the negative battery cable..
2. Remove the front console..
3. Insert a tape-wrapped flathead screwdriver into the gap between the cap tab
and socket.
4. Move the flathead scr ...
Other materials:
Generator Control [Skyactiv G 2.0]
Outline
Idling stability has been improved by optimum control of generator voltage
according to engine operation and electrical load conditions.
The PCM determines the engine operation and electrical load conditions based
on the input signals from each control part and controls ...
Customer Assistance (U.S.A.)
Your complete and permanent satisfaction is our business. We are here to serve
you. All Authorized Mazda Dealers have the knowledge and the tools to keep your
Mazda vehicle in top condition.
If you have any questions or recommendations for improvement regarding the service
of your Mazda vehic ...
Igniter Removal/Installation
WARNING:
Incorrect servicing of the discharge headlights could result in electrical
shock. Before servicing the discharge headlights, always refer to the service
warnings..
Igniter (LH)
1. Disconnect the negative battery cable..
2. Remove the air cleaner cover..
3. Remove th ...
