Mazda CX-5 Service & Repair Manual: Eps Control Module Inspection
1. Remove the driver-side front scuff plate..
2. Remove the driver-side front side trim..
3. Remove the car-navigation unit (with car-navigation system)..
4. Remove the switch panel..
5. Remove the decoration panel..
6. Remove the shift lever knob (MTX vehicles)..
7. Remove the selector lever knob (ATX vehicles)..
8. Remove the front console box..
9. Remove the shift panel..
10. Remove the upper panel..
11. Remove the rear console..
12. Remove the side wall..
13. Remove the front console..
14. Disconnect the hood release lever from the lower panel..
15. Remove the lower panel..
16. Remove the driver-side front heat duct..
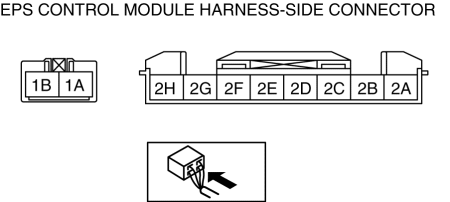
17. Attach the tester lead to the underside of the EPS CM connector and inspect the voltage according to the terminal voltage table (reference).
Terminal Voltage Table (Reference)
|
Terminal |
Signal name |
Connected to |
Measured item |
Measured terminal (measurement condition) |
Voltage (V) |
Inspection item(s) |
|
1A |
Ground |
Ground point |
Voltage |
Under any condition |
1 or less |
|
|
1B |
Battery power supply |
Battery |
Voltage |
Under any condition |
B+ |
|
|
2A |
CAN_H |
— |
Perform DTC inspection |
— |
||
|
2B |
— |
— |
— |
— |
— |
— |
|
2C |
— |
— |
— |
— |
— |
— |
|
2D |
CAN_L |
— |
Perform DTC inspection |
— |
||
|
2E |
— |
— |
— |
— |
— |
— |
|
2F |
— |
— |
— |
— |
— |
— |
|
2G |
— |
— |
— |
— |
— |
— |
|
2H |
Ignition power supply |
IG1 relay |
Voltage |
Ignition ON (engine off or on) |
B+ |
|
|
Ignition OFF (LOCK) |
1 or less |
|||||
 Electric Power Steering System
Outline
A column assist type EPS has been adopted for all models.
EPS provides smooth handling from low to high speeds as a result of the excellent
steering feel provided by the elec ...
 Oil Control Valve (OCV) Inspection [Skyactiv G 2.0]
Coil Resistance Inspection
1. Disconnect the negative battery cable..
2. Remove the plug hole plate..
3. Disconnect the OCV connector.
4. Measure the resistance between terminals A and B using ...
Other materials:
Control System [Full Auto Air Conditioner]
Outline
Refrigerant pressure sensor adopted in which refrigerant pressure is changed
into a linear electric signal and precise information is transmitted.
MS-CAN for communication between the instrument cluster and climate control
unit adopted.
Climate control un ...
Rear Lateral Link Removal/Installation
1. Disconnect the rear stabilizer control link lower side nut..
2. Remove in the order indicated in the table.
3. Install in the reverse order of removal.
4. Inspect the wheel alignment and adjust it if necessary..
1
Rear lateral link outer bolt
...
PCM
Purpose/Function
High-level driveability and lower fuel consumption have been realized by
controlling the appropriate engine conditions (fuel injection/ignition timing)
according to operation conditions.
Controls each output part based on the signal from each input part.
...
