Mazda CX-5 Service & Repair Manual: Clutch Cover Inspection [C66 M R]
1. Remove the clutch cover..
2. Perform the following procedures to inspect the clutch cover.
-
If it exceeds the maximum specification, replace the clutch cover..
a. Measure the wear of the diaphragm spring fingers.

-
Clutch cover diaphragm spring fingers maximum depth
-
0.6 mm {0.02 in}
b. Measure the flatness of the pressure plate with a straight edge and a feeler gauge.
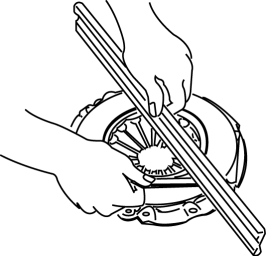
-
Maximum clearance of flatness of the pressure plate
-
0.3 mm {0.01 in}
c. Inspect the diaphragm spring fingers for the degree of uniformity in their height.
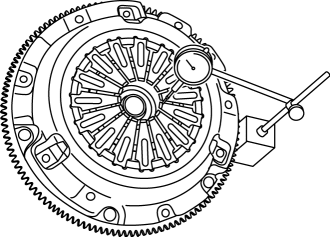
i. Install the clutch cover..
ii. When checking the diaphragm spring fingers, mount a dial gauge on the cylinder block.
iii. Rotate the flywheel and check for misaligned diaphragm spring fingers.
-
Clutch cover diaphragm spring fingers maximum height difference
-
1.0 mm {0.039 in}
 Turbine/Input Shaft Speed Sensor, Output Shaft Speed Sensor [Fw6 A EL, Fw6 Ax
EL]
Turbine/Input Shaft Speed Sensor, Output Shaft Speed Sensor [Fw6 A EL, Fw6 Ax
EL]
Purpose/Function
The turbine/input shaft speed sensor detects the rotation speed of the input
shaft (low clutch drum).
The output shaft speed sensor detects the rotation speed of the ...
 Clutch Disc Inspection [C66 M R]
Operation Inspection
1. Inspect the lining surface for discoloration and grease adhesion.
2. Inspect the torsion spring for weakness and the rivets for looseness.
3. Using a vernier caliper, meas ...
Other materials:
Front Body Straight Line Dimensions (2) [Dimensions]
Point symbol
Designation
Hole diameter or bolt or nut size mm {in}
A
Roof seamless location
-
B
Cabin side outer frame (front pillar outer) projection location
-
...
Theft Deterrent Horn Inspection
1. Disconnect the negative battery cable..
2. Remove the following parts:
a. Trunk end trim.
b. Rear scuff plate (RH).
c. Trunk side trim (RH).
d. Theft-deterrent horn.
3. Apply battery positive voltage to horn terminal A, and connect the horn retaining
bolt to ground as shown in the f ...
Rear Console Disassembly/Assembly
1. Disassemble in the order indicated in the table.
1
Screw A
2
Rear console bracket
3
Screw B
4
Side panel
5
Rear console box
6
U ...
