Mazda CX-5 Service & Repair Manual: Clock Removal/Installation
1. Disconnect the negative battery cable..
2. Remove the following parts:
a. Shift lever knob (MTX).
b. Front console box.
c. Shift panel.
d. Upper panel.
e. Rear console.
f. Side wall.
g. Decoration panel.
h. Front console.
i. Glove compartment.
j. Climate control unit.
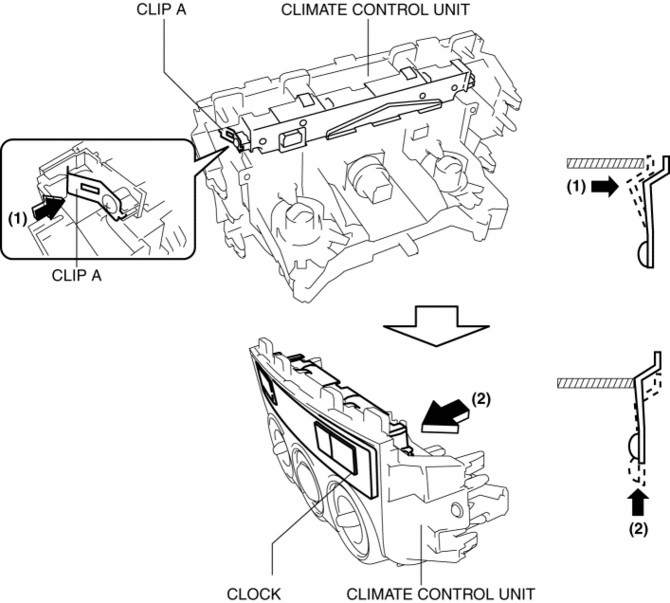
3. Push out the clock in the direction of the arrow (2) shown in the figure while pressing clip A in the direction of the arrow (1) shown in the figure, and detach clip A and the climate control unit.
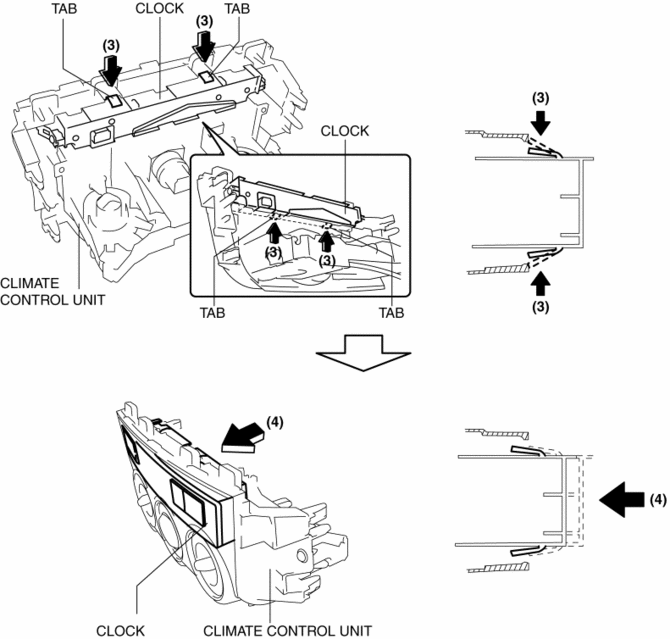
4. Push out the clock in the direction of the arrow (4) shown in the figure while pressing the clock tab in the direction of the arrow (3) shown in the figure and remove the clock tab and climate control unit.
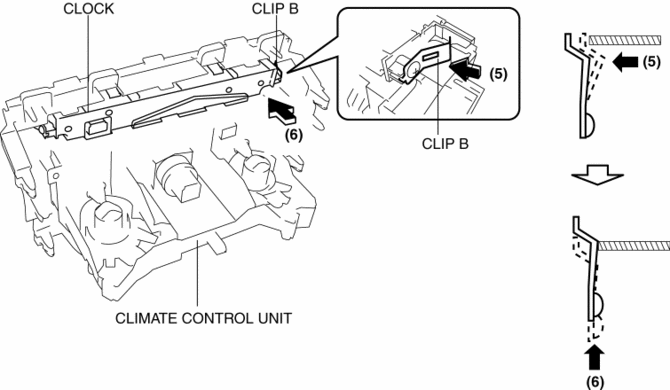
5. Push out the clock in the direction of the arrow (6) shown in the figure while pressing clip B in the direction of the arrow (5) shown in the figure, detach the clock tab and climate control unit, and remove the clock from the climate control unit.
6. Install in the reverse order of removal.
 Clock Inspection
1. Disconnect the negative battery cable..
2. Remove the following parts:
a. Shift lever knob (MTX).
b. Front console box.
c. Shift panel.
d. Upper panel.
e. Rear console.
f. Side wall. ...
 Clock Spring Adjustment [Standard Deployment Control System]
1. Set the front wheels straight ahead.
CAUTION:
The clock spring will break if over?wound. Do not forcibly turn the clock
spring.
2. Turn the clock spring clockwise until it stops. ...
Other materials:
Instrument Cluster Configuration (Using As Built Data)
NOTE:
If the configuration is performed using As-Built data, the set value of the
personalization function is reset to the initial value (condition when shipped
from factory). Verify the set value with the customer and perform the personalization
function setting after performing th ...
Hood Removal/Installation
WARNING:
Removing the hood without supporting it could cause the hood to fall and
cause serious injury. Always perform the procedure with at least another person
to prevent the hood from falling.
1. Disconnect the negative battery cable..
2. Remove the following parts:
a. Fro ...
Magnet Clutch [Full Auto Air Conditioner]
Purpose
The magnetic clutch transmits the rotation force from the engine to the shaft
in the A/C compressor.
Function
The magnetic clutch engages or disengages the magnetic clutch and the A/C
turns on or off by switching the power transmission from the engine.
C ...
