Mazda CX-5 Service & Repair Manual: B Pillar Upper Trim Removal/Installation
1. Remove the following parts:
a. Front scuff plate.
b. Rear scuff plate.
c. B-pillar lower trim.
d. Adjuster anchor cover.
e. Upper anchor installation bolts on the front seat belt.
2. Partially peel back the seaming welt.
3. Take the shaded area shown in the figure, and pull the B-pillar upper trim in the direction of the arrow (1) while detaching clips A, pin B, pin C.
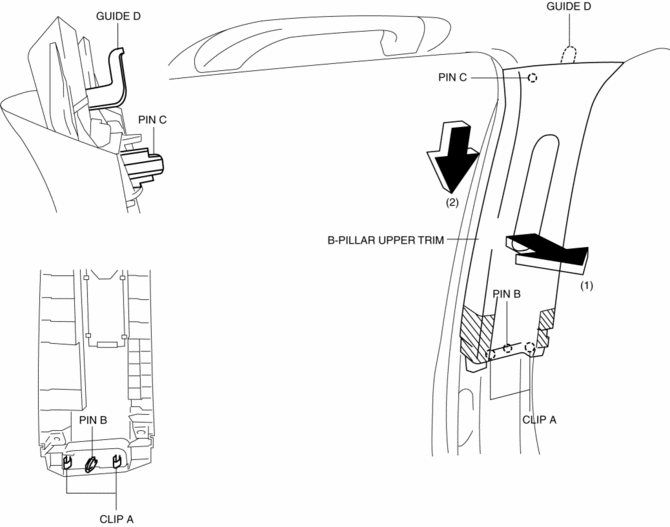
4. Remove the B-pillar upper trim in the direction of the arrow (2) shown in the figure while detaching the guide D.
CAUTION:
-
If clips A, pin B and pin C is removed forcefully, guide D may be damaged. Carefully remove clips A, pin B and pin C so as not to damage guide D.
5. Install in the reverse order of removal.
 B Pillar Lower Trim Removal/Installation
1. Remove the front scuff plate..
2. Remove the rear scuff plate..
3. Partially peel back the seaming welt.
4. Take the shaded area shown in the figure, and pull the B-pillar lower trim
in the ...
 C Pillar Trim Removal/Installation
1. Disconnect the negative battery cable..
2. Remove the following parts:
a. Trunk board.
b. Trunk end trim.
c. Rear scuff plate.
d. Trunk side trim.
e. D-pillar trim.
3. Partially peel ...
Other materials:
Clutch Unit Removal/Installation [C66 M R]
1. Disconnect the negative battery cable..
2. Remove the MTX..
3. Remove in the order indicated in the table.
4. Install in the reverse order of removal.
5. Add the specified amount of specified transaxle oil..
1
Boot
2
Clutch release ...
Drive Belt Removal/Installation [Skyactiv G 2.0]
WARNING:
A hot engine can cause severe burns. Turn off the engine and wait until it
is cool before servicing.
NOTE:
Remove/install the drive belt from the underside of the vehicle.
Generator Drive Belt Removal/Installation
CAUTION:
To prevent damage to the dri ...
Initial Learning [Fw6 A EL, Fw6 Ax EL]
Introduction
If the control valve body and oil pressure switch are replaced, always perform
the initial learning. If the initial learning is not completed, engine rev-up
may occur or shift shock may increase. DTC P06B8:00 is displayed while the initial
learning has not been implement ...
