Mazda CX-5 Service & Repair Manual: Automatic Transaxle Fluid (ATF) Adjustment [Fw6 A EL, Fw6 Ax EL]
CAUTION:
-
Only adjust the ATF level when the ATF temperature is 45—55 °C {113—131 °F}. If the ATF level is incorrect, it could damage the transaxle.
-
Do not add ATF over the specification. Otherwise, the transaxle performance could be reduced and ATF could leak.
1. Remove the dipstick securing bolt.
2. Remove the dipstick.
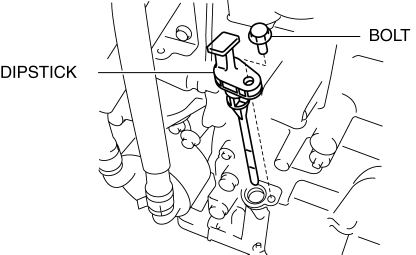
3. Adjust the ATF level.
a. Connect the M-MDS to the DLC-2 and display the PID TFT.
b. Warm up the engine until the ATF temperature is 50 °C {122 °F}
.
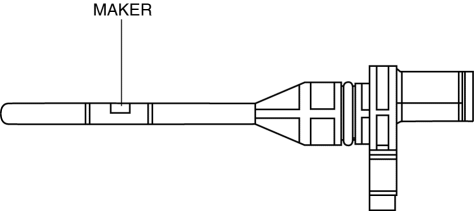
c. Remove the dipstick and wipe the ATF off using a rag while leaving the engine idling.
d. Insert the dipstick and pull it out again.
e. Verify that ATF is adhering to the central marker area on the dipstick.
-
If ATF is not adhering to the central marker area on the dipstick, adjust the ATF level to the central marker area.
NOTE:
-
The ATF color is blue.
-
Only use ATF FZ for the FW6A-EL, FW6AX-EL.
-
ATF type
-
ATF FZ
4. Insert the dipstick and install the securing bolt.
-
Tightening torque
-
8—11 N·m {82—112 kgf·cm, 71—97 in·lbf}
 Automatic
...
 Automatic Transaxle Fluid (ATF) Inspection [Fw6 A EL, Fw6 Ax EL]
CAUTION:
If the ATF level is not within the specification or ATF is not adhering to
the dipstick after warming up the engine, do not drive the vehicle. Otherwise,
the transaxle could be ...
Other materials:
Discharge Headlight Bulb
Purpose, Function
Charges the internal metallic element and emits white light resembling sunlight.
Construction
A mercury-free bulb has been adopted for the discharge headlight bulb.
The discharge headlight bulb is assembled to the front combination light.
The dis ...
Panel Light Control Indicator Alarm
Purpose
The panel light control indicator alarm notifies the driver that the panel
light brightness is either at maximum or minimum.
Function
If the panel light control switch is in the maximum rotation position right
or left when the TNS switch ON signal (TNS and headlight ...
Heater Core
Purpose
The heater core heats passing air.
Function
A portion of the engine coolant is taken into the heater core to heat the
air passing through the heater core.
Construction
The heater core consists of a tube which passes engine coolant, and the heat
ra ...
