Mazda CX-5 Owners Manual: Audio Set (Type B)
CAUTION
Do not press the panel strongly or press it with a sharp-pointed object. Otherwise, the panel could be damaged.
1 Power/Volume/Display/Sound Controls
2 Operating the Radio
3 Operating the Satellite Radio
4 Operating the Compact Disc (CD) Player
5 How to use the Auxiliary jack/USB port
6 Error Indication
7 Setup
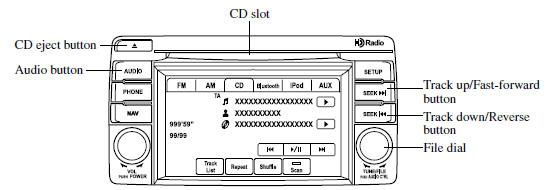
Power/Volume/Display/Sound Controls

Power ON/OFF
Switch the ignition to ACC or ON.
Press the power/volume dial to turn the audio system on. Press the power/volume dial again to turn the audio system off.
Volume adjustment
To adjust the volume, turn the power/ volume dial.
Turn the power/volume dial to the right to increase volume, to the left to decrease it.
Display setting
Press the setup button (  ) to display
the display setting screen.
Touch the  on-screen tab to select
the item you would like to change.
Brightness adjustment
 : Increase brightness
 : Decrease brightness
Contrast adjustment
 : Higher contrast
 : Lower contrast
Tint adjustment*1
 : Green tint enhancement color
 : Red tint enhancement color
*1 Adjustment can be performed only while in the rear view camera mode.
Color adjustment*1
 : To deepen a color
 : To fade a color
*1 Adjustment can be performed only while in the rear view camera mode.
Daytime/nighttime screen setting
The daytime or nighttime screen can be selected even if the headlights are illuminated or turned off (when bright screen is required at night or dark screen is required at noon).
 : Daytime screen setting
 : Nighttime screen setting
 : Switches screen automatically according
to headlight illumination condition
Display OFF
The display can be turned off. Touch the
 on-screen button to turn the display
off.
The display can be turned back on as follows:
• Press the audio button (
) to display the audio screen.
• Press the navigation button (
 ) to display the navigation screen.
• Press the phone button (
 ) to display the Bluetooth® dial screen.
• Press the setup button (
 ) to display the setup dial setting
screen.
• Press the audio control dial to display the setup sound setting screen.
• Shift to the R position to change to the rear view camera mode.
Shift to a position other than R to return to the display off condition.
NOTE
The screen can also be turned off using voice recognition.
Refer to Component Parts 8.
Display setting reset
All of the screen setting values can be reset to their initial settings.
1. Touch the  on-screen button.
2. Touch the  on-screen button.
Audio sound adjustment
Press the audio control dial or touch the
 on-screen button to display the sound
setting screen.
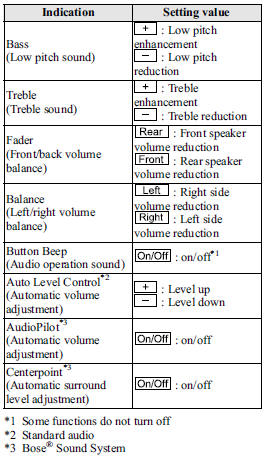
Automatic Level Control (ALC)
The automatic level control is a feature that automatically adjusts audio volume and sound quality according to the vehicle speed. The volume increases in accordance with the increase in vehicle speed, and decreases as vehicle speed decreases.
AudioPilot® 2*4
AudioPilot® 2 automatically adjusts audio volume and sound quality in accordance with the level of noise entering the vehicle interior while driving. When AudioPilot® 2 is turned on, the system automatically calculates the conditions for optimum hearing of sound which may be difficult to hear depending on exterior noise.
AudioPilot® 2 can be set on or off.
*4 AudioPilot® 2 is a registered trademark of Bose Corporation.
Centerpoint®*5
Centerpoint® offers you the experience of 5.1-channel surround sound in your vehicle even with your conventional 2- channel stereo CDs. Centerpoint® can be set on or off.
*5 Centerpoint® is a registered trademark of Bose Corporation.
NOTE
• Centerpoint® operates optimally with a 2- channel stereo CD. Audio files encoded with high compression can be played, however, they may result in poor sound quality.
• Centerpoint® is available for 2-channel stereo audio except for AM radio/FM radio/ AUX/Bluetooth® audio.
Sound setting reset
The settings for bass, treble, fade, and balance can be returned to their initial settings.
1. Touch the  on-screen button.
2. Touch the  on-screen button.
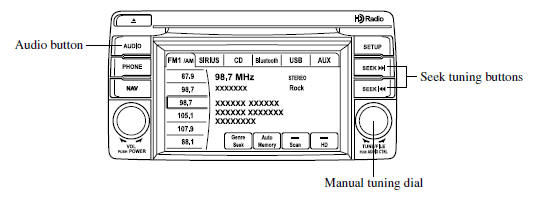
Operating the Radio
Radio ON
Press the audio button ( ) and touch
the  on-screen tab.
Band selection
Touch the on-screen tab to switch
the band as follows: FM1→FM2→AM
NOTE
•
 is displayed when FM1 is selected,
 is displayed when FM2 is selected,
and  is displayed when AM is selected.
• If the FM broadcast signal becomes weak, reception
automatically changes from STEREO to MONO for reduced noise, and the “STEREO” indicator
will no longer display.
Tuning
The radio has the following tuning methods: Manual, Seek, Scan, Preset channel, and Auto memory tuning. The easiest way to tune stations is to set them on preset channels.
NOTE
If the power supply is interrupted (fuse blows or the battery is disconnected), the preset channels will be erased.
Manual tuning
Turning the manual tuning dial will change the frequency higher or lower.
NOTE
When an  broadcast is being received,
a receivable multicast channel is also received.
Seek tuning
Pressing the seek tuning button (
 ) will cause the tuner to seek a higher
or lower frequency automatically.
NOTE
• If you continue to press and hold the
seek tuning button ( ) the
frequency will continue changing without stopping.
• When an
broadcast is being received, a receivable
multicast channel is also received.
Scan tuning
You can search for receivable radio stations by touching the
 on-screen button.
Scanning stops at each station for about five seconds.
Touch the  on-screen button one
time during reception to continue receiving a broadcasting station.
Preset channel tuning
The six preset channels can be used to store six AM and twelve FM stations.
1. To set a channel, first select AM, FM1, or FM2. Tune to the desired station.
2. Press and hold any of the preset onscreen buttons. The reception frequency is programmed and displayed on the preset button.
3. Repeat this operation for the other stations and bands you want to store.
When receiving a programmed frequency, select AM, FM1, or FM2 and touch the preset on-screen button.
NOTE
The programmed frequency is displayed on the preset button.
Auto memory tuning
This is especially useful when driving in an area where the local stations are unknown. Additional AM/FM stations can be stored without disturbing the previously set channels.
1. Touch the  on-screen button.
The auto memory preset list is displayed and the previously tuned frequency is received.
2. Touch the  on-screen button to display
the frequencies of up to ten radio stations on the auto memory preset list.
3. Touch the desired frequency.
NOTE
Touch the  on-screen button during
auto memory tuning to return to the AM/FM main screen.
Radio Data System (RDS)
Radio text information display
A maximum of 64 characters of radio text information sent from a broadcasting station is displayed in the audio display.
NOTE
Radio text information is a function of FM radio. Text information is not displayed in the following:
• During reception • Not an RDS broadcast • During HD reception • RDS broadcast, but radio text is not transmitted from the radio station
Genre Seek
Some FM stations transmit Genre codes (Program type like a Rock, News, and so
on). This code enables alternative stations transmitting the same Genre code to
be found quickly. To select from the genre list, touch the
 on-screen button while in the FM mode
and the desired Genre Seek.
(To scan for Genre Seek:)
1. Touch the genre type which you want to select.
2. Touch the  ,
,
 on-screen button.
Ex.)
89.3 is currently being received. With Rock selected as the Genre, the radio stations
broadcasting Rock are at the following frequencies.
98.3*1, 98.7, 104.3*1, 107.1 *1 Radio stations with good reception The frequency changes as follows each time the Genre Seek on-screen button is pressed.
89.3→98.3→104.3→98.3
NOTE
• Only one Genre can be selected.
• Touch the
 on-screen button to return to the
FM1 or FM2 main screen.
• It may not be possible to receive any station even if the Genre Seek function is used.
• If a program in the selected genre is not broadcast to a region, reception is not possible even if the Genre Seek function is used.
• The Genre Seek function searches for genre
code (program type) which FM analog broadcasts transmit.
 specialty programs (HD2-HD8) cannot
be searched because they are not FM analog broadcasts.
• If radio stations which are selected by scanning
using the Genre Seek function are 
broadcasting stations, they are changed from analog broadcasts to
 broadcasts after a few seconds if
the reception conditions are good. The genre is displayed after the switch, however,
the genre for FM analog broadcasts may differ.
HD Radio
What is HD Radio™ Technology and how does it work?
HD Radio™ Technology is the digital evolution of analog AM/FM radio. Your radio product has a special receiver which allows it to receive digital broadcasts (where available) in addition to the analog broadcasts it already receives. Digital broadcasts have better sound quality than analog broadcasts as digital broadcasts provide free, crystal clear audio. For more information, and a guide to available radio stations and programming, please visit www.hdradio.com.
Benefits of HD Radio™ Technology
(Information)
The song title, artist name and genre will appear on the screen when available by the radio station.
(Multicast)
On the FM radio frequency most digital stations have “multiple” or supplemental programs on each FM station.
Listening to HD Radio™ Technology
If  turns on by selecting a radio
station which is an broadcasting station, the analog broadcast is switched to an
broadcast automatically after a few seconds and then received. For FM,
 , and for AM,
 is displayed, and the
 illuminates in orange.
If the HD Radio broadcast is stopped and changed to an analog broadcast, press
down  to turn off
 .
.
Multicast channel selection (FM)
Press  on-screen button to switch
to the multi-cast channel for the displayed number.
The number of multi-cast channels which can be received differs depending on the radio station.
NOTE
• If an analog broadcast is received once
and  is received while HD1 is selected,
the audio unit switches to the  station
automatically.
• If the reception conditions worsen while receiving an HD specialty channel (HD2 to HD8), “No HD signal” is displayed, and audio output stops.
• Once an analog broadcast is received when
HD1 is selected from the preset channels, it is switched to
 automatically. If the radio reception
conditions are poor, or  is off, switching
to  broadcasts is not possible.
• When an HD specialty channel (HD2 to HD8)
is selected from the preset channels, “No HD signal” is displayed and no audio is
output until  is received. If the radio
reception conditions are poor, “No HD signal” continues to be displayed.
• If the
 is not illuminated or does not illuminate
in orange, information such as song titles of the
 station are received, however, the
audio output is analog. If information can no longer be received and the non-reception
condition continues, and
and
 onscreen buttons disappear.
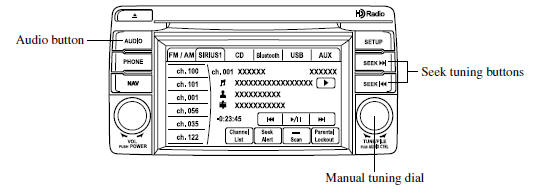
Operating the Satellite Radio
What is satellite radio?
With over 130 channels, SIRIUS Satellite Radio brings you more of what you love.
Get channels and channels of commercialfree music, plus sports, news, talk, entertainment and more.
Commercial-free music from nearly every genre
―rock to pop, hip-hop to country, jazz, classical and more. Plus live performances and artist-dedicated channels.
Live sports Play-by-Play & Expert Talk
―every NFL game, every NASCAR® race, 24/7 sports talk, college sports and more.
Exclusive entertainment, comedy and talk
―The biggest names, compelling talk, hilarious comedy.
World-class news plus local traffic and weather.
Sign up for SIRIUS Satellite Radio today! For more information, visit www.sirius.com. Satellite radio can be subscribed to and received in the United States (Except Alaska and Hawaii) and Canada.
How to Activate Satellite Radio
You must call SIRIUS to activate your service. Activation is free and takes only a few minutes.
SIRIUS service uses an ID code to identify your radio. This code is needed to activate SIRIUS service, and report any problems.
To activate your SIRIUS radio tuner, call a SIRIUS customer service specialist at 1- 888-539-7474 or you can visit SIRIUS online at www.sirius.com.
Please have the following information ready:
• SIRIUS ID (12-digit electronic serial no,
or ESN*1)
• Valid credit card information (may not be
required at initial sign-up)
*1 ESN: Electronic Serial Number Be sure you are parked outside with a clear view
of open sky, you will be instructed to turn on your radio (in SIRIUS mode and tuned
to channel 184).
Activation typically takes only 2―5 minutes.
Displaying the SIRIUS ID (ESN)
Turn the manual tuning dial and select channel 0 to display the twelve-digit Electronic Serial Number (ESN) for the SIRIUS tuner.
SIRIUS operation
All operations of the satellite radio are conducted by means of the audio unit.
SIRIUS radio mode selection
Touch the  on-screen tab on the
audio screen to receive the previously received SIRIUS channel.
Every time the  on-screen tab is touched,
the bank changes in the order shown below.
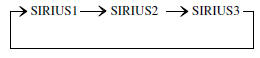
NOTE
• SIRIUS1, SIRIUS2 and SIRIUS3: six stations can be stored in each bank for convenient access to your favorite stations.
•
 is displayed when SIRIUS1 is selected,
 is displayed when SIRIUS2 is selected,
and  is displayed when SIRIUS3 is selected.
Operation in the initial state
It may take some time to start up the equipment when it is in the initial state, when there is a change in the user's subscription condition, when the firmware is updated or when the SIRIUS channel map is changed.
“Updating Channels XXX %” is displayed when the SIRIUS channel map is changed.
If the user contract content is changed, “Subscription Updated” is displayed.
When the firmware is updated, the “Updating Receiver” is displayed.
Updating could take as long as a few minutes depending on the geographical area. When the unit is in an initialized state, channel 184 is displayed after the display indicates “Updating Receiver”.
NOTE
Do not perform the following operation while “Updating Channels XXX %”, “Updating Receiver” is displayed. Otherwise, the updating procedure will be canceled.
• Turning off the audio power • Switching to other modes • Switching the ignition off
When the SIRIUS mode is switched to another mode, or when the power is turned off, the present channel which is being received is stored as the last channel.
Channel up
Turn the manual tuning dial to the right or press the seek up button (
).
Channel down
Turn the manual tuning dial to the left or press the seek down button (
 ).
).
NOTE
The channel is continuously switched to the next or previous channel while
the seek tuning button ( ,
,
) is continuously pressed.
Unsubscribed channel
When a channel which has been preset becomes unsubscribed or the current channel being listened to becomes unsubscribed, the following is displayed:
“Call 888-539-SIRIUS” “to subscribe”
NOTE
When the subscription contract is canceled, all of the channels including channel 184 appear as unsubscribed.
Preset channel programming
1. Select the desired channel to be programmed.
2. Long-press any of the preset on-screen buttons.
NOTE
Six stations can be stored in each bank, SIRIUS1, SIRIUS2 and SIRIUS3 for convenient access to your favorite stations.
Preset channel call-up
Touch the preset on-screen button for the channel which you want to select.
NOTE
In the initial setting, all channels are preset to 184.
Selection from channel list
Receivable channels can be displayed on the channel list screen. You can easily select the channel you want to listen from the list. Each category can be also displayed.
1. Touch the  on-screen button.
2. Touch the channel you want to listen from the list.
NOTE
Currently available channels (including parental locked channels) are all displayed in the list.
(Select from category list)
1. Touch the  on-screen button on
the channel list screen.
2. Touch the category name which you want to select from the list. Touch the
 on-screen button to return to the
channel list screen.
NOTE
A category can be set only when a channel which belongs to a category is being received.
Scan tuning
Touch the  on-screen button to automatically
sample stations. Scanning stops at each station for about five seconds.
To hold a station, touch the  onscreen
button again during this interval.
NOTE
Unsubscribed channels, invalid channels, parental lock channels and channel 0 are not subject to the scan, therefore these channels will skip automatically.
Channel number, channel name, category name, artist name, song titles and information display
The information regarding the channel which is currently being received is displayed.
NOTE
If channels not subscribed and parental locked channels can be received, the channel name, category name, artist name, song title and information is displayed.
Display scroll
If a whole title cannot be displayed at one time, touch the
 on-screen button on the right side
of the title. When the last character is displayed, touch the
 onscreen button to display the first
character of the title.
NOTE
The  on-screen button is displayed
only if a whole title cannot be displayed at one time.
Instant replay
This function allows you to rewind and replay the program that you were previously or are currently listening to.
When the  on-screen button is touched,
playback starts from the beginning of the current program.
When the on-screen button is touched
twice, playback starts from the beginning of the previous program.
Touch and hold the  on-screen button
to reverse the program while the button is being pressed.
When the  on-screen button is touched,
playback starts from the beginning of the next program.
When the  on-screen button is touched
while the last program is being played, the instant replay mode is canceled.
Touch and hold the  on-screen button
to fast-forward the program while the button is being pressed.
When touching and holding the button until the end of the program, the instant replay mode is canceled.
Instant replay (PAUSE)
If the  on-screen button is touched,
instant replay mode is turned on in a paused condition (PAUSE).
Touch the  on-screen button again
to resume playback from the point at which it was paused.
Parental lock
Parental lock, parental unlock, parental lock code change, and parental lock code reset can be set.
NOTE
• Touch the
 on-screen button during all the settings
to return to the previous display.
• Touch the
 on-screen button during the code and
master code input to delete an input number.
• If only a four-digit code or master code is input, “Done” can be selected.
• If the registered code has been forgotten, reset the code in “Initialize Parental Code” to [0000].
Parental lock
If a channel is locked, the channel is muted.
1. Turn the manual tuning dial to select the desired channel.
2. Touch the  on-screen button to display
the settings screen.
3. Touch the  on-screen button to display
the parental lock settings screen.
4. “Input Parental Code” is displayed, and input of the registered code is possible.
To enter a number, use the numerical keypad.
5. After inputting the four digits, touch the
 on-screen button to confirm the four
digits.
6. If the four digits match the registered code, “Channel XXX locked” appears and mute is turned on. If they do not match the registered code, “Wrong code” appears and then the display returns to “Input Parental Code”.
Parental unlock
Channels locked using the parental lock function can be unlocked.
1. Select a channel to be unlocked by turning the manual tuning dial.
2. Touch the  on-screen button to display
the settings screen.
3. Touch the  on-screen button to display
the parental unlock settings screen.
4. “Input Parental Code” is displayed, and input of the registered code is possible.
To enter a number, use the numerical keypad.
5. After inputting the four digits, touch the
 on-screen button to confirm the four
digits.
6. If the four digits match the registered code, “Channel XXX unlocked” appears and mute is canceled. If they do not match the registered code, “Wrong code” appears and then the display returns to “Input Parental Code”.
Parental-lock code change
When changing the code, the new code is input after the previous one is input first.
1. Touch the  on-screen button to
display the settings screen.
2. Touch the  onscreen button to display
the code change screen.
3. “Enter Current Code” is displayed, and input of the registered code is possible.
To enter a number, use the numerical keypad.
4. After inputting the four digits, touch the
 on-screen button to confirm the four
digits.
5. If the four digits match the registered code, “Enter New Code” is displayed.
If they do not match the registered code, “Wrong code” appears and then the display returns to “Enter Current Code”. To enter a number, use the numerical keypad.
6. After inputting the four digits, touch the
 on-screen button to confirm the four
digits.
7. “Code changed” appears to indicate that the new code input has been completed.
8. The display returns to its normal display.
NOTE
Channels locked before changing the code remain after changing the code. To unlock a channel, input the changed code.
Parental-lock code reset
If the registered code has been forgotten, reset the code to the default [0000] code.
1. Touch the  on-screen button to
display the settings screen.
2. Touch the  onscreen button to display
the code initial screen.
3. “Enter Master Code” is displayed, and input of the registered code is possible.
To enter a number, use the numerical keypad.
NOTE
Master code:
The Master Code is used to initialize or reinitialize the code in the event that
the code is not set to [0000] and/or the personalized code is not known. The initialization
process resets the code to [0000]. The master code can potentially defeat the intent
of the security of the parental lock if it is located by persons not authorized
by the owner to access certain channels.
SIRIUS Satellite Radio Master Code: [0913]
4. After inputting the four digits, touch the
 on-screen button to confirm the four
digits.
5. If the four digits match the master code, “Code initialized” appears. If they do not match the master code, “Wrong code” appears and the display returns to “Enter Master Code”.
6. The code returns to the default [0000] code.
Seek alert
The song title and artist name for the song currently being listened to, and team names at the sports game currently being listened to can be recorded as favorites.
The user is notified when a program begins which has favorites-related information recorded.
Selection from seek alert program list
Select the station you want to listen to from the list to receive the program.
Touch the  on-screen button to return
to the receiving screen.
Storing songs, artists, and sports team names
NOTE
• A maximum of 10 songs, artists, and sports team names each can be stored.
• If the song title, artist name, sports team name cannot be displayed, “No available items for this program” is displayed.
• Even if the song title, and artist name are displayed in the main screen, it may not be possible to record information for old songs.
• If a song name is stored, the song seek function is turned on.
• If an artist name is stored, the artist seek function is turned on.
• If a sports team name is stored, the game alert function is turned on.
1. Touch the  on-screen button to
display the current song and artist names currently being received. The sports team
name is displayed while the sports program is being received.
2. Select the item you want to store from song title, artist name and sports team name.
3. “XXXXX (song, artist, sports team name) stored” is displayed.
NOTE
If there is not enough available storage space, “Song Memory Full” or “Artist Memory Full” or “Team Memory Full” and “Delete one to store new one” are displayed. Delete from the list.
Seek alert setting
On or off switching to song seek, artist seek, or game alert function, and deletion of stored information can be performed.
Touch the  on-screen button and the
 on-screen button. Touch the button
you want to change from  ,
,
 , or
, or
 .
.
(On or off switching)
Touch the
 ,
,
 , and
, and
 on-screen button.
(Deletion)
1. Select song title, artist name, or sports team name that you want to delete from the list.
2. Touch the  on-screen button to display
“XXXXX (song, artist, sports team name) deleted”.
Operating the Compact Disc (CD) Player
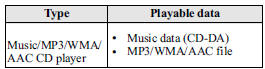
NOTE
If a disc has both music data (CD-DA) and MP3/WMA/AAC files, playback of the two or three file types differs depending on how the disc was recorded.
Inserting the CD
Insert the CD into the slot, label-side up.
The auto-loading mechanism will set the CD and begin play.
NOTE
There will be a short lapse before play begins while the player reads the digital signals on the CD.
Ejecting the CD
Press the CD eject button ( ) to
) to
eject the CD.
Playback
Press the audio button (  ) or
) or
on-screen tab with a CD inserted.
Pause
To pause playback, touch the  onscreen
button.
Touch the  on-screen button during
a pause to cancel it.
Fast-forward/Reverse
Operations using audio panel
Press and hold the fast-forward button (
) to advance through a track at high speed.
Press and hold the reverse button (
 ) to reverse through a track at high
speed.
Operations on screen
Touch and hold the  on-screen button
to advance through a track at high speed.
Touch and hold the  on-screen button
to reverse through a track at high speed.
Track search
Operations using audio panel
Press the track up button (  ) or
) or
turn the file dial clockwise once to skip forward to the beginning of the next track.
Press the track down button (  ) or
) or
turn the file dial counterclockwise within a few seconds after playback begins to
track down to the beginning of the previous track.
Press the track down button ( ) or
) or
turn the file dial counterclockwise after a few seconds have elapsed to start playback
from the beginning of the current track.
Operations on screen
Touch the  on-screen button once to
skip forward to the beginning of the next track.
Touch the  on-screen button within
a few seconds after playback begins to track down to the beginning of the previous
track.
Touch the  on-screen button after
a few seconds have elapsed to start playback from the beginning of the current track.
Displaying file list
The desired file list in the CD can be viewed.
During music CD playback
Touch the  on-screen button to display
the track list in the CD.
During MP3/WMA/AAC CD playback (Viewing file list in desired folder)
1. Touch the  on-screen button to
display the folder list in the CD.
2. Touch the folder which you want to select.
(Viewing file list of current folder)
Touch the  on-screen button.
Selecting file/track
Select the file/track you want to play.
During music CD playback
1. Touch the  on-screen button to
display the track list in the CD.
2. Touch the track you want to play.
During MP3/WMA/AAC CD playback
NOTE
Press the  on-screen button on
the file list screen to display the list of folders.
(Selection from all folders in CD)
1. When the  on-screen button is
touched, the folder list in the CD is displayed.
2. Select the folder name from the displayed list.
3. The files in the selected folder are displayed.
4. Select the file you want to play.
(Selection from inside folder in which a song is currently being played)
1. Press the  on-screen button to
select the song list.
2. Touch the song you want to listen to.
Music scan
During music CD playback
This function scans the titles on a CD and plays 10 seconds of each song to aid you in finding a song you want to listen to.
1. Touch the  on-screen button during
playback to play 10 seconds of each subsequent track starting from the next song.
2. Touch the  on-screen button during
playback of the song you want to listen to and continue the playback from that point.
During MP3/WMA/AAC CD playback
This function scans the titles in a folder currently being played and plays 10 seconds of each song to aid you in finding a song you want to listen to.
1. Touch the  on-screen button during
playback to play 10 seconds of each subsequent track starting from the next song.
2. Touch the  on-screen button during
playback of the song you want to listen to and continue the playback from that point.
NOTE
• If the unit is left in scan, normal playback will resume where scan was selected.
• If all the tracks are scanned, the unit will resume normal playback.
Repeat playback
During music CD playback
Touch the  on-screen button during
playback to play the song currently being played repeatedly.“
” is displayed during playback.
Touch the on-screen button while
“ ” is displayed to cancel.
During MP3/WMA/AAC CD playback
(Track repeat)
Touch the on-screen button to play
the song during playback repeatedly. “
” is displayed during playback.
Touch the on-screen button two times
while “ ” is displayed to cancel.
(Folder repeat)
Touch the on-screen button two times
to play the songs in the folder repeatedly. “
” is displayed during playback.
Touch the on-screen button while
“ ” is displayed to cancel.
Shuffle playback
During music CD playback
Touch the  on-screen button during
playback to play the songs in the CD shuffle. “
” is displayed during playback.
Touch the  on-screen button while
“  ” is displayed to cancel.
During MP3/WMA/AAC CD playback (Folder shuffle)
Touch the  on-screen button during
playback to play the songs in the folder shuffle. “
 ” is displayed during playback.
Touch the  on-screen button two times
while “  ” is displayed to cancel.
(CD shuffle)
Touch the on-screen button two times
during playback to play the songs in the CD shuffle. “
” is displayed during playback.
Touch the on-screen button while
“ ” is displayed to cancel.
Display scroll
If a whole title cannot be displayed at one time, touch the
 on-screen button on the right side
of the title. When the last character is displayed, touch the
 onscreen button to display the first
character of the title.
NOTE
• The
 on-screen button is displayed only
if a whole title cannot be displayed at one time.
• The information viewable in the display is only CD information (such as artist name, song title) which has been recorded to the CD.
• This unit cannot display some characters.
Character which cannot be displayed are indicated by an asterisk (
).
• The number of characters which can be displayed is restricted.
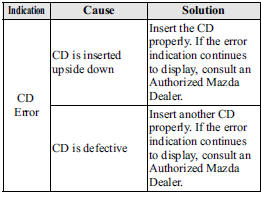
Message Display
If “CD Error” is displayed, it means that there is some CD malfunction. Check the CD for damage, dirt, or smudges, and then properly reinsert. If the message appears again, take the unit to an Authorized Mazda Dealer for service.
How to use Auxiliary jack/USB port
Audio can be heard from the vehicle's speakers by connecting a commerciallyavailable portable audio unit to the auxiliary jack.
Use a commercially-available, nonimpedance (3.5 ) stereo mini plug cable.
Contact an Authorized Mazda Dealer for details.
In addition, audio can be played from the vehicle audio device by connecting USB memory or an iPod to the USB port.
Refer to AUX/USB/iPod mode on .
Error Indications
If you see an error indication on the display, find the cause in the chart. If you cannot clear the error indication, take the vehicle to an Authorized Mazda Dealer.
Setup
You can customize settings in the setup display as follows:
Display
Refer to Power/Volume/Display/Sound Controls 6.
Sound
Refer to Power/Volume/Display/Sound Controls 6.
Vehicle
• Door Locks • Light Control • Wipers Control
1. Press the setup button ( )
)
2. Touch the  on-screen tab to display
the vehicle setting screen.
3. Touch the desired setting item.
4. Select the desired setup item from the list by touching it.
5. Touch the  on-screen button.
Language
1. Press the setup button ( ).
2. Touch the  on-screen tab to display
the language setting screen.
3. Touch the desired language from the list.
4. Touch the on-screen button.
Default (Vehicle settings only)
1. Press the setup button ( ).
2. Touch the  on-screen tab.
3. Touch the  on-screen button.
4. Touch the  on-screen button.
5. Touch the on-screen button.
NOTE
The settings for display, sound, and language cannot be initialized.
 Audio Set (Type A)
1 Power/Volume/Sound Controls
2 Operating the Radio
3 Operating the Compact Disc (CD) Player
4 How to use auxiliary jack/USB port
5 Error Indications
Power/Volume/Sound Controls
Power ON/O ...
 Audio Control Switch Operation
When the audio unit is turned on, operation of the audio unit from the steering
wheel is possible.
NOTE
Because the audio unit will be turned off under the following conditions,
the switches wil ...
Other materials:
Generator [Skyactiv G 2.0]
Purpose, Function
The generator operates by obtaining drive force from the engine via the drive
belt and generates the required electricity for electronic devices.
Construction
The generator is installed on the engine left front side.
Output control is perfor ...
Front Door Latch Switch
Purpose, Function
Switches on/off in conjunction with the latch lever rotation, and detects
the front door open/closed condition by the voltage which is changed by the
rear body control module (RBCM).
Construction
The switch is turned on/off by the rotation of the latch lev ...
Audio Unit (Without Color LCD)
NOTE:
“iPod” is a registered trademark of Apple Inc. in the United States and other
countries.
Outline
The audio unit controls the CD, radio, exterior input devices (AUX/USB/iPod)
and the display.
Function
The display integrated into the audio unit display ...
