Mazda CX-5 Service & Repair Manual: Front Door Latch Switch
Purpose, Function
-
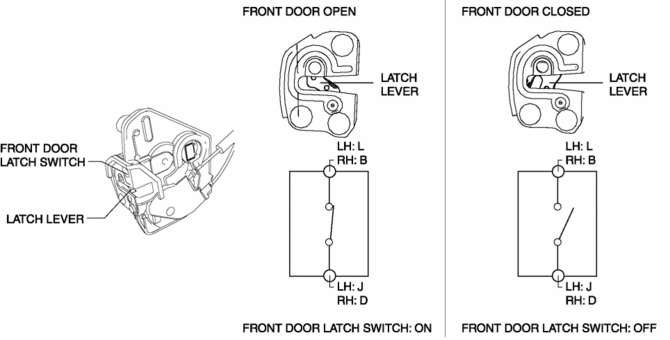
Switches on/off in conjunction with the latch lever rotation, and detects the front door open/closed condition by the voltage which is changed by the rear body control module (RBCM).
Construction
-
The switch is turned on/off by the rotation of the latch lever.
-
When the front door is completely opened, the front door latch switch turns on (contact point: Closed).
Operation
Door open (unlatch) operation
1. When the inner or outer handle is operated, the door opens, the latch lever is in an unlatched condition, and the front door latch switch turns on.
Door closed (latched) operation
1. When a door is closed, the front door lock striker enters the latch lever groove.
2. When the door is further closed, the latch lever is pressed by the front door lock striker and it rotates.
3. When the door is completely closed, the latch lever is in a latched condition, the front door latch switch turns off.
Fail-safe
-
Function not equipped.
 Front Door Latch And Lock Actuator Removal/Installation
1. Perform the front door glass preparation..
2. Disconnect the negative battery cable..
3. Remove the following parts:
a. Inner garnish.
b. Front door trim.
c. Inner handle.
d. Front door ...
 Front Door Latch Switch Inspection
1. Perform the front door glass preparation..
2. Disconnect the negative battery cable..
3. Remove the following parts:
a. Inner garnish.
b. Front door trim.
c. Front door glass.
d. Front ...
Other materials:
Installation Of Radio System
The control modules and control unit have been designed with sufficient attention
to radio wave disturbances from the outside. However, observe the following precautions
when installing the radio set to the vehicle to prevent adverse effects on the control
modules and control unit.
Inst ...
Car Navigation System Does Not Operation [Car Navigation System]
Possible DTC
Even if the map screen is touched, the car-navigation system cannot be
operated
POSSIBLE CAUSE
Audio unit malfunction (bad LCD panel)
Car-navigation unit malfunction
Diagnosti ...
Passenger Compartment Temperature Sensor [Full Auto Air Conditioner]
Purpose
The passenger compartment temperature sensor detects the cabin temperature.
Function
The passenger compartment temperature sensor converts the detected temperature
to an electric signal.
Construction
A thermistor-type passenger compartment temperature sens ...
