Mazda CX-5 Service & Repair Manual: Audio Unit (Without Color LCD)
NOTE:
-
“iPod” is a registered trademark of Apple Inc. in the United States and other countries.
Outline
-
The audio unit controls the CD, radio, exterior input devices (AUX/USB/iPod) and the display.
Function
-
The display integrated into the audio unit displays audio information such as CD and radio related information.
-
Records the following items which the user has set.
|
Item |
Specification |
|
|
Preset memory |
AM |
6 |
|
FM1 |
6 |
|
|
FM2 |
6 |
|
|
SIRIUS (SAT1) |
6 |
|
|
SIRIUS (SAT2) |
6 |
|
|
SIRIUS (SAT3) |
6 |
|
USB/iPod applicable
-
A USB device such as USB memory or an iPod connected to the auxiliary jack/USB port can be controlled by the audio unit.
Latin character display
-
Information such as CD and radio related information can be displayed in the audio unit display in Latin characters.
Specification
|
Item |
Specification |
||
|
Rated voltage |
(V) |
12 |
|
|
Frequency range |
AM |
(kHz) |
530—1,710 |
|
FM |
(MHz) |
87.75—107.9 |
|
|
Amplifier maximum output |
(W) |
25?4 |
|
|
Output impedance |
(ohm) |
4 |
|
Construction
-
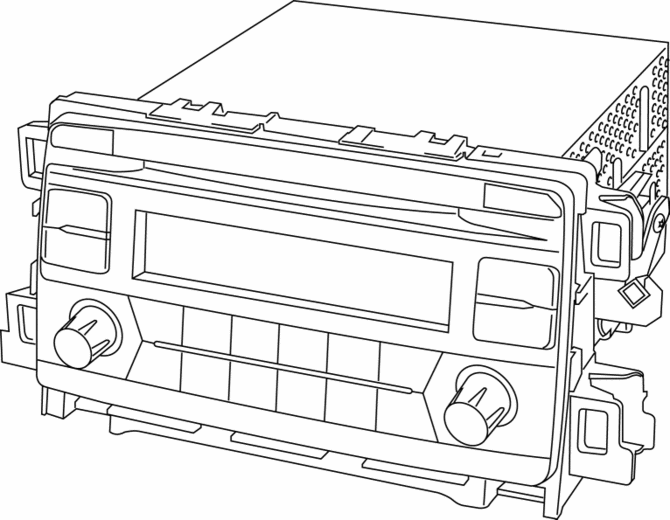
An audio unit with integrated AM/FM tuner/MP3/WMA (Windows Media Audio)/AAC (Advanced Audio Coding) applicable CD player is assembled to the audio panel.
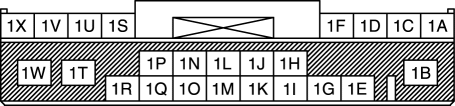
Terminal layout and signal
Audio unit
|
Terminal |
Signal |
|
|
|
1A |
Front door speaker LH (+) |
|
1B |
B+ |
|
|
1C |
Front door speaker LH (-) |
|
|
1D |
Front door speaker RH (+) |
|
|
1E |
TNS (+) |
|
|
1F |
Front door speaker RH (-) |
|
|
1G |
TNS (–) |
|
|
1H |
— |
|
|
1I |
Vehicle speed signal |
|
|
1J |
— |
|
|
1K |
— |
|
|
1L |
— |
|
|
1M |
— |
|
|
1N |
Steering switch 1 |
|
|
1O |
— |
|
|
1P |
Steering switch 2 |
|
|
1Q |
— |
|
|
1R |
ACC |
|
|
1S |
Rear door speaker LH (+) |
|
|
1T |
— |
|
|
1U |
Rear door speaker LH (-) |
|
|
1V |
Rear door speaker RH (+) |
|
|
1W |
Power ground |
|
|
1X |
Rear door speaker RH (-) |
|
|
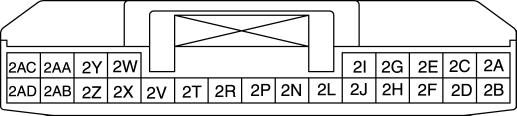
|
2A |
— |
|
2B |
— |
|
|
2C |
— |
|
|
2D |
— |
|
|
2E |
— |
|
|
2F |
— |
|
|
2G |
— |
|
|
2H |
— |
|
|
2I |
— |
|
|
2J |
— |
|
|
2L |
— |
|
|
2N |
— |
|
|
2P |
— |
|
|
2R |
— |
|
|
2T |
— |
|
|
2V |
— |
|
|
2W |
AUX control |
|
|
2X |
AUX LH, RH (-) |
|
|
2Y |
AUX signal RH (+) |
|
|
2Z |
AUX signal LH (+) |
|
|
2AA |
— |
|
|
2AB |
— |
|
|
2AC |
— |
|
|
2AD |
— |
|
|
|
3A |
USB power ground |
|
3B |
USB data (+) |
|
|
3C |
USB power supply |
|
|
3D |
USB data (-) |
|

Antenna feeder connector
|
Terminal |
Signal |
|
|
|
4A |
ANT CONT |
|
4B |
Antenna |
|

Switch Location
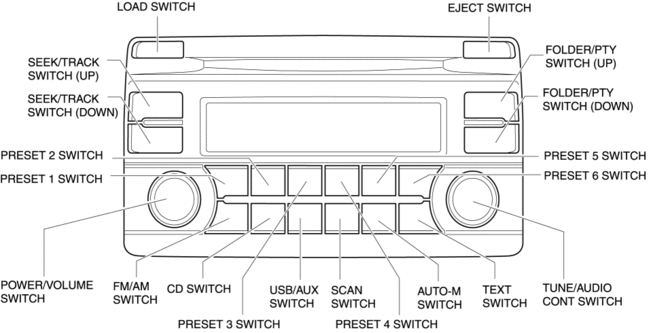
Operation
-
Refer to AUDIO SYSTEM.
Fail-safe
-
Function not equipped.
 Audio Unit (With Color LCD)
NOTE:
“iPod” is a registered trademark of Apple Inc. in the United States and other
countries.
Purpose
The audio unit controls the CD, radio, exterior input devices (AUX/US ...
 Audio Unit Personalization Features Setting Procedure
Door Locks Systems
1. Switch the ignition ON (engine off or on).
2. Turn the audio unit power on.
3. Select the following from the audio unit screen.
a. “Setup”
b. “Vehicle”
c. “D ...
Other materials:
Fuel Pump Control Module
Purpose, Function
Controls the voltage applied to the fuel pump for reducing fuel pump load
and improving fuel economy.
Controls the voltage applied to the fuel pump based on the control signal
from the PCM.
Construction
The fuel pump control module is installed bel ...
How to Use This Manual
We want to help you get the most driving pleasure from your vehicle. Your owner's
manual, when read from cover to cover, can do that in many ways.
Illustrations complement the words of the manual to best explain how to enjoy
your Mazda. By reading your manual, you can find out about the fea ...
Air Bag System [Two Step Deployment Control System]
Outline
The air bag system is a device that supplements the passenger restraint function
of the seat belts. The air bag system will not have the designed effect if the
seat belts are not worn properly.
The air bag system is composed of the following parts:
...
