Mazda CX-5 Service & Repair Manual: Windshield Removal
1. Disconnect the negative battery cable..
2. Remove the following parts:
a. Windshield wiper arm and blade.
b. Cowl grille.
c. Rain sensor (with auto light/wiper system).
d. Auto-dimming mirror (with auto-dimming mirror).
e. Rearview mirror (without auto-dimming mirror).
f. A-pillar trim.
g. Sunvisor.
h. Front map light.
i. Assist handle.
3. Set the headliner out of the way.
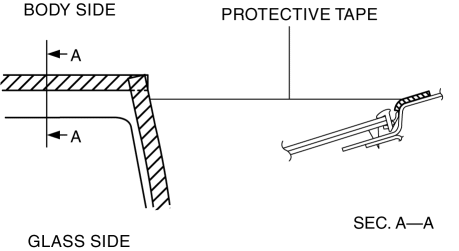
4. Apply protective tape along the edge of the body.

NOTE:
-
Overlap and adhere the protective tape to the corners to prevent damage.
5. Remove the windshield molding by pulling it outward.
NOTE:
-
If the windshield molding is difficult to remove, warm the windshield molding using a hot air blower.
-
The windshield molding is a replacement part.
Not Reusing Windshield
WARNING:
-
Using piano wire with bare hands can cause injury. Always wear gloves when using piano wire.
NOTE:
-
If it is difficult to cut sealant, use piano wire and follow the procedure under “Reusing Windshield”.
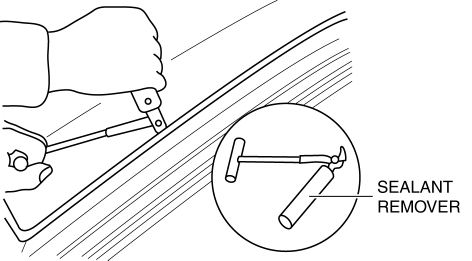
1. Cut out the sealant all around the glass using a sealant remover.

2. Remove the windshield.
Reusing Windshield
WARNING:
-
Using piano wire with bare hands can cause injury. Always wear gloves when using piano wire.
CAUTION:
-
Because the lens for rainfall/illumination level detection is integrated with the windshield, the auto light/wiper systems may not operate correctly if the lens is damaged. When removing the windshield, be careful not to damage the lens. If the lens is damaged, replace the windshield.
NOTE:
-
Before removing the windshield from the body, mark the position of the windshield by affixing tape to the windshield and body panel.
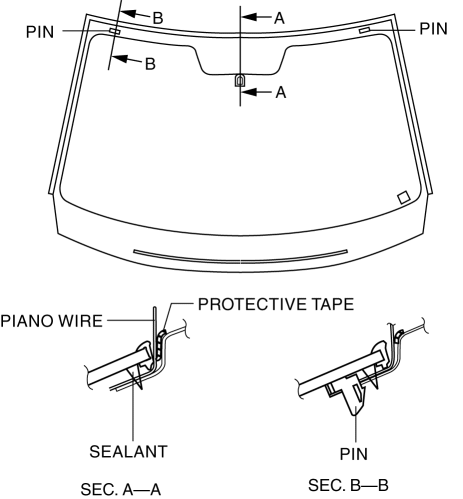
1. Avoiding the pin on the inside of the vehicle, insert piano wire which has been cut to sufficient length.

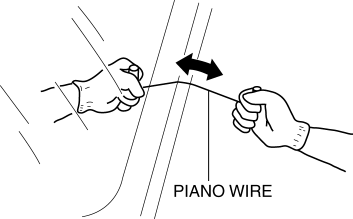
2. Wind each end of piano wire around a bar.
NOTE:
-
Use a long sawing action to spread the work over the whole length of piano wire to prevent it from breaking due to localized heating.
3. Secure one end of piano wire, and while pulling the other end, cut the sealant around the windshield.

4. Pinch the pin from the inside of the vehicle and detach it.
5. Remove the windshield.
6. If the pin is damaged, remove the pin.
NOTE:
-
Before removing the pin from the windshield glass, place an alignment mark on the windshield.
 Windshield Installation
WARNING:
Using a utility knife with bare hands can cause injury. Always wear gloves
when using a utility knife.
CAUTION:
If a door is opened or closed when all the window glas ...
 Horn
Horn
...
Other materials:
Rear Brake (Disc) Removal/Installation
1. Loosen the adjusting nut..
2. Remove in the order indicated in the table.
3. Install in the reverse order of removal.
4. After installation, add brake fluid, bleed the air, and inspect for fluid
leakage..
5. Pump the brake pedal a few times and inspect the following:
The disc pa ...
Clock
Purpose
The clock displays the current time, the passenger and rear seat belt status,
the passenger air bag deactivation (PAD) switch status, and the seat warmer
operation status to notify the user.
Function
Stores the time set by the user and displays the current time.
...
Front Combination Light Removal/Installation
WARNING:
Incorrect servicing of the discharge headlights could result in electrical
shock. Before servicing the discharge headlights, always refer to the service
warnings..
NOTE:
Fogging or condensation on the inside of the front combination lights may
occur due to a n ...
