
Mazda CX-5 Owners Manual: Turn and Lane-Change Signals
NOTE
• If an indicator light stays on without flashing or if it flashes abnormally, one of the turn signal bulbs may be burned out.
• A personalized function is available to change the turn indicator sound volume.
Refer to Personalization Features on .
Turn Signals
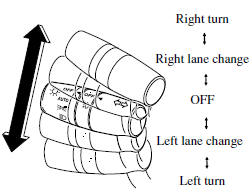
Move the signal lever down (for a left turn) or up (for a right turn) to the stop position. The signal will self-cancel after the turn is completed.
If the indicator light continues to flash after a turn, manually return the lever to its original position.
Green indicators on the dashboard show which signal is working.
Lane-Change Signals
(Without Smart Turn)
Move the lever slightly toward the direction of the change ―until the indicator flashes― and hold it there. It will return to the off position when released.
(With Smart Turn)
To signal a lane change, press the turn signal lever up or down halfway and release. After releasing the lever, the turn signal indicator flashes three times.
NOTE
A personalized function is available to change the number of flashes.
Refer to Personalization Features .
 Fog Lights
Use this switch to turn on the fog lights.
The fog lights will improve visibility at night and during foggy conditions.
To turn the fog lights on, rotate the fog light switch to the
position.
The ...
 Windshield Wipers and Washer
The ignition must be switched ON.
WARNING
Use only windshield washer fluid or plain water in the reservoir:
Using radiator antifreeze as washer fluid is dangerous. If sprayed on the windshield,
i ...
Other materials:
Exhaust Manifold
Purpose, Function
By lengthening the exhaust passage, the transmission of exhaust pressure
waves to other cylinders can be delayed, and the amount of gas exhausted from
a cylinder and forced back inside the combustion chamber is reduced By reducing
the residual gas, the temperature i ...
Front Seat Rail Guide Cover Removal/Installation
WARNING:
Handling a side air bag improperly can accidentally operate (deploy) the
air bag, which may seriously injure you. Read the service warnings/cautions
in the Workshop Manual before handling the front seat (side air bag integrated)..
If the sliding mechanisms on both side ...
Keyless Beeper
Purpose, Function
Notifies the user that the lock/unlock operation of the advanced keyless
entry system is completed, and warns if the system is operated incorrectly.
Construction, Operation
Installed inside the cowl grille.
The keyless beeper operates based on the LF ...
