Mazda CX-5 Owners Manual: Specifications
Specifications
Engine

Electrical System

CAUTION
When cleaning the iridium plugs, do not use a wire brush. The fine particulate coating on the iridium alloy and platinum tips could be damaged.
Lubricant Quality
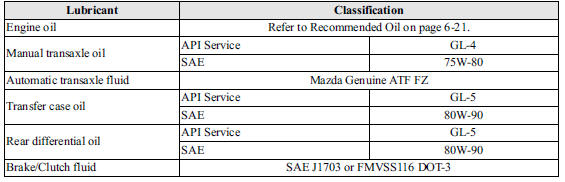
NOTE
Refer to Introduction on for owner's responsibility in protecting your investment.
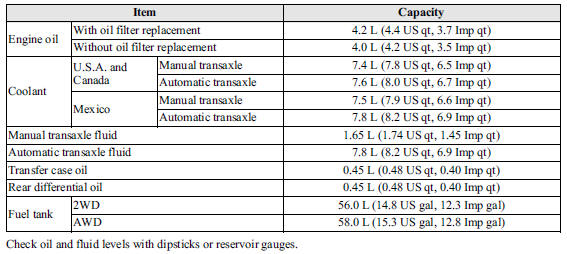
Capacities
(Approximate Quantities)
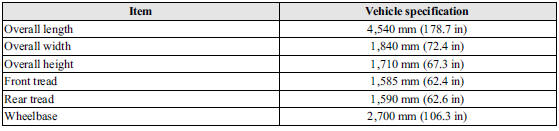
Dimensions
Weights
2WD

AWD

Air Conditioner

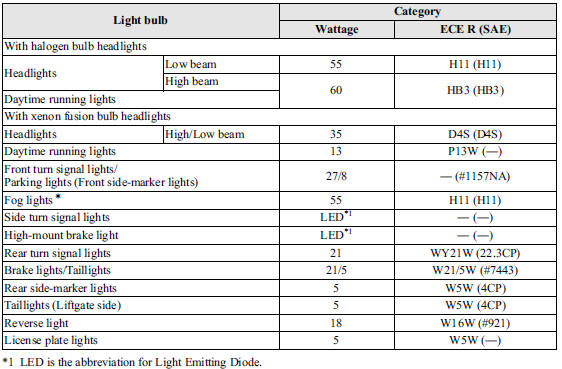
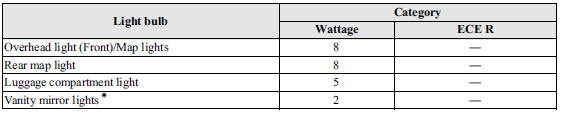
Light Bulbs
Exterior light
Interior light
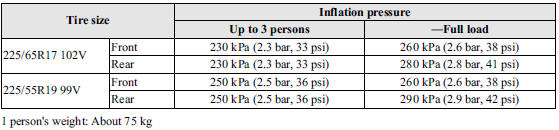
Tires
NOTE
The tires have been optimally matched with the chassis of your vehicle.
When replacing tires, Mazda recommends that you replace tires of the same type originally fitted to your vehicle. For details, contact an Authorized Mazda Dealer.
Check the tire pressure label for tire size and inflation pressure.
Refer to Tire Inflation Pressure 6.
After adjusting the tire pressure, initialization of the tire pressure monitoring system is necessary to make the system operates normally.
Refer to Tire Pressure Monitoring System Initialization 3.
Standard tire
(U.S.A. and Canada)

(Mexico)
Temporary spare tire
(U.S.A. and Canada)

(Mexico)

 Identification Numbers
Vehicle Information Labels
Vehicle Identification Number
The vehicle identification number legally identifies your vehicle. The number
is on a plate attached to the left top side of the dashboard ...
 Personalization Features
Personalization Features
...
Other materials:
Fuse Block
Purpose
Fuses used by each system are grouped and housed together for smooth inspection
and replacement servicing.
Function
Fuses used by each system are grouped and housed together.
Construction
Installed inside the front side trim (LH).
Operation
Fu ...
Air Bag Module And Pre Tensioner Seat Belt Disposal Procedures [Two Step Deployment
Control System]
WARNING:
A live (undeployed) air bag module, pre-tensioner seat belt or lap pre-tensioner
seat belt may accidentally operate (deploy) when it is disposed of and cause
serious injury. Always refer to the “AIR BAG MODULE AND PRE-TENSIONER SEAT
BELT DEPLOYMENT PROCEDURES” and ...
Glass/Windows/Mirrors
Outline
The following glass has been adopted.
Windshield
Front door glass
Rear door glass
Rear door quarter glass
Quarter window glass
Rear window glass
Outer mirror glass
The following mirrors h ...
