Mazda CX-5 Service & Repair Manual: Seat Belt Warning Light
Purpose
-
The seat belt warning light warns the driver that a seat belt is not fastened.
Function
-
The instrument cluster flashes/illuminates the seat belt warning light based on the following CAN signals:
-
Vehicle speed signal sent from PCM
-
Driver/passenger buckle switch signal, occupancy detection sensor signal sent from SAS control module
Driver/passenger seat belt warning light display function
-
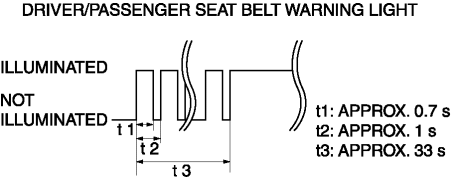
The driver/passenger seat belt warning light has a warning for when the vehicle is stopped, while the vehicle is being driven, and subsequent warnings while the vehicle is being driven.
-
When all of the following conditions are met, it flashes/illuminates.
-
Ignition switch ON (engine off or on)
-
Driver/passenger buckle switch on signal (seat belt unfastened) is detected
-
Occupancy sensor on signal (occupant in passenger seat) is detected (passenger seat belt warning light only)
-
The driver/passenger seat belt warning flash/illumination pattern is as shown in the figure.
-
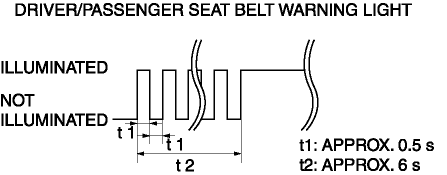
When all of the following conditions are met, it flashes/illuminates
-
Vehicle speed is approx. 20 km/h {12 mph} or more
-
Driver/passenger buckle switch on signal (seat belt unfastened) is detected
-
Occupancy sensor on signal (occupant in passenger seat) is detected (passenger seat belt warning light only)
-
The driver/passenger seat belt warning flash/illumination pattern is as shown in the figure.
-
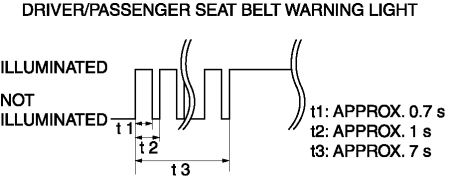
When all of the following conditions are met, it flashes/illuminates
-
Vehicle speed is approx. 20 km/h {12 mph} or more
-
Occupancy sensor on signal (occupant in passenger seat) is detected (passenger seat belt warning light only)
-
After warning while vehicle is being driven operates, buckle switch off signal (seat belt fastened) to on signal (seat belt unfastened) is detected
-
The driver/passenger seat belt warning flash/illumination pattern is as shown in the figure.
-
Warning when vehicle is stopped
-
Warning while vehicle is driven
-
Subsequent warning while vehicle is driven
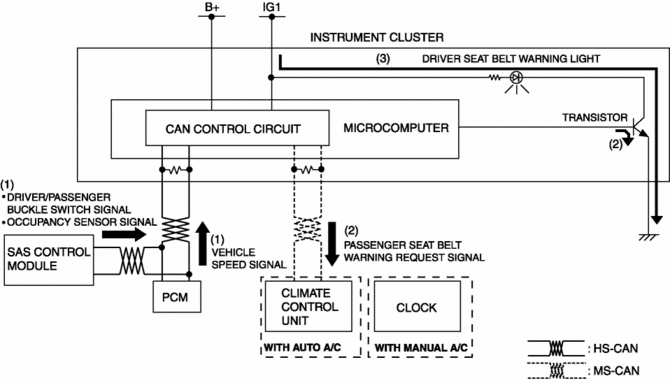
Construction
-
The microcomputer in the instrument cluster controls the illumination/flashing/turning off of the seat belt warning light based on the driver/passenger buckle switch signal and occupancy sensor signal from the SAS control module, and the vehicle speed signal from the PCM.
-
The driver seat belt warning light is set in the instrument cluster.
-
The passenger seat belt warning light are set in the clock (with manual A/C)/climate control unit (with auto A/C). For details on the passenger seat belt warning light, refer to CLOCK (with manual A/C)/CLIMATE CONTROL UNIT [FULL-AUTO AIR CONDITIONER] (with auto A/C).
Operation
1. The instrument cluster receives (1) a vehicle speed signal from the PCM, and a driver/passenger seat buckle switch signal and occupancy sensor signal from the SAS control module.
2. The instrument cluster microcomputer turns the transistor on (2) intermittently for flashing and continuously for illumination based on the each signal. In addition, it sends a driver/passenger seat belt warning request signal to the clock (with manual A/C)/climate control unit (with auto A/C).
3. When the transistor turns on intermittently, the driver seat belt warning light flashes (3), when it turns on continuously, the driver seat belt warning light illuminates (3).
Fail-safe
-
Function not equipped.
 Seat Belt Warning Alarm
Purpose
The seat belt warning alarm warns occupants that a seat belt is not fastened.
Function
The instrument cluster sounds the seat belt warning alarm based on the following
C ...
 Security Indicator Light
Purpose
Notifies the driver that the immobilizer system is operating.
Function
If a malfunction is detected in the immobilizer system, the DTC can be verified
by the flashing pa ...
Other materials:
Turn And Hazard Indicator Alarm
Purpose
The turn and hazard indicator alarm notifies the driver that a turn light
or the hazard warning lights are flashing.
Function
When the instrument cluster receives the turn signal/hazard warning indicator
light illumination request signal sent from the front body con ...
Hood Release Cable Removal/Installation
1. Disconnect the negative battery cable..
2. Remove the following parts:
a. Front bumper.
b. Front combination light (LH).
c. Front mudguard (LH).
d. Hood release lever.
3. Disconnect the hood release cable from the hood latch.
4. While pressing the tabs of the clip in the direction o ...
Parking Mechanism [Fw6 A EL, Fw6 Ax EL]
Purpose/Function
The parking mechanism locks the output gear when the selector lever is shifted
to the P position which locks the driving wheels against rotation to prevent
coasting when parking the vehicle.
Construction/Operation
For component parts related to the parking ...
