Mazda CX-5 Service & Repair Manual: Room Straight Line Dimensions (2) [Dimensions]
|
Point symbol |
Designation |
Hole diameter or bolt or nut size mm {in} |
|
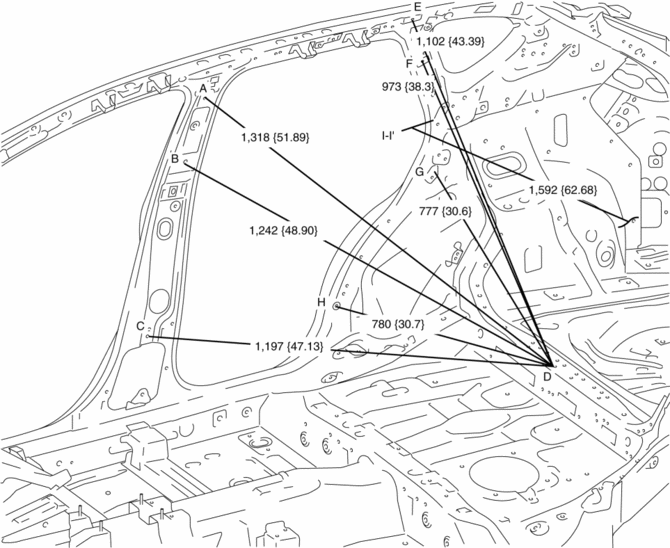
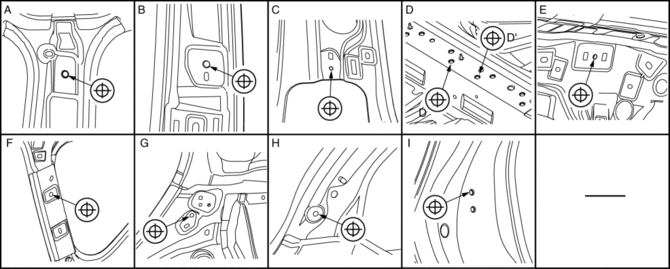
A |
Front seat belt upper anchor installation |
?14 {0.55} |
|
B |
Front seat belt upper anchor installation |
?14 {0.55} |
|
C |
Center pillar inner datum hole |
?7 {0.3} |
|
D |
Rear seat installation hole |
?14 {0.55} |
|
E |
Rear pillar inner datum hole |
?7 {0.3} |
|
F |
C-pillar trim installation hole |
?10 {0.39} |
|
G |
Trunk side trim installation hole |
?8.6 {0.34} |
|
H |
Rear pillar inner datum hole |
?8.6 {0.34} |
|
I |
Rear door striker installation hole |
?13 {0.51} |
 Room Straight Line Dimensions (1) [Dimensions]
Point symbol
Designation
Hole diameter or bolt or nut size mm {in}
A
Front pillar inner datum hole
?7 {0.3}
...
 Room Straight Line Dimensions (3) [Dimensions]
Point symbol
Designation
Hole diameter or bolt or nut size mm {in}
A
Rear seat installation hole
?14 {0.55}
...
Other materials:
Audio Set (Type B)
CAUTION
Do not press the panel strongly or press it with a sharp-pointed object. Otherwise,
the panel could be damaged.
1 Power/Volume/Display/Sound Controls
2 Operating the Radio
3 Operating the Satellite Radio
4 Operating the Compact Disc (CD) Player
5 How to use the Auxiliary jack/U ...
Engine Oil Control
Outline
The PCM reduces the oil pump load applied to the engine by controlling the
appropriate engine hydraulic pressure according to the engine operation conditions.
The engine hydraulic pressure switches in two steps. When hydraulic pressure
is not needed, the oil pump dischar ...
Fuel Tank Removal/Installation
WARNING:
Fuel is very flammable liquid. If fuel spills or leaks from the pressurized
fuel system, it will cause serious injury or death and facility breakage. Fuel
can also irritate skin and eyes. To prevent this, always complete the “Fuel
Line Safety Procedure”, while referring ...
