
Mazda CX-5 Service & Repair Manual: Roof Molding Installation
1. Install the roof molding to the front T-studs.
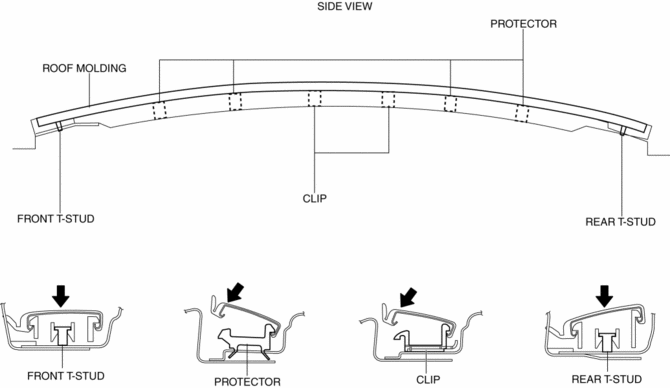
2. Hook the roof molding to clips and attach the roof molding while pressing it in the direction of the arrow shown in the figure.
3. Install the roof molding to the rear T-stud.
4. Press in the protectors installation positions shown in the figure and firmly adhere them to the body.
 Headliner Removal/Installation
1. Disconnect the negative battery cable..
2. Remove the following parts:
a. Sunroof seaming welt (with sunroof system).
b. A-pillar trim.
c. Front map light.
d. Sunvisor.
e. Front scuff p ...
 Roof Molding Removal
1. Insert a tape-wrapped flathead screwdriver in the position shown in the figure.
2. Rotate a tape-wrapped flathead screwdriver in the direction of the arrow in
the order of (1), (2) shown in th ...
Other materials:
On/Off Solenoid Removal/Installation [Fw6 A EL, Fw6 Ax EL]
WARNING:
A hot transaxle and ATF can cause severe burns. Turn off the engine and wait
until they are cool.
Always wear protective eye wear when using the air compressor. If the air
compressor is used, any particles of dirt or soiling could spatter and get into
the eyes.
...
Auxiliary Jack/Usb Port
NOTE:
“iPod” is a registered trademark of Apple Inc. in the United States and other
countries.
Purpose, Function
The Auxiliary jack/USB port outputs the audio signals of commercially-available
portable audio, a USB device, or an iPod connected to the Auxiliary jack/USB ...
Interior Lights
Overhead Lights
Front Map Lights
When the overhead light switch is in the door or off position, press the lens
to illuminate the front map lights, and then press the lens again to turn them off.
NOTE
The front map lights will not turn off even if the lens is pressed in the
following ca ...
