Mazda CX-5 Service & Repair Manual: Refrigerant System Service Cautions
Handling Insufficient Refrigerant Level
-
If an insufficient refrigerant level is detected at troubleshooting, do not charge (add) the refrigerant. Because an accurate amount of refrigerant cannot be determined from the pressure indicated on the manifold gauge, never charge the refrigerant. If there is too much or too little refrigerant from the refilling, there may be secondary problems such as damage to the refrigerant cycle parts, or a decrease of cooling performance. Therefore, if it is determined that the refrigerant level is insufficient, completely remove refrigerant from the refrigerant cycle and refill with refrigerant to the specified amount.
Handling Compressor Oil
-
Use only the following specified compressor oil for this vehicle. Using compressor oil (PAG oil) other than specified compressor oil can damage the A/C compressor.
-
FD46XG
-
Do not spill compressor oil on the vehicle. A drop of compressor oil on the vehicle surface can eat away at the paint. If oil gets on the vehicle, wipe it off immediately.
-
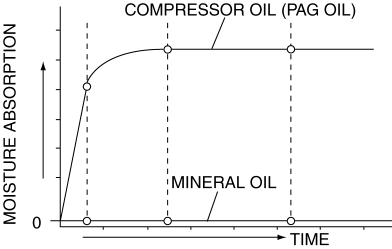
Compressor oil (PAG oil) has a higher moisture absorption efficiency than the previously used mineral oil. If moisture mixes with the compressor oil, the refrigerant system could be damaged. Therefore, install caps immediately after using the compressor oil or removing refrigerant system parts to prevent moisture absorption.
-
If the refrigerant gas is completely discharged from the system for reasons such as a malfunction during A/C operation, repair or replace the malfunctioning part, charge the refrigerant to the specified amount and always add 60 ml {60 cc, 2.0 fl oz} of compressor. If the compressor oil is not adequately replenished, the A/C compressor may quickly deteriorate, abnormal noise may develop, cooling performance may be affected or, in the worst case, the A/C compressor may seize.

 Refrigerant Pressure Sensor [Manual Air Conditioner]
Purpose
The refrigerant pressure sensor detects the refrigerant pressure in the refrigerant
cycle.
Function
The refrigerant pressure sensor converts the detected refrigerant pre ...
 Refrigerant System Service Warnings
Handling Refrigerant
Avoid breathing air conditioning refrigerant or lubricant vapor. Exposure
may irritate eyes, nose and throat. Also, due to environmental concerns, we
urge use of reco ...
Other materials:
Shift Control Module Removal/Installation [C66 M R]
Removal
1. Shift the shift lever to the neutral position.
2. Remove the plug hole plate..
3. Disconnect the negative battery cable..
4. Remove the air cleaner and air hose as a single unit..
5. Remove the battery and battery tray..
6. Disconnect the control cable from the transaxle.
a. ...
Turbine/Input Shaft Speed Sensor, Output Shaft Speed Sensor [Fw6 A EL, Fw6 Ax
EL]
Purpose/Function
The turbine/input shaft speed sensor detects the rotation speed of the input
shaft (low clutch drum).
The output shaft speed sensor detects the rotation speed of the output shaft
(primary gear).
The turbine/input shaft speed sensor and output shaft speed ...
Instrument Cluster Configuration (Using As Built Data)
NOTE:
If the configuration is performed using As-Built data, the set value of the
personalization function is reset to the initial value (condition when shipped
from factory). Verify the set value with the customer and perform the personalization
function setting after performing th ...
