Mazda CX-5 Service & Repair Manual: Rear Window Glass Removal
1. Disconnect the negative battery cable..
2. Remove the following parts:
a. Liftgate upper trim.
b. Liftgate side trim.
c. Liftgate recess.
d. Liftgate lower trim.
e. Rear spoiler.
f. Rear wiper arm and blade.
g. Rear wiper motor.
3. Using a screwdriver wrapped in protective tape, pull the antenna feeder No.3 connector in the direction of the arrow (2) shown in the figure while pressing glass antenna terminal in the direction of the arrow (1) shown in the figure, and disengage the glass antenna terminal from the antenna feeder No.3 connector. (with SIRIUS satellite radio system)
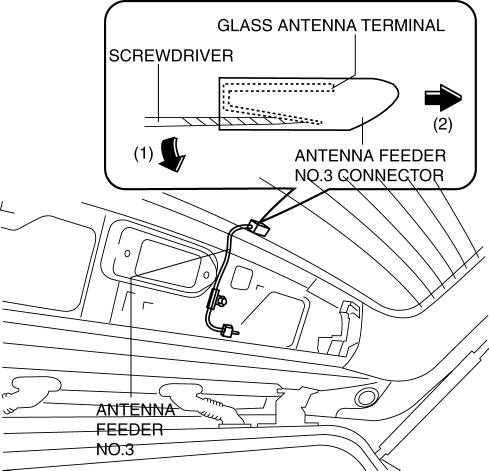
4. Disconnect the antenna feeder No.3 connector. (with SIRIUS satellite radio system)
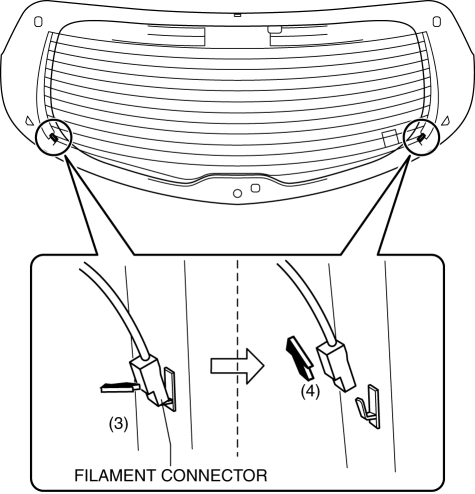
5. Disconnect the filament connectors in the direction of the arrow in the order of (3), (4) shown in the figure.
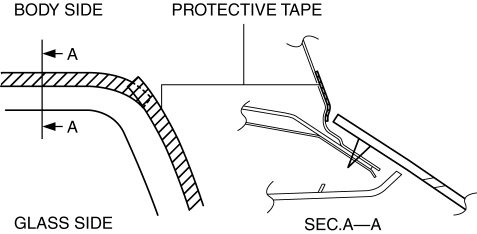
6. Apply protective tape along the edge of the body.
NOTE:
-
Overlap and adhere the protective tape to the corners to prevent damage.
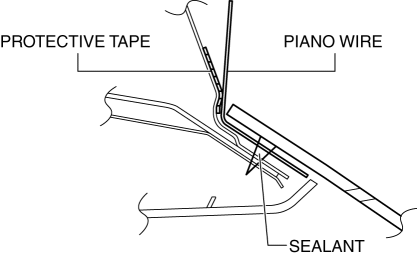
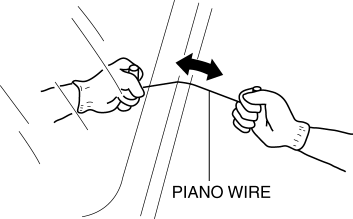
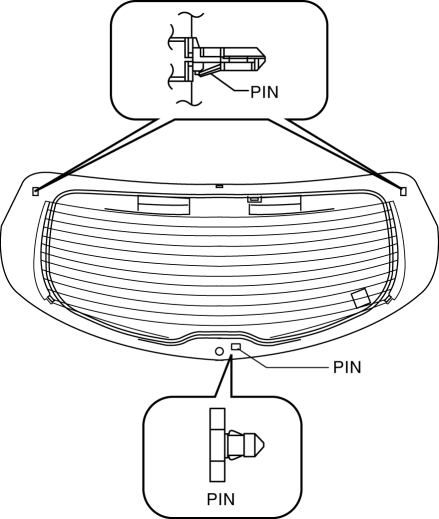
7. Avoiding the pin on the inside of the vehicle, insert piano wire which has been cut to sufficient length.
WARNING:
-
Using piano wire with bare hands can cause injury. Always wear gloves when using piano wire.
NOTE:
-
Before removing the rear window glass from the body, mark the position of the glass by affixing tape to the glass and body panel.
8. Wind each end of piano wire around a bar.
NOTE:
-
Use a long sawing action to spread the work over the whole length of piano wire to prevent it from breaking due to localized heating.
9. Secure one end of piano wire, and while pulling the other end, cut the sealant around the rear window glass.
10. Pinch pins from the inside of the vehicle and detach it.
11. Remove the rear window glass.
 Rear Window Glass Installation
WARNING:
Using a utility knife with bare hands can cause injury. Always wear gloves
when using a utility knife.
CAUTION:
Proper installation of the glass may be difficult if s ...
 Windshield Installation
WARNING:
Using a utility knife with bare hands can cause injury. Always wear gloves
when using a utility knife.
CAUTION:
If a door is opened or closed when all the window glas ...
Other materials:
Before Service Precaution
WARNING:
Fuel vapor is hazardous. It can very easily ignite, causing serious injury
and damage. Always keep sparks and flames away from fuel.
Fuel line spills and leakage from the pressurized fuel system are dangerous.
Fuel can ignite and cause serious injury or death and damag ...
Heated Oxygen Sensor (HO2 S) Inspection
HO2S Inspection
1. Connect the M-MDS to the DLC?2.
2. Switch the ignition ON (engine on).
3. Warm up the engine to normal operating temperature.
4. Access the following PIDs using the M-MDS..
VSS (Vehicle speed)
RPM (Engine speed)
O2S12 (HO2S output voltage)
5. D ...
Rear Shock Absorber Disposal
WARNING:
Whenever drilling into a rear shock absorber, wear protective eye wear. The
gas in the rear shock absorber is pressurized, and could spray metal chips into
the eyes and face when drilling.
1. Clamp a rear shock absorber on a flat surface or with the piston pointing
...
