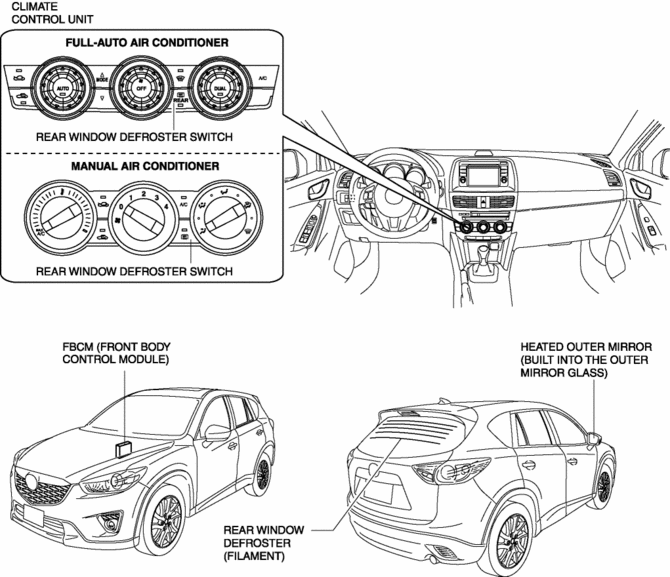
Mazda CX-5 Service & Repair Manual: Rear Window Defroster/Outer Mirror Heater
Outline
-
Fogging is cleared from the rear window and outer mirror glass by heating of the filament.
Structural view
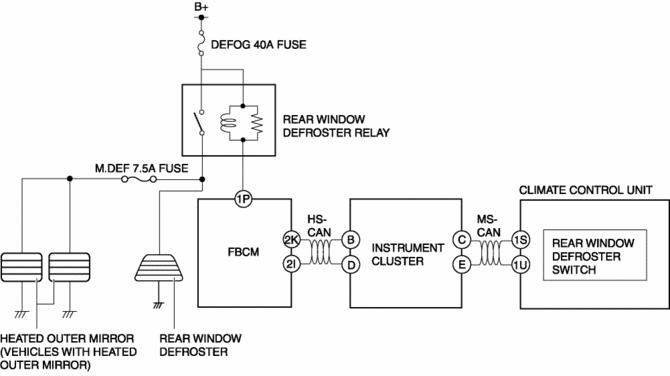
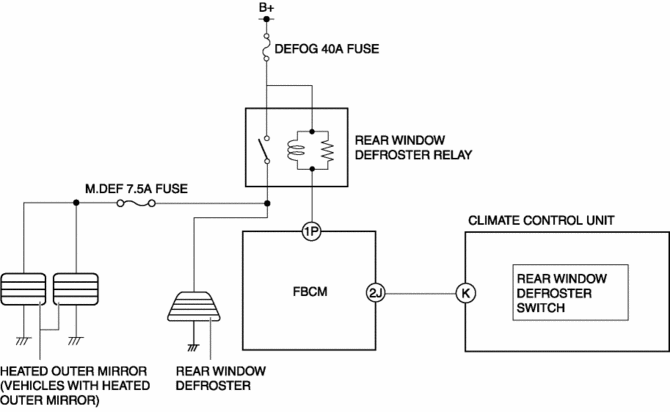
System wiring diagram
Vehicles with full-auto air conditioner system
Vehicles with manual air conditioner system
Construction
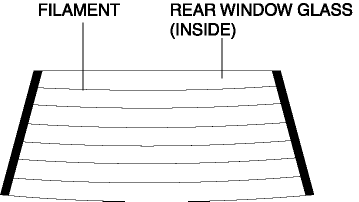
Rear window defroster
-
The rear window defroster filament is inside the rear window glass.
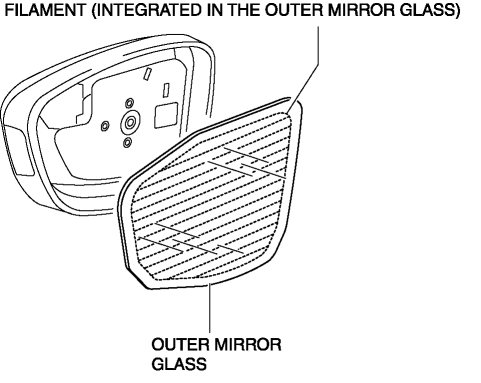
Heated outer mirror
-
The heated outer mirror filament is integrated in the outer mirror glass.
Operation
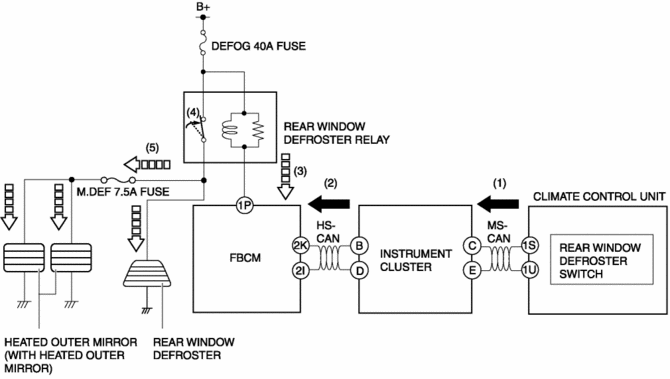
Vehicles with full-auto air conditioner system
1. When the rear window defroster switch on the climate control unit is turned on (1), an ON/OFF control request signal is sent to the front body control module (FBCM) through the instrument cluster as a CAN signal.(2)
2. When the front body control module (FBCM) receives the ON/OFF control request signal, it supplies the battery voltage to the rear window defroster relay.(3)
3. When the battery voltage is supplied to the rear window defroster relay, a switch inside the rear window defroster relay is turned on.(4)
4. When the switch inside the rear window defroster relay is turned on, the battery voltage is supplied to the rear window defroster/heated outer mirrors to operate them.(5)
-
When approx. 15 min.
has elapsed after the rear window defroster switch was turned on, the timer control of the front body control module (FBCM) turns off the rear window defroster relay automatically to turn off the rear window defroster/heated outer mirror.
-
When the rear window defroster switch is pressed while the rear window defroster/heated outer mirrors are operating, they stop operating.
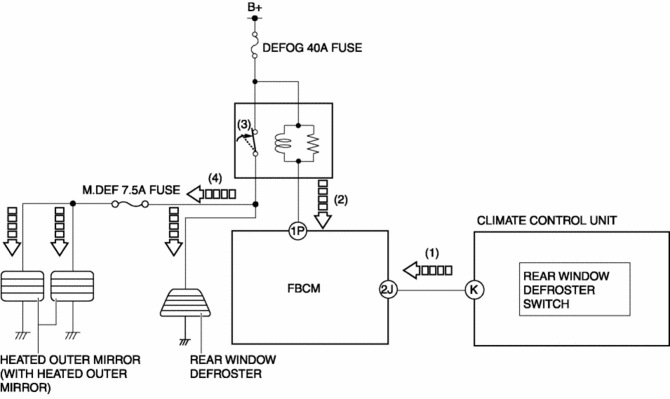
Vehicles with manual air conditioner system
1. When the rear window defroster switch on the climate control unit is turned on (1), a signal is sent from the climate control unit to the front body control module (FBCM) and the battery voltage is supplied to the rear window defroster relay.(2)
2. When the battery voltage is supplied to the rear window defroster relay, a switch inside the rear window defroster relay is turned on.(3)
3. When the switch inside the rear window defroster relay is turned on, the battery voltage is supplied to the rear window defroster/heated outer mirrors to operate them.(4)
-
When approx. 15 min.
has elapsed after the rear window defroster switch was turned on, the timer control of the front body control module (FBCM) turns off the rear window defroster relay automatically to turn off the rear window defroster/heated outer mirror.
-
When the rear window defroster switch is pressed while the rear window defroster/heated outer mirrors are operating, they stop operating.
Fail-safe
-
Function not equipped
 Power Outer Mirror System
Outline
Power outer mirrors which can be operated remotely have been adopted.
Structural view
System wiring diagram
Function
Mirror glass adjustment function
Outer mirro ...
 Rearview Mirror Removal/Installation
1. Remove the screw.
2. Pull the rearview mirror in the direction of the arrow (1) shown in the figure
3. Install in the reverse order of removal. ...
Other materials:
Lap Pre Tensioner Seat Belt [Two Step Deployment Control System]
Purpose
The lap pre-tensioner seat belts retract and tighten the seat belt webbing
to protect the front passengers during a collision.
Function
The lap pre-tensioner seat belts operate (deploy) based on the operation
signal from the SAS control module to instantly retract a ...
Air Bag System Service Cautions [Two Step Deployment Control System]
Air Bag System Component Disassembly
Disassembling the air bag system components could cause it to not operate
(deploy) normally. Never disassemble any air bag system components.
Air Bag Module, Pre-tensioner Seat Belt, Lap Pre-tensioner Seat Belt Handling
Oil, grease, or ...
Roof Carrier Bracket Removal/Installation
1. Disconnect the negative battery cable..
2. Remove the following parts:
a. Sunroof seaming welt (with sunroof system).
b. A-pillar trim.
c. Front map light.
d. Sunvisor.
e. Front scuff plate.
f. Rear scuff plate.
g. B-pillar lower trim.
h. Adjust anchor cover.
i. Upper anchor i ...
