Mazda CX-5 Service & Repair Manual: Rear Seat Back Removal/Installation
CAUTION:
-
When removing or putting in the rear seat, contact with the surrounding areas of the vehicle could cause scratches and damage. When removing or putting in the rear seat, always use two or more persons to perform the work and be careful not to scratch or damage the rear seat and the surrounding area of the vehicle.
-
When performing the procedure with a rear seat back removed from the vehicle, perform the procedure on a clean cloth so as not to damage or soil the seat.
NOTE:
-
When removing the rear seat back from the vehicle or putting it back in, it can be performed smoothly by removing the headrest.
6:4 Split Type
1. Remove the trunk board..
2. Press the push knob to fold the rear seat back.
3. Remove bolts A.

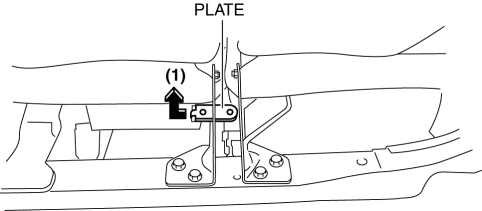
4. Remove the plate in the direction of the arrow (1) shown in the figure.
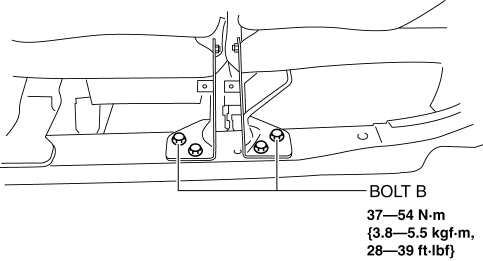
5. Remove bolts B.
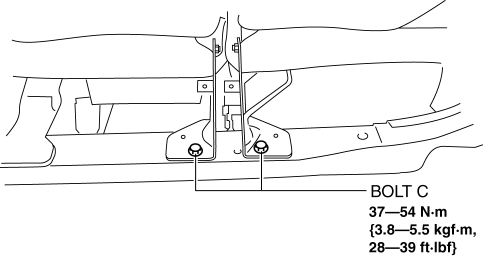
6. Remove bolts C.
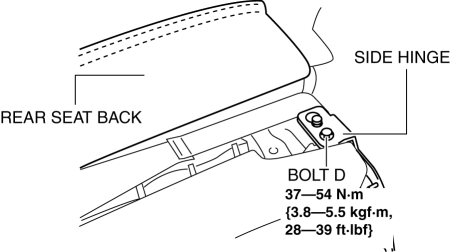
7. Remove bolt D.
8. After moving the rear seat in the direction of the arrow (2) shown in the figure, remove pin B while moving the side hinge in the direction of the arrow (3).
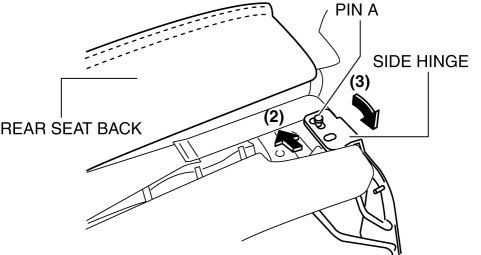
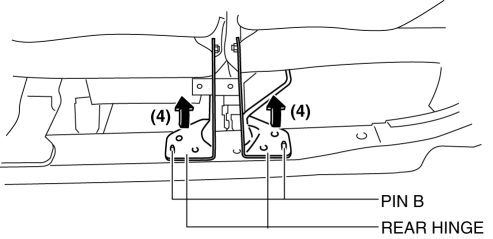
9. Move the rear hinge in the direction of the arrow (4) shown in the figure and set pin A aside.
10. Remove the rear seat back.
4:2:4 Split Type
1. Remove the trunk board..
2. Remove the rear seat..
3. Remove bolts A.

4. Remove the rear seat back.
5. Install in the reverse order of removal.
 Rear Seat Back Frame Removal/Installation
CAUTION:
When performing the procedure with a rear seat removed from the vehicle,
perform the procedure on a clean cloth so as not to damage or soil the seat.
6:4 Split Type
1. Remov ...
 Rear Seat Back Striker Removal/Installation
1. Disconnect the negative battery cable..
2. Press the push knob to fold the rear seat back.
3. Remove the following parts:
a. Trunk board.
b. Trunk end trim.
c. Rear scuff plate.
d. Trun ...
Other materials:
Constant Monitoring
The following components of the air bag systems are monitored by a diagnostic
system:
• Crash sensors, and diagnostic module (SAS
unit)
• Front air bag sensors
• Air bag modules
• Side crash sensors
• Air bag/Front seat belt pretensioner system
warning light
• Fron ...
Engine Transaxle Integration Control [Fw6 A EL, Fw6 Ax EL]
Outline
The TCM controls engine output torque and reduces transaxle output shaft
torque fluctuation during auto shifting, and reduces shock occurring from the
vehicle during shifting.
Construction
Operation
During auto shifting, the TCM sends the torque reduction reque ...
Timing Chain, Chain Tensioner
Purpose, Function
Timing chain
The timing chain transmits the rotation force of the crankshaft to the camshaft
to perform the rotation timing of the crankshaft and camshaft.
Chain tensioner
The chain tensioner constantly maintains the timing chain tension and the
timing ch ...
