
Mazda CX-5 Service & Repair Manual: Propeller Shaft On Vehicle Inspection
Joint Area Excessive Play Inspection
1. Shake the universal joint by hand and verify that there is no excessive play.
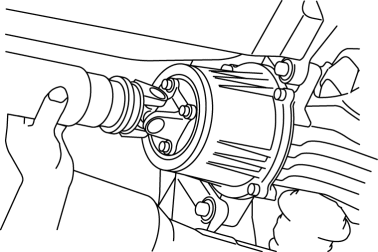
2. If there is any excessive play, replace the propeller shaft..
Propeller Shaft Runout Inspection
CAUTION:
-
Do not rotate the propeller shaft using engine force when inspecting.
1. Shift to neutral position and release the parking brake.
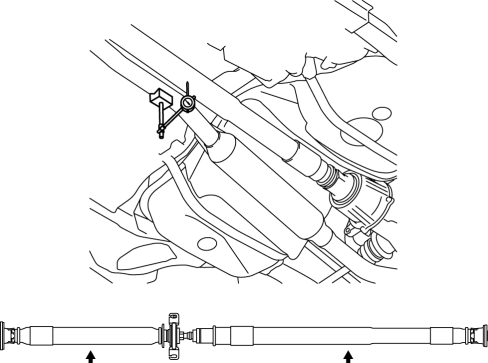
2. Rotate the rear wheel by hand and inspect the propeller shaft runout at the two locations shown in the figure.
-
If it exceeds the standard specification, replace the propeller shaft.
-
Standard propeller shaft runout (on-vehicle)
-
0.8 mm {0.031 in}
 Propeller Shaft Inspection
1. Measure the propeller shaft center runout using the dial gauge.
If it exceeds the maximum specification, replace the propeller shaft as a
single component.
Propeller shaft m ...
 Propeller Shaft Removal/Installation
CAUTION:
If the constant velocity joint is bent during propeller shaft removal/installation
or transportation after servicing, the constant velocity joint boot may contact
the metallic c ...
Other materials:
Cargo Compartment Light Inspection
1. Disconnect the negative battery cable..
2. Remove the cargo compartment light..
3. Verify that the continuity between the cargo compartment light terminals is
as indicated in the table.
If not as indicated in the table, replace the cargo compartment light..
...
Driveline/Axle Abbreviations
AAS
Active Adaptive Shift
ABS
Antilock Brake System
ABDC
After Bottom Dead Center
ACC
Accessories
AFS
Adaptive Front Lighting System
ALC
...
Interior Equipment (View B)
1 Audio control switches
2 SRS air bags
3 Cruise control switches
4 Navigation system (if equipped)
5 Audio system
6 Hazard warning flasher switch
7 Climate control system
8 Glove compartment
9 Rear window defroster switch
10 Accessory socket
11 MT shift lever
12 AT shift lever ...
