Mazda CX-5 Service & Repair Manual: Oil Pressure Inspection
WARNING:
-
Hot engines and engine oil can cause severe burns. Turn off the engine and wait until it and the engine oil have cooled.
-
A vehicle that is lifted but not securely supported on safety stands is dangerous. It can slip or fall, causing death or serious injury. Never work around or under a lifted vehicle if it is not securely supported on safety stands.
-
Continuous exposure to USED engine oil has caused skin cancer in laboratory mice. Protect your skin by washing with soap and water immediately after working with engine oil.
1. Disconnect the negative battery cable..
2. Remove the front under cover No.2..
3. Remove the oil pressure switch..
NOTE:
-
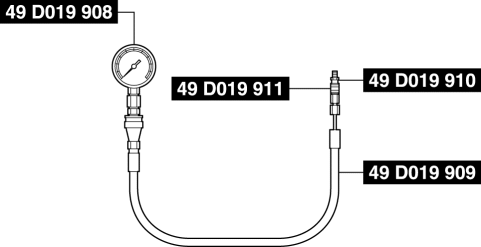
Use the following SSTs in this inspection.
-
49 D019 908 (gauge)
-
49 D019 909 (hose)
-
49 D019 910 (adapter)
-
49 D019 911 (adapter)
4. Install the SSTs
to the oil pressure switch installation hole using the following procedure.
a. Assemble SSTs 49 D019 908
, 49 D019 909
, and 49 D019 911
outside of the engine compartment beforehand.
b. Install SST 49 D019 910
to the oil pressure switch installation hole.
c. Install SST 49 D019 911
to the SST 49 D019 910
.
5. Connect the negative battery cable..
6. Warm up the engine to normal operating temperature.
7. Run the engine at the specified speed, and note the gauge readings.
-
If not within the specification, inspect for the cause and repair or replace if necessary.
NOTE:
-
The oil pressure can vary with oil viscosity, temperature and engine speed.
-
Oil pressure (reference value) [coolant temperature: 80—90 °C {176—194 °F}]
-
Lo : 110—175 kPa {1.13—1.78 kgf/cm2, 16.0—25.3 psi} [1,500 rpm]
-
Hi : 300—430 kPa {3.06—4.38 kgf/cm2, 43.6—62.3 psi} [4,500 rpm]
8. Stop the engine and wait until it is cools.
9. Disconnect the negative battery cable..
10. Remove the SSTs.
11. Install the oil pressure switch..
12. Connect the negative battery cable..
13. Start the engine and confirm that there is no oil leakage.
-
If there is oil leakage, repair or replace the applicable part.
14. Install the front under cover No.2..
 Oil Pan
Purpose, Function
The engine oil required for lubrication in the engine accumulates in the
oil pan.
Construction
The oil pan is installed on the lower part of the cylinder block ...
 Oil Pump Removal/Installation
WARNING:
Hot engines and engine oil can cause severe burns. Turn off the engine and
wait until it and the engine oil have cooled.
A vehicle that is lifted but not securely supported ...
Other materials:
Manifold Absolute Pressure (Map) Sensor
Purpose/Function
Detects the intake air pressure introduced into the cylinder as basic information
for mainly determining the fuel injection amount.
Detects the intake air pressure introduced into the cylinder and inputs it
to the PCM as an intake air pressure signal.
Cons ...
Rear End Panel Installation [Panel Replacement]
Symbol Mark
Installation Procedure
1. When installing new parts, measure and adjust the body as necessary to conform
with standard dimensions.
2. Drill holes for the plug welding before installing the new parts.
3. After temporarily installing new parts, make sure the related parts fit p ...
Automatic Transaxle Outline [Fw6 A EL, Fw6 Ax EL]
Outline
Contribution to low fuel economy
Wide TCC range
Clutch/brake resistance reduction
Realized direct feel and quick shifting
Oil passage resistance reduction and improved clutch/brake response
b ...
