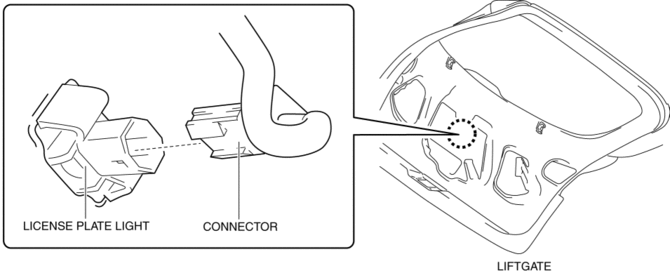
Mazda CX-5 Service & Repair Manual: License Plate Light Removal/Installation
1. Disconnect the negative battery cable..
2. Remove the following parts:
a. Liftgate upper trim.
b. Liftgate side trim.
c. Liftgate lower trim.
3. Disconnect the connector.
4. While pressing the license plate light tab in the direction of arrow (1) shown in the figure, press the license plate light in the direction of arrow (2) to detach the license plate light tab and liftgate.
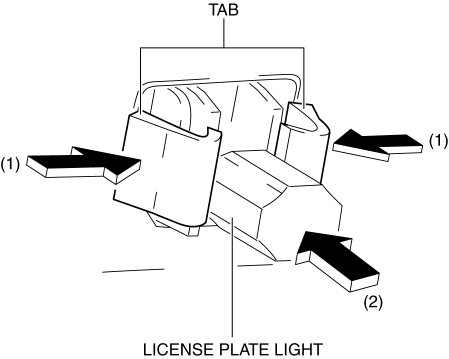
CAUTION:
-
If the license plate light is removed from the liftgate, the license plate light may fall off and be damaged. When removing the license plate light from the liftgate, hold the license plate light on lens side with a hand during servicing.
5. Remove the license plate light.
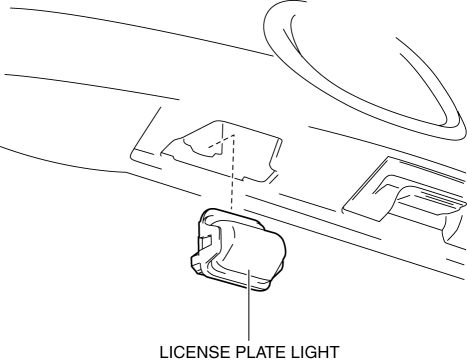
6. Install in the reverse order of removal.
 License Plate Light Bulb Removal/Installation
1. Disconnect the negative battery cable..
2. Insert a tape-wrapped flathead screwdriver into the clearance between the
lens and license plate light shown in the figure.
3. Move the flathead ...
 PID/Data Monitor Inspection [Adaptive Front Lighting System (Afs)]
1. Connect the M-MDS to the DLC-2.
2. After the vehicle is identified, select the following items from the initialization
screen of the M-MDS.
a. Select “DataLogger”.
b. Select “Modulesâ ...
Other materials:
Manual Transaxle Removal/Installation [C66 M R]
Removal
1. Disconnect the negative battery cable..
2. Remove the plug hole plate..
3. Remove the front under cover No.2..
4. Remove the front under cover No.1..
5. Remove the splash shield..
6. Drain the manual transaxle oil..
7. Disconnect and/or remove the following parts in the engin ...
Electric Variable Valve Timing Motor/Driver Inspection
WARNING:
A hot engine can cause severe burns. Turn off the engine and wait until it
is cool before servicing.
CAUTION:
Do not disassemble the electric variable valve timing motor/driver because
it is a precision unit.
Do not apply excessive force when rotating the ...
Crankshaft Position (CKP) Sensor
Purpose/Function
Detects the crankshaft speed as basic information for mainly determining
the fuel injection timing and ignition timing.
Detects the crankshaft speed and inputs it to the PCM as a CKP signal.
Construction
Installed on the side of the cylinder block (ri ...
