Mazda CX-5 Owners Manual: Keys
WARNING
Do not leave the key in your vehicle with children and keep them in a place where your children will not find or play with them: •eaving children in a vehicle with the key is dangerous. This could result in someone being badly injured or even killed. Children may find these keys to be an interesting toy to play with and could cause the power windows or other controls to operate, or even make the vehicle move.
CAUTION
●Because the key (transmitter) uses low-intensity radio waves, it may not function correctly under the following conditions:
● The key is carried with communication devices such as cellular phones.
● The key contacts or is covered by a metal object.
● The key is near electronic devices such as personal computers.
● Non-Mazda genuine electronic equipment is installed in the vehicle.
● There is equipment which discharges radio waves near the vehicle.
● The key (transmitter) may consume battery power excessively if it receives high-intensity radio waves. Do not place the key near electronic devices such as televisions or personal computers.
● To avoid damage to the key (transmitter), DO NOT:
● Drop the key.
● Get the key wet.
● Disassemble the key.
● Expose the key to high temperatures on places such as the dashboard or hood, under direct sunlight.
● Expose the key to any kind of magnetic field.
● Place heavy objects on the key.
● Put the key in an ultrasonic cleaner.
● Put any magnetized objects close to the key.
A code number is stamped on the plate attached to the key set; detach this plate and store it in a safe place (not in the vehicle) for use if you need to make a replacement key (auxiliary key).
Also write down the code number and keep it in a separate safe and convenient place, but not in the vehicle.
If your key (auxiliary key) is lost, consult your Authorized Mazda Dealer and have your code number ready.
NOTE
The driver must carry the key to ensure the system functions properly.
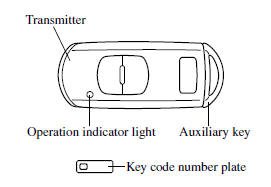
Pull out the auxiliary key from the key.
 Keys
Keys
...
 Keyless Entry System
This system uses the key buttons to remotely lock and unlock the doors and the
liftgate.
The system can start the engine without having to take the key out of your purse
or pocket.
It can also h ...
Other materials:
Rear Door Speaker Inspection
1. Disconnect the negative battery cable..
2. Remove the rear door trim..
3. Disconnect the rear door speaker connector..
4. Verify that the resistance between the rear door speaker terminals is as indicated
in the table.
If not as indicated in the table, replace the rear door sp ...
Rear Door Garnish Removal/Installation
WARNING:
Using a utility knife with bare hands can cause injury. Always wear gloves
when using a utility knife.
Front
1. Using a tape-wrapped fastener remover, remove clips A in the direction of
arrow (1), (2) shown in the figure.
2. Remove the double-sided adhesive tape in the ...
Blind Spot Monitoring (Bsm) Off Indicator Light
Purpose
The BSM OFF indicator light informs the driver that the Blind Spot Monitoring
(BSM) system is turned off or there is a malfunction in the system.
Function
The instrument cluster illuminates the BSM OFF indicator light based on the
BSM system off signal sent via a CA ...
