Mazda CX-5 Service & Repair Manual: Front Side Frame Installation [Panel Replacement]
Symbol Mark

Installation Procedure
1. When installing new parts, measure and adjust the body as necessary to conform with standard dimensions.
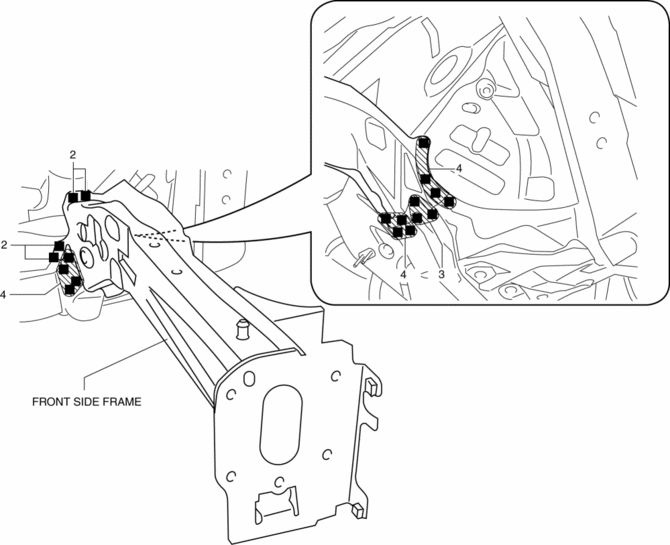
2. Drill holes for the plug welding before installing the new parts.
3. After temporarily installing new parts, make sure the related parts fit properly.
4. Plug weld the 19 locations shown in the figure, then install the front side frame.

 Front Side Frame (Partial Cutting) Removal [Panel Replacement]
Symbol Mark
Removal Procedure
1. Drill the 4 locations indicated by (A) shown in the figure, then remove suspension
mounting reinforcement and outer frame reinforcement.
2. Rough cut locatio ...
 Front Side Frame Removal [Panel Replacement]
Symbol Mark
Removal Procedure
1. Drill the 15 locations indicated by (A) shown in the figure.
2. Drill the 4 locations indicated by (B) shown in the figure.
NOTE:
When drilling the 4 ...
Other materials:
Engine Front Cover
Purpose, Function
The engine front cover covers the front of the engine to prevent engine oil
spillage, noise leakage, and foreign material penetration.
Construction
The engine front cover is installed to the front of the engine.
The lightweight engine front ...
Rear Stabilizer Removal/Installation [2 Wd]
WARNING:
Verify that the rear crossmember is securely supported by a jack. If the
rear crossmember falls off, it can cause serious injury or death, and damage
to the vehicle.
CAUTION:
Performing the following procedures without first removing the rear ABS wheel-spee ...
Air Intake Actuator Inspection [Full Auto Air Conditioner]
1. Connect battery positive voltage to air intake actuator terminal B (or C),
connect terminal C (or B) to ground, and then verify that the air intake actuator
operates as shown in the table.
If the operation condition is not normal, replace the air intake actuator.
...
