Mazda CX-5 Service & Repair Manual: Front Shock Absorber Disposal
WARNING:
-
Whenever drilling into a front shock absorber, wear protective eye wear. The gas in the front shock absorber is pressurized, and could spray metal chips into the eyes and face when drilling.
1. Place the shock absorber on a level surface or with the piston pointing downwards.
2. Drill a 2—3 mm {0.08—0.11 in}
hole at point A shown in the figure so the gas can escape.
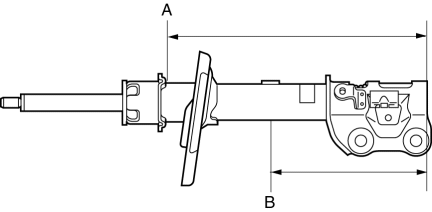
-
Point A: 340 mm {13.4 in}
3. Drill a 2—3 mm {0.08—0.11 in}
hole at the point B shown in the figure to drain the oil.
-
Point B: 145 mm {5.71 in}
4. Turn the hole made in Step 3 downwards and drain the oil by pumping the piston rod up and down several times.
5. Cut off the bottom end of the front shock absorber.
6. Dispose of waste oil according to local waste disposal laws.
 Front Shock Absorber And Coil Spring Removal/Installation
CAUTION:
Performing the following procedures without first removing the front ABS
wheel-speed sensor may possibly cause an open circuit in the wiring harness
if it is pulled by mistake ...
 Front Shock Absorber Inspection
1. Remove the front shock absorber..
2. Inspect for damage and oil leakage.
3. Compress and extend the shock absorber piston rod at least three times
at a steady rate. From the fourth compressio ...
Other materials:
Ignition Switch
Push Button Start Positions
The system operates only when the driver is in the vehicle or within operational
range while the key is being carried.
Each time the push button start is pressed, the ignition switches in the order
of off, ACC, and ON. Pressing the push button start again from ON sw ...
Manual Transaxle Oil Replacement [C66 M R]
1. Park the vehicle on level ground.
2. Remove the front under cover No.2..
3. Remove the drain plug and gasket, and drain the manual transaxle oil.
4. Install a new gasket and the drain plug.
Tightening torque
39—59 N·m {4.0—6.0 kgf·m, 29—43 ft·lbf}
5. Remove the ...
Clock Removal/Installation
1. Disconnect the negative battery cable..
2. Remove the following parts:
a. Shift lever knob (MTX).
b. Front console box.
c. Shift panel.
d. Upper panel.
e. Rear console.
f. Side wall.
g. Decoration panel.
h. Front console.
i. Glove compartment.
j. Climate control unit.
3. P ...
