Mazda CX-5 Service & Repair Manual: Flywheel Inspection [C66 M R]
1. Remove the flywheel..
2. Perform the following procedures to inspect the flywheel.
-
If there is any malfunction or it exceeds the maximum specification, replace the flywheel..
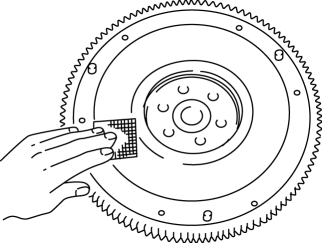
a. Inspect the surface that contacts the clutch disc for scratches, nicks, and discoloration.

-
Correct slight scratches and discoloration using sandpaper.
b. Inspect the ring gear teeth for damage and wear.
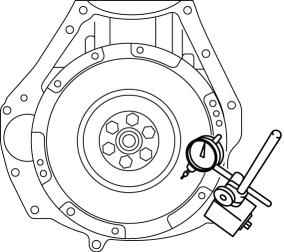
c. Inspect the runout of the surface that contacts the clutch disc.

i. Install the flywheel..
ii. Measure the runout of the surface that contacts the clutch disc using a dial gauge.
-
Flywheel maximum runout
-
0.1 mm {0.004 in}
 Clutch [C66 M R]
Purpose, Function
The clutch unit transmits or cuts the drive force between the engine and
MTX according to the clutch pedal operation.
Construction/Operation
The construction/o ...
 Low Clutch [Fw6 A EL, Fw6 Ax EL]
Purpose/Function
The low clutch operates in 1GR, 2GR, 3GR and 4GR and intermittently operates
the sun gear by drive force from the turbine shaft.
For the low clutch, a centrifugal ba ...
Other materials:
Crankshaft, Main Bearing
Purpose, Function
The crankshaft converts the reciprocating movement of the piston to a rotational
movement via the connecting rod.
The main bearing forms an oil film on the outer surface of the crankshaft
journal to prevent wear due to sliding.
Construction
Crankshaft
...
Keyless Antenna Removal/Installation
With Advanced Keyless Entry System
Vehicle interior, front
1. Disconnect the negative battery cable..
2. Remove the following parts:
a. Decoration panel.
b. Shift lever knob (MTX).
c. Front console box.
d. Shift panel.
e. Upper panel.
f. Rear console.
g. Side wall.
h. Front conso ...
Keyless Antenna [Advanced Keyless Entry System]
Purpose
Outputs a request signal and specifies the remote transmitter location.
Function
The keyless antenna outputs request signals to the inside and outside of
the vehicle based on the signals from the LF control unit.
Construction, Operation
The antennas for re ...
