Mazda CX-5 Service & Repair Manual: Brake Pedal Removal/Installation
CAUTION:
-
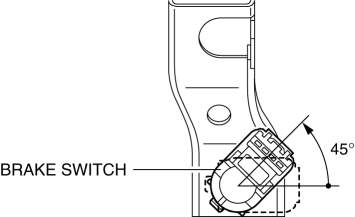
The clearance between the brake switch and the brake pedal is automatically adjusted to the correct amount when the brake switch is inserted into the installation hole on the brake pedal and rotated to fix in place. If the brake switch is not properly installed, the clearance may be incorrect, causing a brake light malfunction. Therefore, always verify that the brake pedal is properly installed and fully released before installing the brake switch to the pedal.
-
Once the brake switch clearance has automatically been adjusted, it cannot be adjusted again. Therefore, replace the switch with a new one when replacing the power brake unit or the pedal, or performing any procedure that changes the pedal stroke.
1. Remove the battery..
2. Disconnect the brake pipes from the master cylinder..
3. Disconnect the clutch reserve hose from the master cylinder. (MTX).
4. Remove the side wall (driver side)..
5. Remove the front heat duct (LH)..
6. Remove in the order indicated in the table.
7. Install in the reverse order of removal.
8. After installation, add brake fluid, bleed the air, and inspect for fluid leakage..
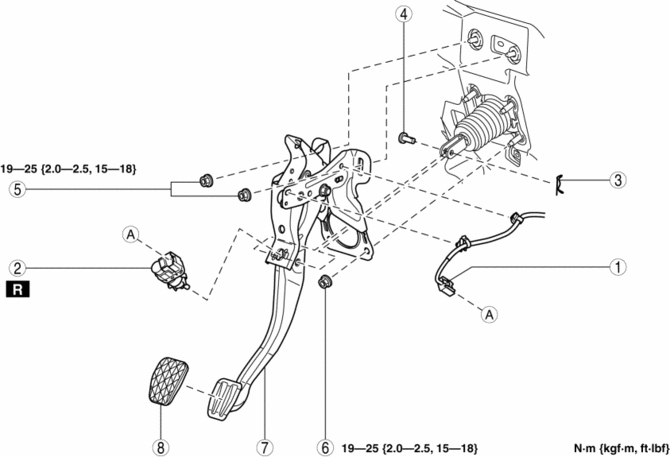
|
1 |
Brake switch connector and wiring harness |
|
2 |
Brake switch (See Brake Switch Installation Note.) |
|
3 |
Spring pin |
|
4 |
Clevis pin |
|
5 |
Nut |
|
6 |
Nut |
|
7 |
Brake pedal (See Brake Pedal Removal Note.) |
|
8 |
Pedal pad |
Brake Pedal Removal Note
1. Move the power brake unit to the vehicle front where the power brake unit fork does not interfere with the brake pedal arm.
2. Remove the brake pedal.
Brake Switch Installation Note
1. Inspect the brake pedal..
2. With the brake pedal fully released, insert a new brake switch into the installation hole on the brake pedal.
3. Secure the brake switch by turning it counterclockwise 45°
.
 Brake Pedal Inspection
Pedal Height Inspection
1. Measure the distance from the center of the upper surface of the pedal pad
to the insulator and verify that it is as specified.
If not within the specificatio ...
 Brake/Taillight Bulb Removal/Installation
1. Disconnect the negative battery cable..
2. Insert a tape-wrapped flathead screwdriver into the service hole in the position
shown in the figure.
3. Move the flathead screwdriver in the di ...
Other materials:
ABS Wheel Speed Sensor And ABS Sensor Rotor
Purpose/Function
The ABS wheel-speed sensor and ABS sensor rotor detect the rotation condition
of each wheel and transmit this information to the DSC HU/CM.
The signal from the ABS wheel-speed sensor is the primary signal that the
DSC HU/CM uses when carrying out control.
...
Auto Leveling Sensor Removal/Installation
1. Disconnect the negative battery cable..
2. Disconnect the connector.
3. Remove the bolts.
4. Remove the auto leveling sensor.
5. Install in the reverse order of removal.
6. Perform the auto leveling system initial setting.. ...
Steering Gear And Linkage Inspection
1. Remove the steering gear and linkage..
2. Remove the tie-rod end and boot..
3. Measure the rotation torque of the pinion shaft using a crescent wrench and
pull scale. (speed measurement reference 5 В°/s)
a. Install the crescent wrench to the steering gear.
b. Measure the length fr ...
