Mazda CX-5 Service & Repair Manual: Back Up Light Bulb Removal/Installation
1. Disconnect the negative battery cable..
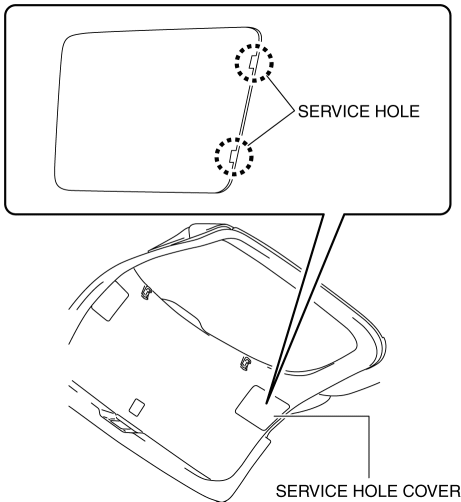
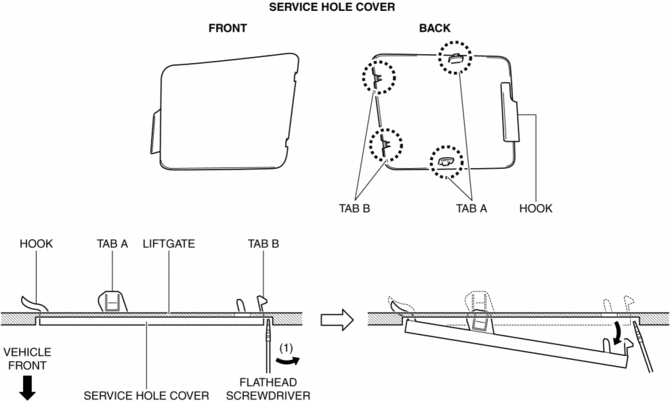
2. Insert a tape-wrapped flathead screwdriver into the service hole in the position shown in the figure.
3. Move the flathead screwdriver in the direction of the arrow (1) shown in the figure, pull out the service hole cover from the liftgate, and detach the service hole cover tabs and liftgate connections.
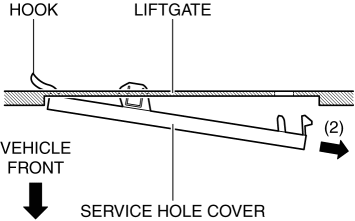
4. Pull out the service hole cover in the direction of the arrow (2) shown in the figure and pull out the service hole cover hook from the liftgate.
5. Remove the service hole cover.
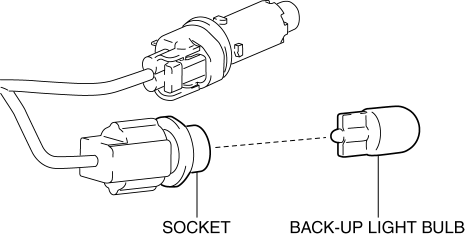
6. Rotate the socket in the direction of the arrow (3) shown in the figure and remove it from the liftgate light in the direction of the arrow (4) shown in the figure.
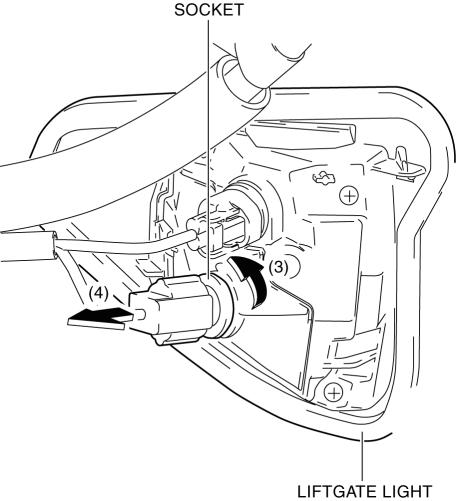
7. Remove the back-up light bulb.
8. Install in the reverse order of removal.
 Afs (Adaptive Front Lighting System) Control Module
Purpose
The AFS control module calculates the target optical axis based on the vehicle
height signal and outputs the target optical axis signal to the headlight leveling
actuator.
F ...
 Brake/Taillight Bulb Removal/Installation
1. Disconnect the negative battery cable..
2. Insert a tape-wrapped flathead screwdriver into the service hole in the position
shown in the figure.
3. Move the flathead screwdriver in the di ...
Other materials:
Intake Air Temperature (Iat) Sensor Inspection
IAT Sensor No.1
Resistance inspection
NOTE:
Because the IAT sensor No.1 is integrated in the MAF sensor, replacing the
IAT sensor No.1 includes replacement of the MAF sensor/IAT sensor No.1.
1. Disconnect the negative battery cable..
2. Disconnect the MAF sensor/IAT sensor No.1 ...
Sas Control Module [Standard Deployment Control System]
Purpose
The SAS control module controls the air bag system operation.
Function
During a frontal collision, the SAS control module controls the following
air bag module operation (deployment).
Driver-side air bag module
Passenger-side air bag module
...
Discharge Headlight Bulb
Purpose, Function
Charges the internal metallic element and emits white light resembling sunlight.
Construction
A mercury-free bulb has been adopted for the discharge headlight bulb.
The discharge headlight bulb is assembled to the front combination light.
The dis ...
