Mazda CX-5 Service & Repair Manual: Auto Light Off System
Purpose
-
The auto light-Off system turns off the TNS or headlights automatically.
-
The front body control module (FBCM) performs auto light-Off system fail-safe..
Function
-
The auto light-Off system controls the front body control module (FBCM).
-
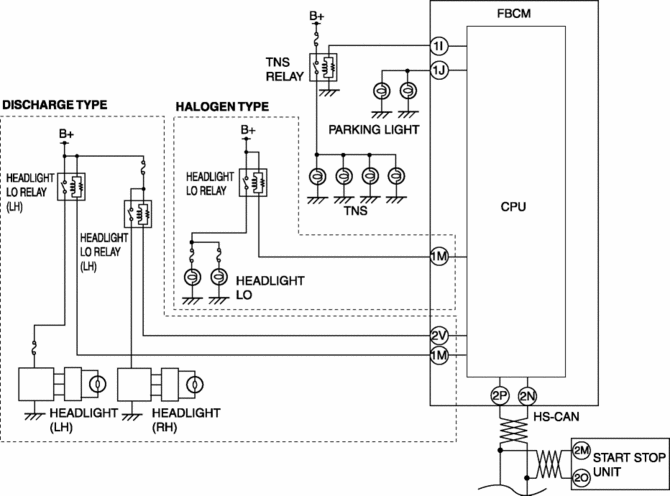
The front body control module (FBCM) controls the auto light-Off system based on the following signals and conditions:
-
IG power supply condition
-
TNS or headlight illumination condition
-
Light switch signal sent from start stop unit via CAN signal
-
If the front body control module (FBCM) detects that the ignition is switched off when the TNS and headlights are turned on, the TNS and headlights are turned on for a certain period of time and turned off after a certain period of time has elapsed.
-
A personalization feature has been adopted which can change the illumination time of the TNS or headlights. For details on the personalization features, refer to LIGHTING SYSTEM PERSONALIZATION.
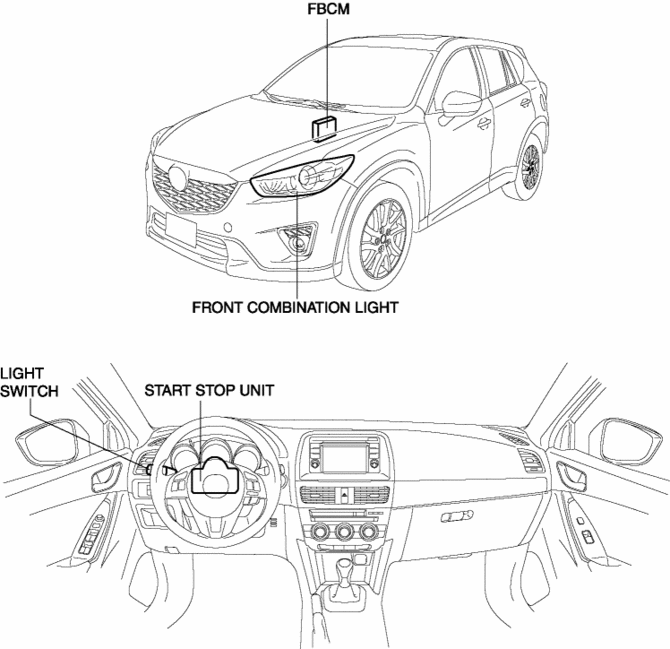
Structural view
System wiring diagram
Operation
-
If the front body control module (FBCM) detects that the ignition is switched off when the light switch is in the TNS/HEAD/AUTO position and the headlights are turned on, the TNS or headlights are turned on for 30 s*1 and turned off after 30 s.
-
If the front body control module (FBCM) receives the light switch signal from the start stop unit during the auto light-Off system operation, the headlight is controlled as follows:
-
Light switch switches to TNS/HEAD signal: Illuminates the light for 30 s after receiving the signal.
-
Light switch switches to OFF/AUTO signal: Turns off the light when receiving the signal.
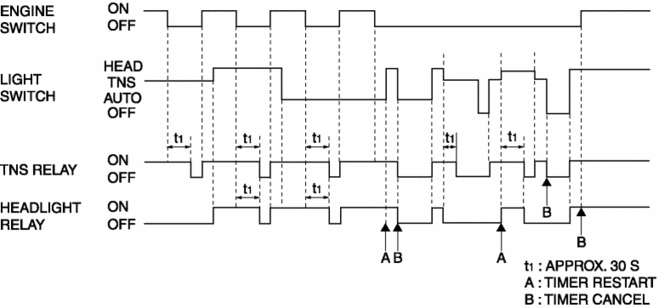
*1 The illumination time can be changed by personalization. For details on the personalization, refer to LIGHTING SYSTEM PERSONALIZATION.
 Auto Leveling Sensor Removal/Installation
1. Disconnect the negative battery cable..
2. Disconnect the connector.
3. Remove the bolts.
4. Remove the auto leveling sensor.
5. Install in the reverse order of removal.
6. Pe ...
 Auto Light System
Outline
The auto light system automatically turns the TNS and headlights on/off according
to the illumination level above and in front of the vehicle.
The auto light system is contro ...
Other materials:
Outer Mirror Glass Installation
1. Connect the mirror heater connectors. (with heated outer mirror)
2. Connect the blind spot monitoring (BSM) warning indicator light connector
(with blind spot monitoring system).
NOTE:
Lightly pull the blind spot monitoring (BSM) warning indicator light connector
and verify t ...
Refrigerant Pressure Sensor Inspection [Full Auto Air Conditioner]
1. Install the manifold gauge.
2. Verify the high-pressure side reading of the manifold gauge.
3. Measure the terminal voltage at PCM terminal 2BB, 2AX and 2AJ
4. Using the graph below, measure and verify the terminal voltages at 2AX.
5. Follow the PCM inspection when measuring the other te ...
Exhaust System
Purpose, Outline
A 4-2-1 exhaust system has been adopted which reduces residual gas in the
cylinders using the scavenging effect and contributes to a high compression
ratio.
The loop structure of the exhaust pipes for the 4-2-1 system takes up less
space.
Structural Vie ...
