Mazda CX-5 Service & Repair Manual: Steering Wheel And Column Inspection
Play inspection
1. With the wheels in the straight-ahead position, start the engine.
2. Turn the steering wheel to the left and right gently, then verify that the steering wheel play is within the specification.
-
Steering wheel play
-
0—30 mm {0—1.1 in}
Looseness, Excessive Play Inspection
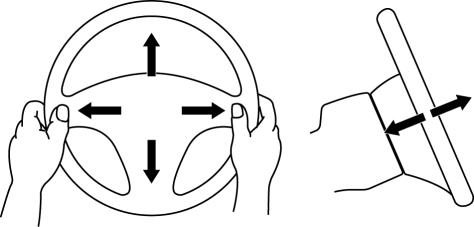
1. Inspect the steering wheel for looseness or excessive play in the axial direction of the shaft and four locations around the steering wheel.
-
If there is any malfunction, inspect the following, and repair or replace the applicable part.
-
Column bearing wear
-
Looseness of the steering wheel installation part
-
Looseness of the column installation area
-
Excessive play in the intermediate shaft joint
-
Excessive play in the steering gear
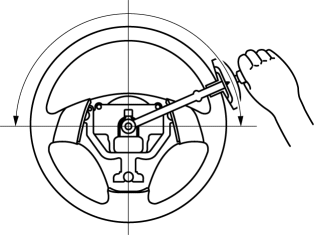
Steering Force Inspection
1. Verify that the equipped tire size and tire air pressure is as specified.
2. With the vehicle on a hard, level surface, put the wheels in the straight-ahead position.
3. Remove the driver-side air bag module..
WARNING:
-
Handling the air bag module improperly can accidentally operate (deploy) the air bag module, which may seriously injure you.Read the service warnings and cautions before handling the air bag module..
4. Start the engine and idle it.
5. Verify that the power steering malfunction indicator light is not illuminated or flashing.
6. Inspect the steering torque using a torque wrench.
-
If it exceeds the reference value, inspect the steering gear and linkage..
-
Steering wheel steering force (reference)
-
7.8 NВ·m {80 kgfВ·cm, 69 inВ·lbf} or less
NOTE:
-
Comparing another vehicle of the same model under the same conditions is an acceptable inspection method.
-
The steering torque varies with the conditions indicated below.
-
Road conditions: Such as dry, wet, asphalt, or concrete
-
Tire condition: Such as brand, wear, and tire pressure
 Steering Shaft Inspection
1. Inspect the steering column for excessive play and damage.
2. Verify that the clearance between the projection on the steering column shown
in the figure and the bracket is less than 2.0 mm {0. ...
 Steering Wheel And Column Removal/Installation
WARNING:
Handling the air bag module improperly can accidentally operate (deploy)
the air bag module, which may seriously injure you. Read the service warnings
and cautions before handli ...
Other materials:
Rear Seat
Split Folding
The seatbacks can be folded down to provide more space in the luggage compartment.
WARNING
Tightly secure cargo in the luggage compartment when it is transported
with the seatbacks folded down:
Driving without tightly securing cargo and luggage is dangerous as it could move
and ...
Engine Coolant Temperature (ECT) Sensor Inspection
Resistance Inspection
WARNING:
When the engine is hot, it can badly burn. Turn off the engine and wait until
it is cool before removing the ECT sensor.
ECT Sensor No.1
1. Remove the ECT sensor No.1..
2. Place the ECT sensor No.1 in water with a thermometer, and heat the water
...
Identification Number Locations
Vehicle Identification Number (VIN)
If the VIN plate is adhered to the dashboard, it is located in the position
shown in the figure.
Engine Type/Number
SKYACTIV-G 2.0
SKYACTIV-G 2.5
...
