Mazda CX-5 Owners Manual: Specifications
Specifications
Engine

Electrical System

CAUTION
When cleaning the iridium plugs, do not use a wire brush. The fine particulate coating on the iridium alloy and platinum tips could be damaged.
Lubricant Quality
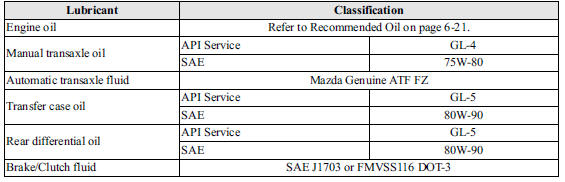
NOTE
Refer to Introduction on for owner's responsibility in protecting your investment.
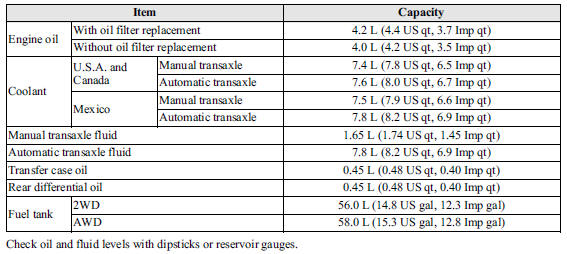
Capacities
(Approximate Quantities)
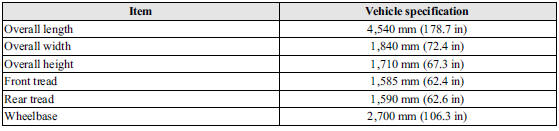
Dimensions
Weights
2WD

AWD

Air Conditioner

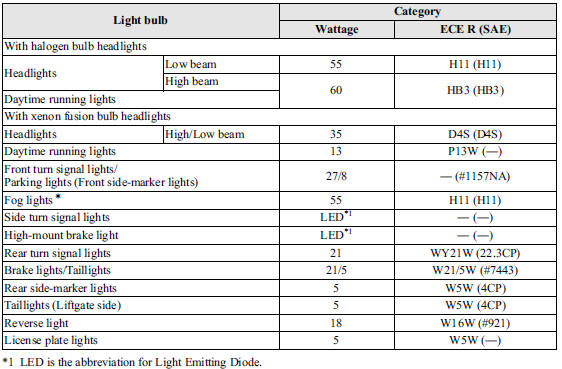
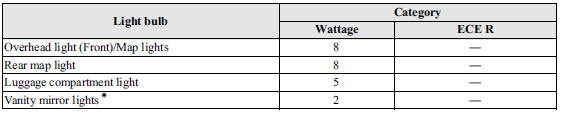
Light Bulbs
Exterior light
Interior light
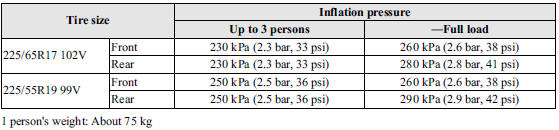
Tires
NOTE
The tires have been optimally matched with the chassis of your vehicle.
When replacing tires, Mazda recommends that you replace tires of the same type originally fitted to your vehicle. For details, contact an Authorized Mazda Dealer.
Check the tire pressure label for tire size and inflation pressure.
Refer to Tire Inflation Pressure 6.
After adjusting the tire pressure, initialization of the tire pressure monitoring system is necessary to make the system operates normally.
Refer to Tire Pressure Monitoring System Initialization 3.
Standard tire
(U.S.A. and Canada)

(Mexico)
Temporary spare tire
(U.S.A. and Canada)

(Mexico)

 Identification Numbers
Vehicle Information Labels
Vehicle Identification Number
The vehicle identification number legally identifies your vehicle. The number
is on a plate attached to the left top side of the dashboard ...
 Personalization Features
Personalization Features
...
Other materials:
Customer Assistance (Puerto Rico)
Your complete and permanent satisfaction is our business. That is why all Authorized
Mazda Dealers have the knowledge and the tools to keep your Mazda vehicle in top
condition.
If you have any questions or recommendations for improvement regarding the service
of your Mazda vehicle or servicin ...
Rear Seat Cushion Trim Removal/Installation
CAUTION:
When removing or putting in the rear seat cushion, contact with the surrounding
areas of the vehicle could cause scratches and damage. When removing or putting
in the rear seat cushion, always use two or more persons to perform the work
and be careful not to scratch or dama ...
Thermostat
Purpose, Function
When the engine coolant temperature is low, the thermostat blocks the engine
coolant passage between the radiator and engine. As a result, because engine
coolant cycles without passing through the radiator, warming is promoted.
Construction
The thermostat ...
