Mazda CX-5 Service & Repair Manual: Shift Pressure Control (Direct Electric Shift Control) [Fw6 A EL, Fw6 Ax EL]
Outline
-
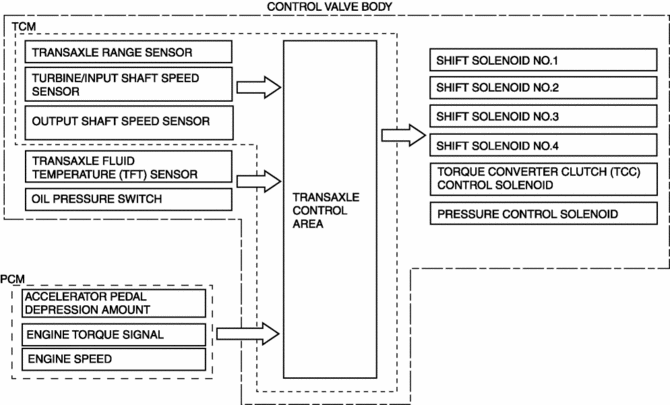
The TCM drives shift solenoids No.1, 2, 3, 4, the pressure control solenoid, and the on/off solenoid based on inputs signals from each switch and sensor, and performs direct electronic control of the clutch engagement pressure. As a result, precise hydraulic pressure control of the clutch engagement, not possible using a conventional accumulator, is achieved.
Construction

Operation
N to D, and N to R selected
-
When N to D, and N to R are selected, the TCM drives the pressure control solenoid and shift solenoids No. 1 and 3 for optimum clutch engagement pressure control.
Shifting
-
During shifting, the TCM drives shift solenoids No.1, 2, 3, and 4 to directly control the clutch engagement pressure for optimum clutch engagement pressure control.
-
During each gear shift, the engagement side clutch pressure and release side clutch pressure are controlled simultaneously. As a result, the torque capacities of both clutches can be controlled in connection to each other when switching clutches, engine over-speed during shifting and interlock among clutches is prevented, and smooth and responsive shifting is achieved.
 Shift Lock System [Fw6 A EL, Fw6 Ax EL]
Purpose, Function
The shift-lock system operates when the ignition is switched to ON and the
brake pedal is not depressed, and inhibits the selector lever from being shifted
from the P po ...
 Shift Pressure Control (Learning Control) [Fw6 A EL, Fw6 Ax EL]
Outline
The TCM optimizes the hydraulic pressure for clutch engagement and disengagement
through learning correction of the clutch engagement pressure.
NOTE:
The clutch engagem ...
Other materials:
Cowl Panel Removal/Installation
1. Disconnect the negative battery cable..
2. Remove the following parts:
a. Windshield wiper arm and blade.
b. Cowl grille.
c. Windshield wiper motor.
d. Keyless beeper.
3. Remove clips A.
4. Remove bolts B.
5. Remove the cowl panel in the direction of the arrow shown in the fig ...
Blind Spot Monitoring (Bsm) Control Module Inspection
1. Disconnect the negative battery cable..
2. Remove the rear combination light..
3. Remove the rear bumper..
4. Connect the negative battery cable..
5. Verify that the voltages of each of the terminals are as indicated in the
terminal voltage table (reference).
If the voltage is n ...
Seat Belt
Outline (Standard Deployment Control System)
Three-point front seat belts with the following functions for front seat
passengers adopted.
ELR (Emergency Locking Retractor: emergency locking mechanism)
Load limiter
Pre-tensioner seat belt.
T ...
