Mazda CX-5 Service & Repair Manual: Refrigerant Pressure Sensor Removal/Installation [Manual Air Conditioner]
1. Disconnect the negative battery cable..
2. Discharge the refrigerant..
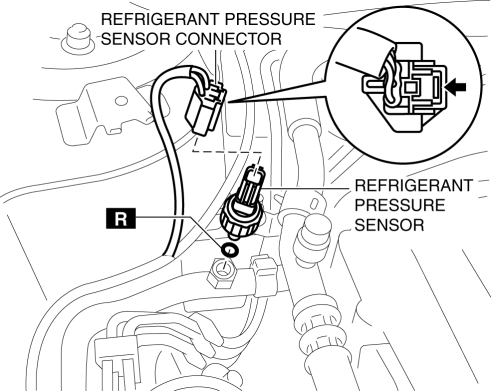
3. Disconnect the refrigerant pressure sensor connector.
CAUTION:
-
If moisture or foreign material enters the refrigeration cycle, cooling ability will be lowered and abnormal noise will occur. Always immediately plug all open fittings after removing any refrigeration cycle parts to keep moisture or foreign material out of the cycle.
4. Loosen the refrigerant pressure sensor using two spanners.
5. Remove the refrigerant pressure sensor..
-
Tightening torque
-
10—11 N·m {102—112 kgf·cm, 89—97 in·lbf}
6. Install in the reverse order of removal.
7. Perform the refrigerant system performance test..
Refrigerant Pressure Sensor Installation Note
1. Apply compressor oil to the O-rings and connect the joints.
 Refrigerant Pressure Sensor Removal/Installation [Full Auto Air Conditioner]
1. Disconnect the negative battery cable..
2. Discharge the refrigerant..
3. Disconnect the refrigerant pressure sensor connector.
CAUTION:
If moisture or foreign material enters the ref ...
 Refrigerant Pressure Sensor [Full Auto Air Conditioner]
Purpose
The refrigerant pressure sensor detects the refrigerant pressure in the refrigerant
cycle.
Function
The refrigerant pressure sensor converts the detected refrigerant pre ...
Other materials:
Meter Hood Removal/Installation
1. Disconnect the negative battery cable..
2. Remove the upper column cover.
3. Using a phillips screwdriver, remove fasteners.
NOTE:
When pulling up the shaft of fasteners using a phillips screwdriver, the
shaft will not be pulled up if it is rotated by pressing the driver. To pull ...
Washer Fluid Level Sensor
Purpose
The washer fluid-level sensor illuminates the low washer fluid level warning
light when the washer fluid level is lowered.
Function
The washer fluid-level sensor detects the decrease in the washer fluid level.
Construction
The washer fluid-level sensor con ...
Differential Oil Temperature Sensor Removal/Installation
WARNING:
Hot differential oil may cause severe burns. Do not perform maintenance while
differential oil is hot.
1. Disconnect the negative battery cable.
2. Disconnect the differential oil temperature sensor connector.
3. Remove the differential oil temperature sensor.
4. ...
